

Dynamics 365 Finance and Operations credit management functionality has been much improved in recent months from what had been very minimal functionality. Microsoft has now created a Credit and Collections module dedicated to this new credit management functionality. There are many great features but the most important in my estimation are the blocking rules.
Blocking rules allow credit managers and account managers to set up a series of different blocking rules based on common credit related rules that will trigger credit management holds on a sales order. These rules are based on very common reasons for credit holds in most organizations and are easily configured.
In this post we will go over the setups required to use this functionality as well as show some examples of how the holds work and how the hold review and release process works.
Blocking Rules Setups
The first step to enabling blocking rules is enabling the credit management checkpoints. To do this navigate to Credit and collections > Setup > Credit and collections parameters. Click the “Credit” tab. In the “Credit management checkpoint” section we are able to select which events will trigger the system to check the blocking rules and if any of them are violated, will result in a credit management hold. The “Document status check” column indicates the event and the “Posting” column indicates if the actual document or event is posted the blocking rules should be fired.
If the “Pro forma” checkbox is checked it means that the blocking rules are evaluated when a pro forma version of the event is posted. In the “Grace days” column you can specify how many days after the credit management hold has been released that you have to process the order before the same hold can be applied again. So, for example if you set the grace days to 5 and you release a credit management hold you will have 5 days to process that order and on the 6th day if the blocking rules are run again and are triggered, the same hold can be reapplied.
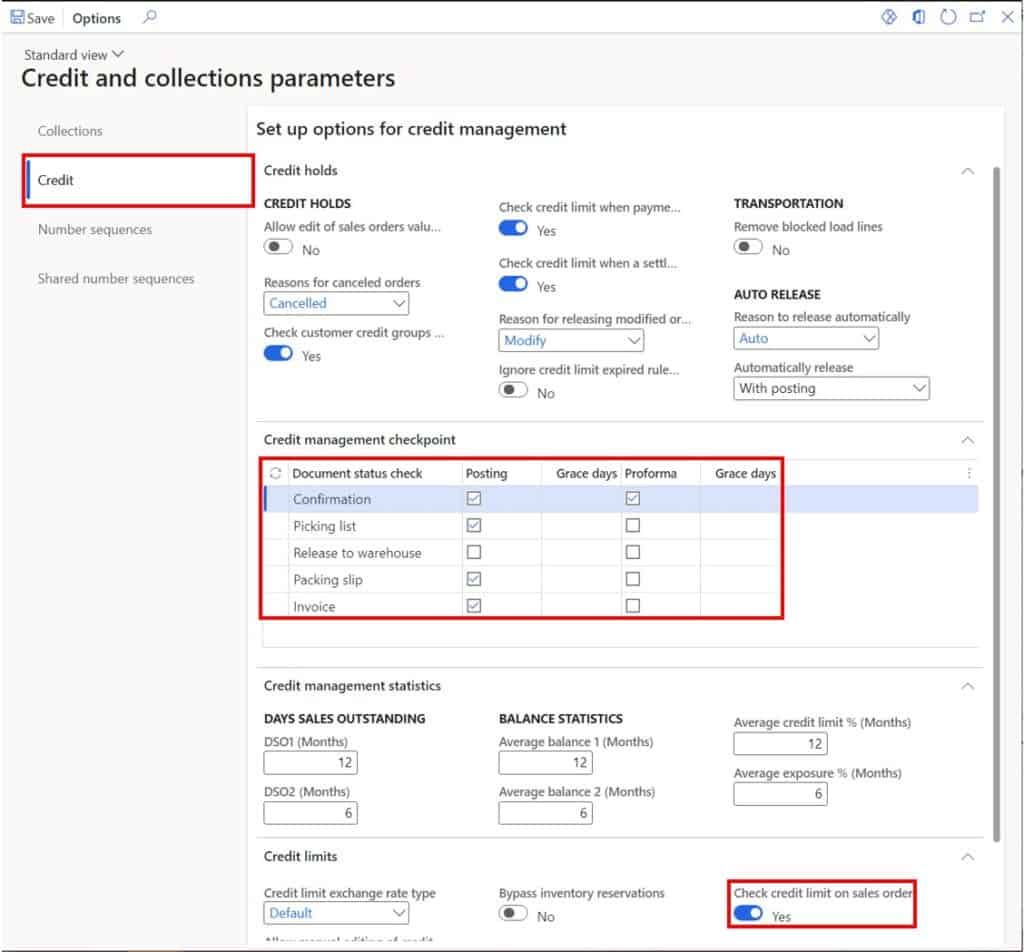
If you want to check credit limits, make sure you enable the “Check credit limit on sales order” flag. Now that we have set up our triggers for credit management blocking rules we can now go through and set up our blocking rules. You can set up one or multiple blocking rule types that can all be evaluated when blocking rules are triggered.
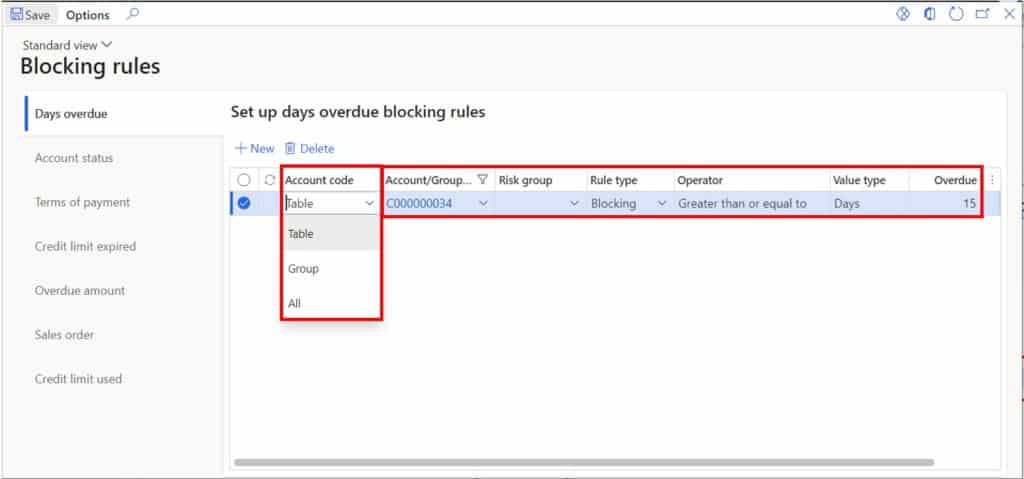
Days Overdue
The first blocking rule type that can be configured is the “Days overdue” blocking rule type. This blocking rule will put a customer on hold if they have a balance that is overdue by a given number of days. In my experience this is the most commonly used blocking rule.
To create a blocking rule for “Days overdue”, click the “Days overdue” tab and click the “New” button. In the account code field select whether you want the scope of the rule to apply to a single customer (table), a group of customers (group) or all customers (All). If you select group, you will need to select a credit management group and then assign that credit management group to the applicable customers. Based on the “Account code” selection, in the “Account/Group” field select a customer account or credit management group. You can also pair down the rule by adding a risk group. This will filter the rule down to only customers that are also associated with a certain “Risk group”. This is not a required field. It is only used if you want to further filter down the customer selection.
In the “Rule type” field you can select whether the rule is a blocking rule or an exclusion rule. Typically, the way I configure this is I set up all my blocking rules and then if there are specific customers or groups of customers that should be excluded from the rule that I just set up, I will set those up as “Exclusion” rules. This will exclude those specific customers or groups of customers from being put on hold for that specific blocking rule condition. The “Operator” and “Value type” fields are fixed so you can skip those. The next field is the “Overdue” field which defines how many days overdue do you want to allow a balance before the sales order should be put on credit management hold. So, in this example if customer “C000000034” has any overdue balance of 15 days or more the sales order will be put on credit management hold.
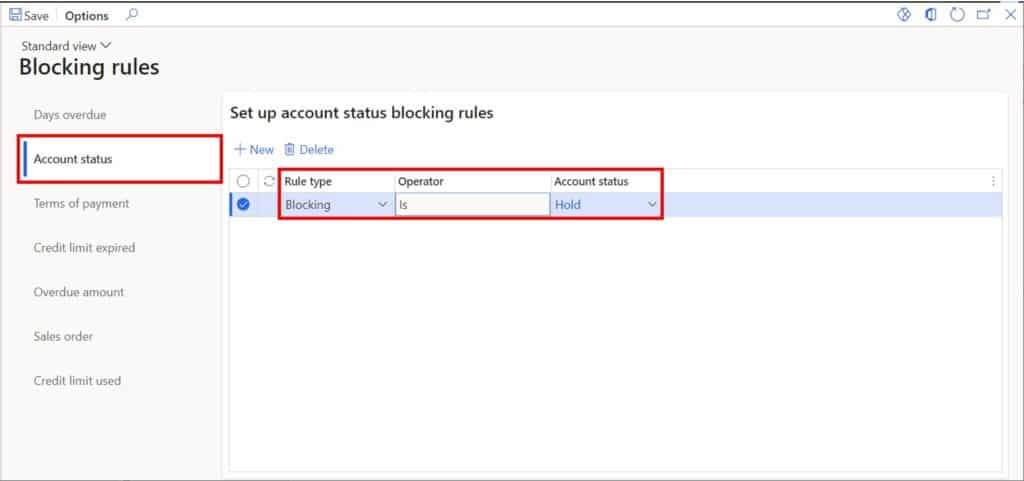
Account Status
The “Account status” blocking rule type will place a sales order on hold if the account status of a customer has a certain account status. This is a pretty straight forward rule that allows you to create user defined account statuses and then assign them to customers.
To create the blocking rule, click the “New” button, define the “Rule type” as a “Blocking” rule and which “Account status” should trigger the sales order hold.
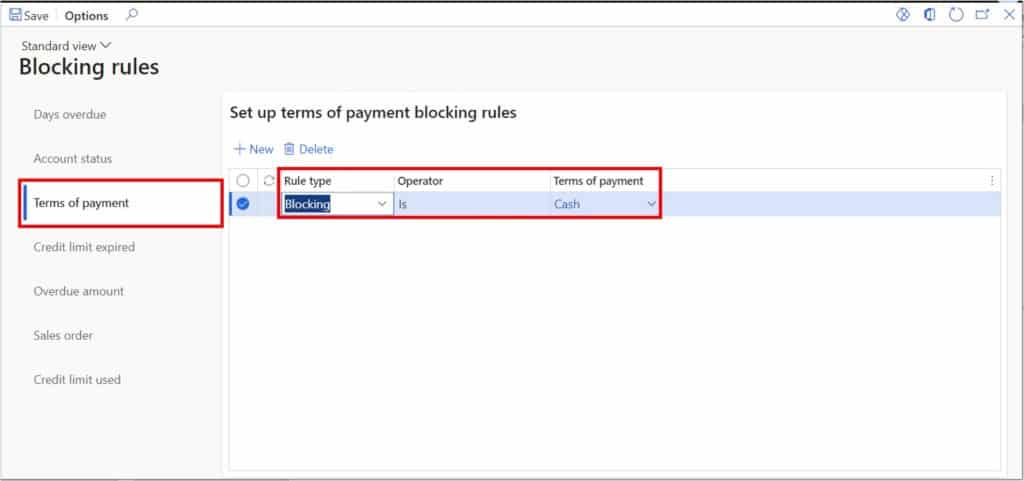
Terms of Payment
The “Terms of payment” blocking rule type will put a sales order on hold if terms are payment match the terms of payment specified in the blocking rule. This is typically used for customers that require full payment or pre-payment before processing an order.
To create the blocking rule click the “New” button and set the “Rule type” to “Blocking” and select the “Terms of payment” that should trigger a credit management hold on a sales order if that payment term is used.
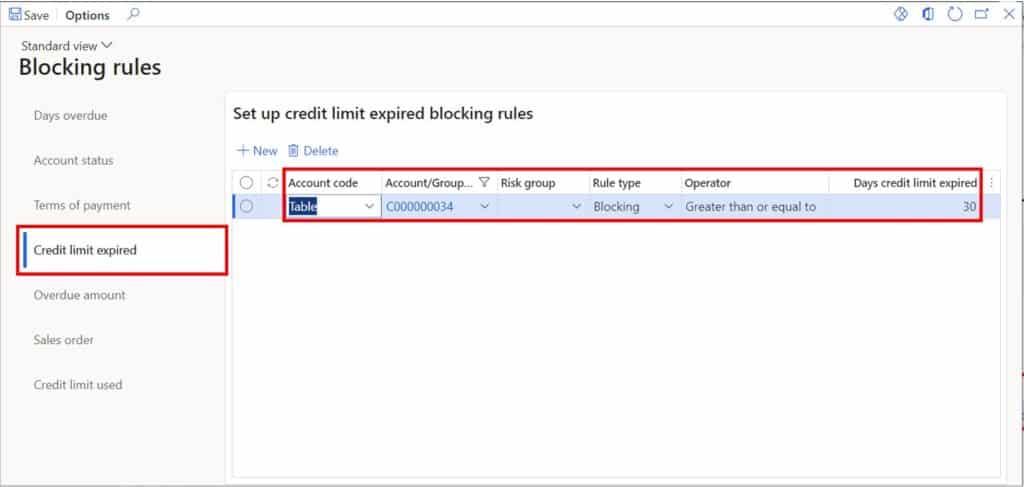
Credit Limit Expired
The “Credit limit expired” blocking type will place a sales order on hold if the selected customer or group of customers, has a credit limit that is a given number of days expired. On the credit and collections fast tab of the customer record there is a “Credit limit expiration date” field that the system will look at to determine whether or not the order should be placed on hold for that customer. There is also a credit and collections parameter setting called “Ignore credit limit expired rule when expiration date is blank” if this is unchecked the system will consider all blank credit limit expiration dates as expired so be aware of that.
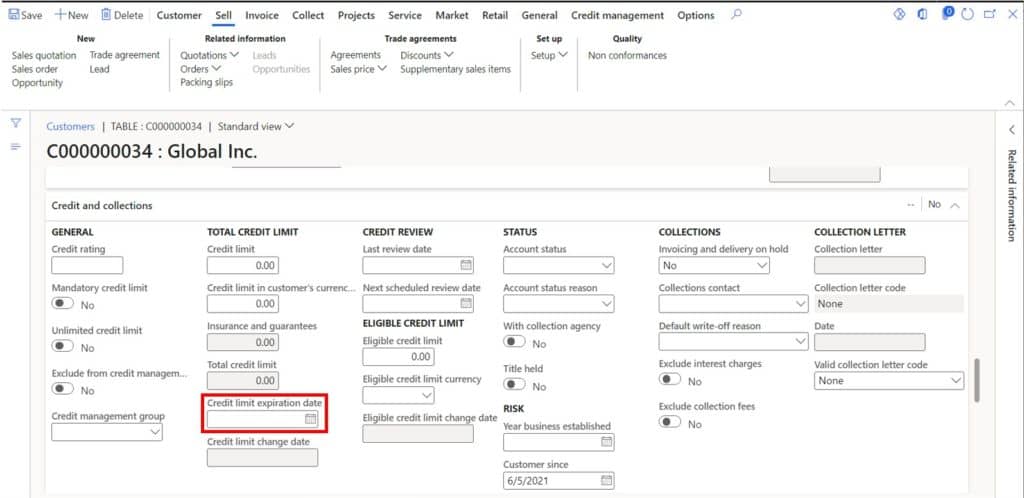
To set up a “Credit limit expired” blocking rule click the “Credit limit expired” tab click the “New” button. Select the appropriate “Account code” based on if you want to apply the rule to a single customer, a group of customers (credit management group), or all customers. Next set the “Rule type” to “Blocking” and enter the number of days after the credit limit expiration that should trigger a credit management hold on a sales order.
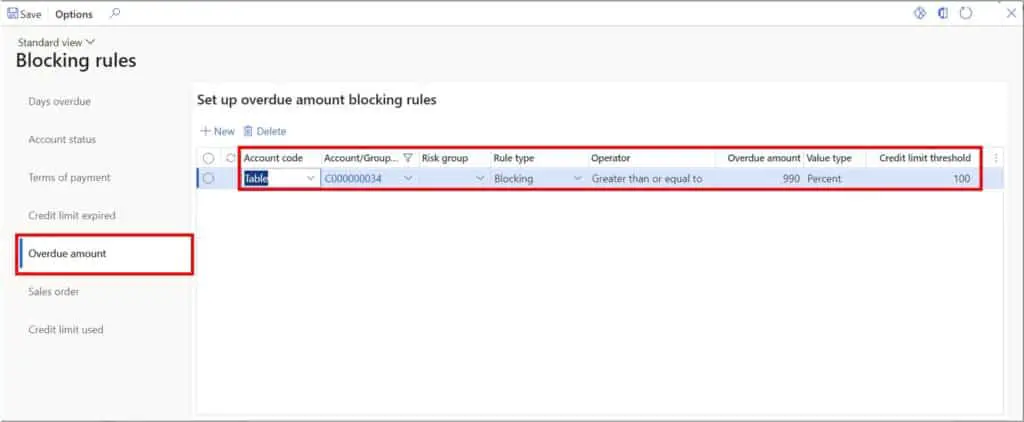
Overdue Amount
The “Overdue amount” blocking rule type allows you to put a sales order on hold if the customer, group of customers, or all customers (based on account code selection) if the customer has an overdue amount greater than or equal to the amount specified or if a certain percentage of their credit limit has been reached or exceeded by the overdue balance.
To create an “Overdue amount” blocking rule type click the “Overdue amount” tab and click the “New” button and select whether the rule should apply to a single customer (Table), a group of customers (Group), or all customers (All). Then in the “Account/Group” field select the customer or customer group depending on the account code selection. In the “Rule type” select “Blocking” and in the “Overdue amount” select the overdue amount that should trigger a credit management hold on a sales order. Finally, in the “Credit limit threshold” field select the percentage of the credit limit that when reached or exceeded will trigger a credit management hold on the sales order.
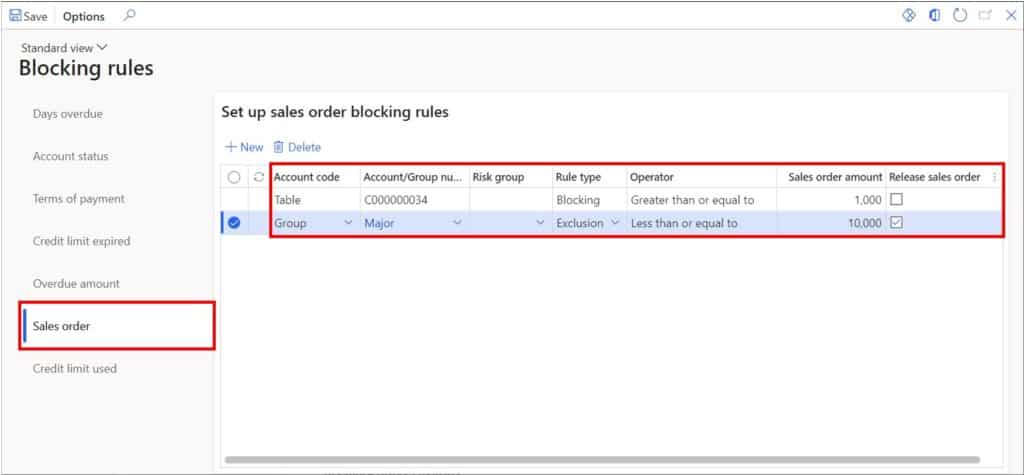
Sales Order
The “Sales order” blocking rule is used to initiate a credit management hold on a sales order that meets or exceeds the sales order amount defined for any customer in the specified criteria. The amount applies only to a single sales order. So even if you have multiple open sales orders that summed together exceed the amount it will not trigger a credit management rule. The “Release sales order” option is only available on “Exclusion” rules types. If the “Release sales order” option is selected and the exclusion rule is applied, this will cancel out any other blocking rule holds that may have been applicable otherwise and it will allow the sales order to be processed.
To create a “Sales order” blocking rule click the “Sales order” tab and click the “New” button. Select the appropriate “Account code” and “Account/Group” field depending on which customers the rule should apply to. Next select the “Sales order amount” that should trigger a sales order hold if the sales order reaches or exceeds that amount. You can also create an exclusion rule if desired that will exclude certain customers from this rule.
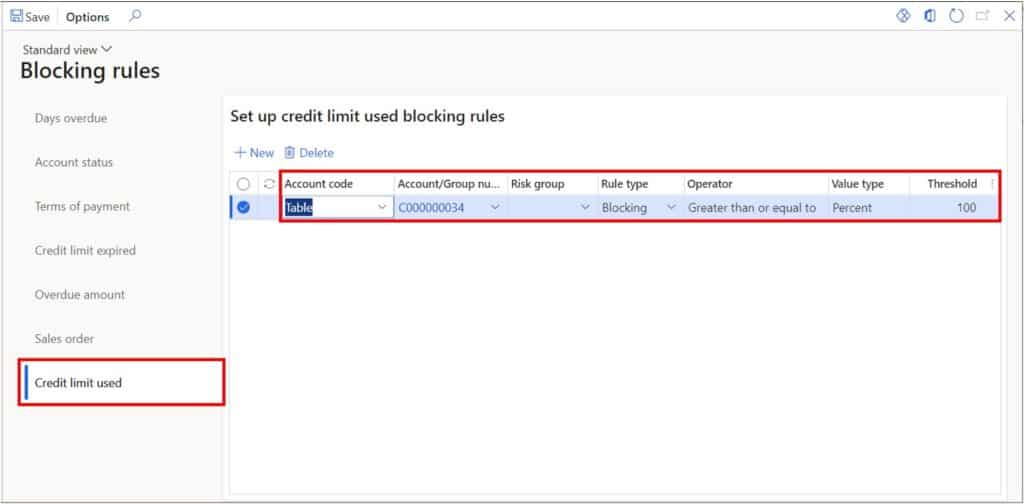
Credit Limit Used
The “Credit limit used” blocking rule type is used to place an order on hold if a customer within the blocking rule criteria has met or exceeded a given percentage of that customer’s credit limit.
To create a “Credit limit used” blocking rule type click the “Credit limit used” tab and click the “New” button. Select the appropriate “Account code” and “Account/Group” to define the applicable customer criteria. Next select “Blocking in the “Rule type” field and enter the threshold percentage of the customer’s credit limit that will trigger a credit management hold.
Blocking Rules Example
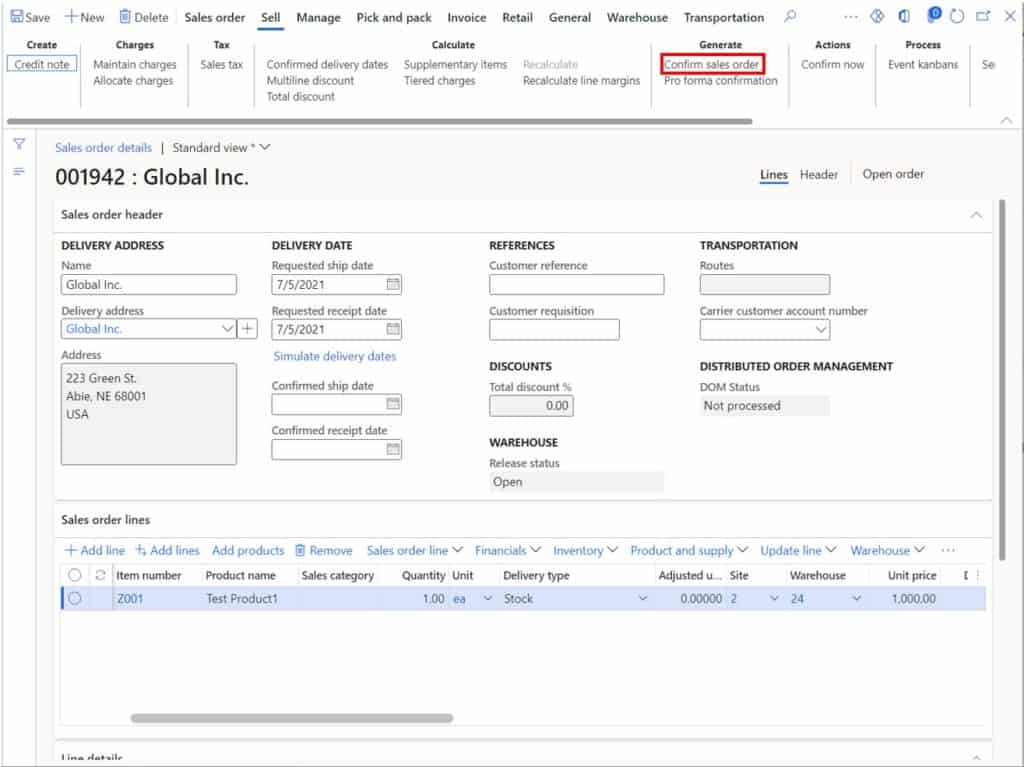
Now that we have set up some blocking rules let’s walk through an example of how the blocking rules result in credit management holds on a sales order and how we clear the credit management holds to continue processing the sales order. In this example I have a customer with a $1,000 overdue balance, a $1,000 credit limit, and an order for $1,000. Based on the blocking rules we have set up we should expect a credit management hold for several reasons. One of our credit management checkpoints was on sales order confirmation so let’s post a sales order confirmation and trigger a credit management hold.
Now if I attempt to post a confirmation, I will get an error telling me that the order has been placed into credit management. This will also happen on any other credit management checkpoints that are selected in the credit management parameters.
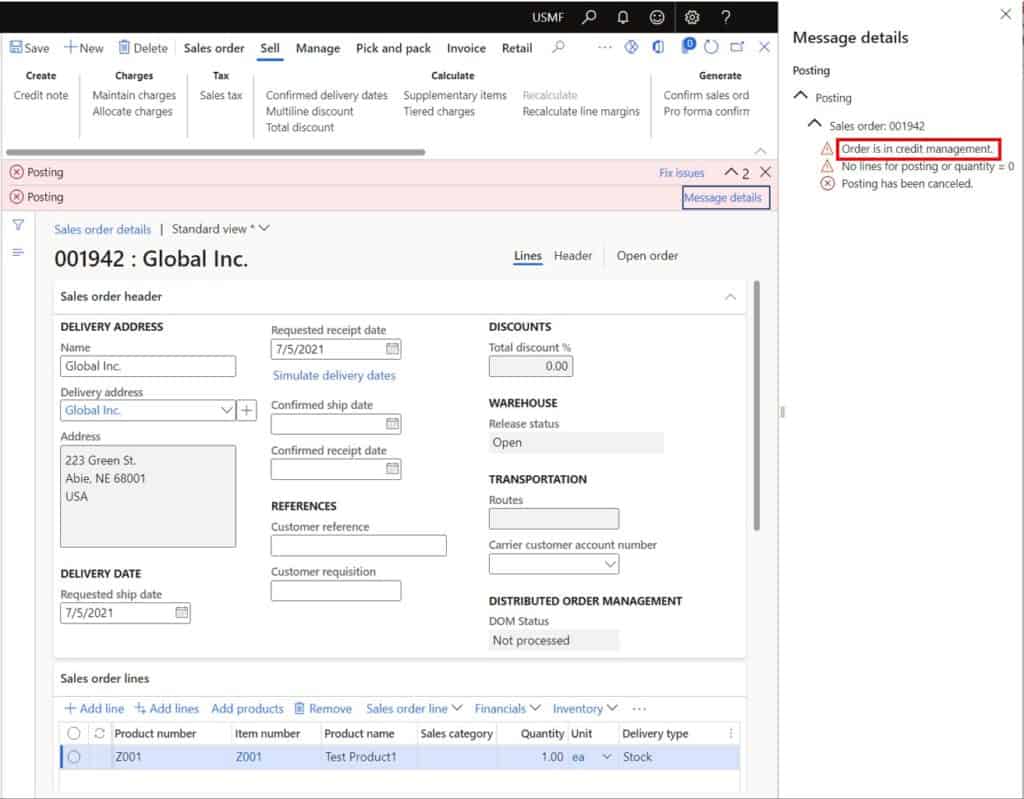
We can also see that there is a flag called “In credit management” on the sales order header that is set to “Yes” now that indicates that the order in on credit management hold. You can add this field to the sales order list page grid if needed to easily see orders that are on credit management hold.

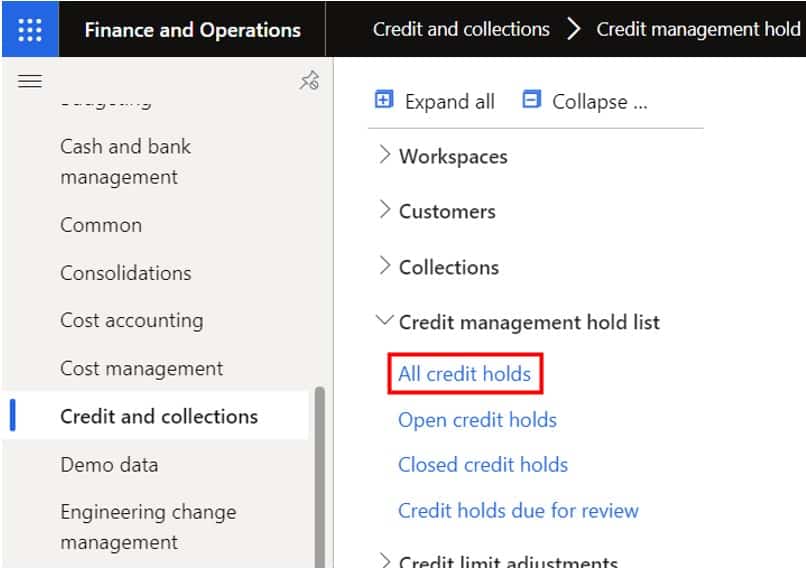
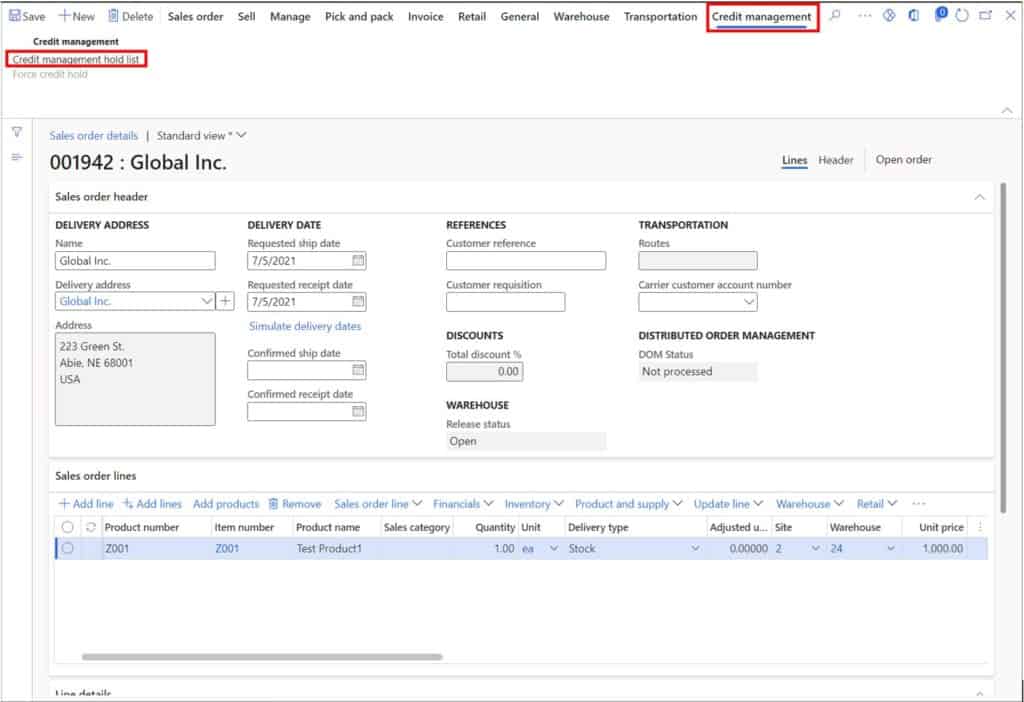
You can see a list of all credit management holds by navigating to Credit and collections > Credit management hold list > All credit holds.
Alternatively, you can get to the hold directly from the sales order by clicking the “Credit management” tab in the ribbon and click the “Credit management hold list”.
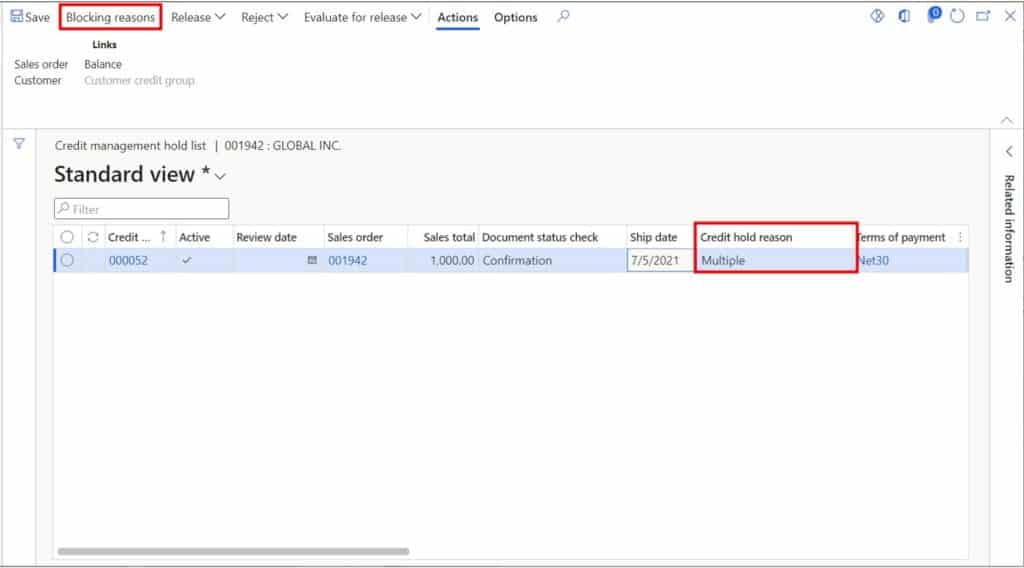
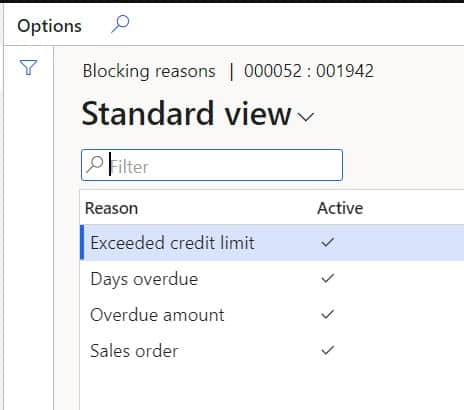
Now we can see the details of the credit management hold. In the “Document status check” field you can see the action that triggered the credit management hold based on the blocking rule. The “Credit hold reason” field tells you the reason for the hold. If there are multiple reasons you will need to click the “Blocking reasons” button to see all the reasons.
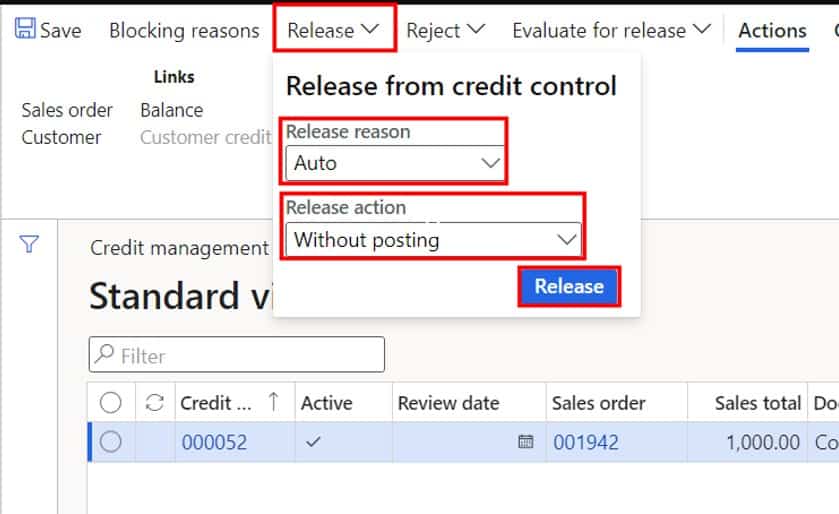
When the credit manager has reviewed the credit management hold and is ready to release the sales order to be processed, click the “Release” button. Next, select a reason code for the release, and a “Release action”. The “Release action” has two options, “With posting” and “Without posting”. “With posting” means that as soon as you click the “Release” button the system will continue processing the event that originally triggered the credit management hold. So, in my case it would go ahead and post the sales order confirmation. “Without posting” means that someone will have to go in and process the event manually.
Once the credit management hold is released you will notice that the “In credit management” flag is set to “No” and the sales order can continue to be processed. Keep in mind that if you have not set the grace days you may trigger some of the same hold codes if the blocking rules continue to be violated.
Takeaway
Credit management blocking rules constitute a greatly improved feature set over the older credit management functionality of versions past. Blocking rules are easy to set up, easy to implement, and very flexible in terms of when they are evaluated during the sales order process. I hope this post has given you the information required to utilize blocking rules in your D365 Finance and Operations implementation.