

In Dynamics 365 Finance and Operations, default order settings are a core part of the product setup if you are using master planning in any capacity. The default order settings control things like the minimum order quantities, lead times, and even whether or not the product can even be purchased, sold or produced.
In this post we will go through the default order settings setup and what everything does and controls.
Default Order Settings Setup
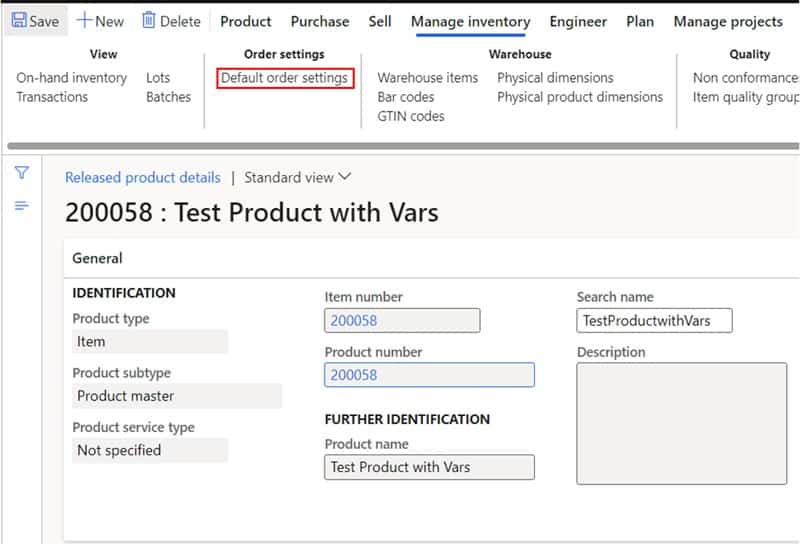
The setup of the default order settings typically happens during the initial product setup. Navigate to Product information management > Products > Released products. Select your product from the list and in the “Manage inventory” tab in the ribbon, click the “Default order settings” button.
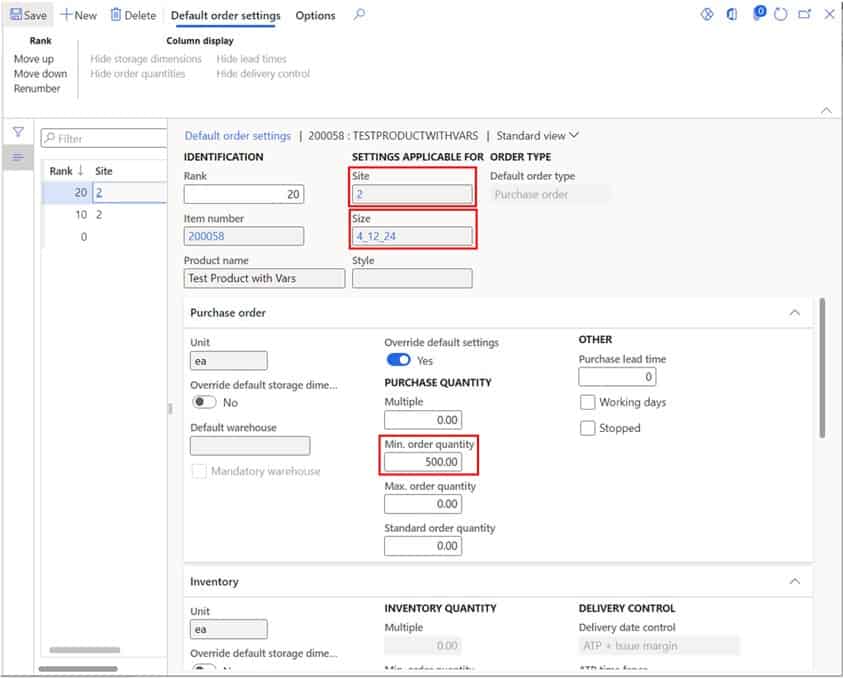
The first thing you might notice is the “Rank” column and this might be confusing conceptually (at least it was for me) but I am going to show an example that should clear it up. With default order settings you can set up multiple default order settings for each combination of product and site dimensions. The way the ranking system works is by the system evaluating which default order setting record to take in the case that there is more than one applicable record. The zero ranked record is the default and will always exist. If you only have one record this is the record the system will take every time to evaluate the default order settings.
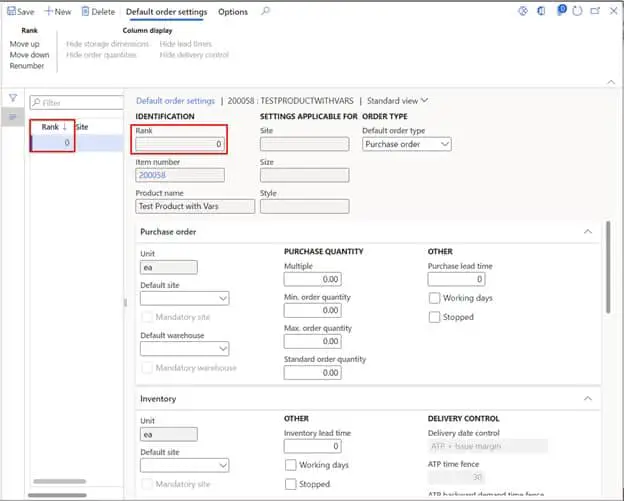
To understand how the rank works we need to think about the top part of the form as the filter that the system will use to choose the record based on whatever source document you are on, and the lower portion of the form is the output or the information that the system will take and use. I will explain what all these fields do later in this post.
For this example, let’s say that have a product that has the style and size dimensions active and for a specific size, the purchase lead time is different than all other variants. In my default record (zero rank) I have a minimum order quantity of 100.
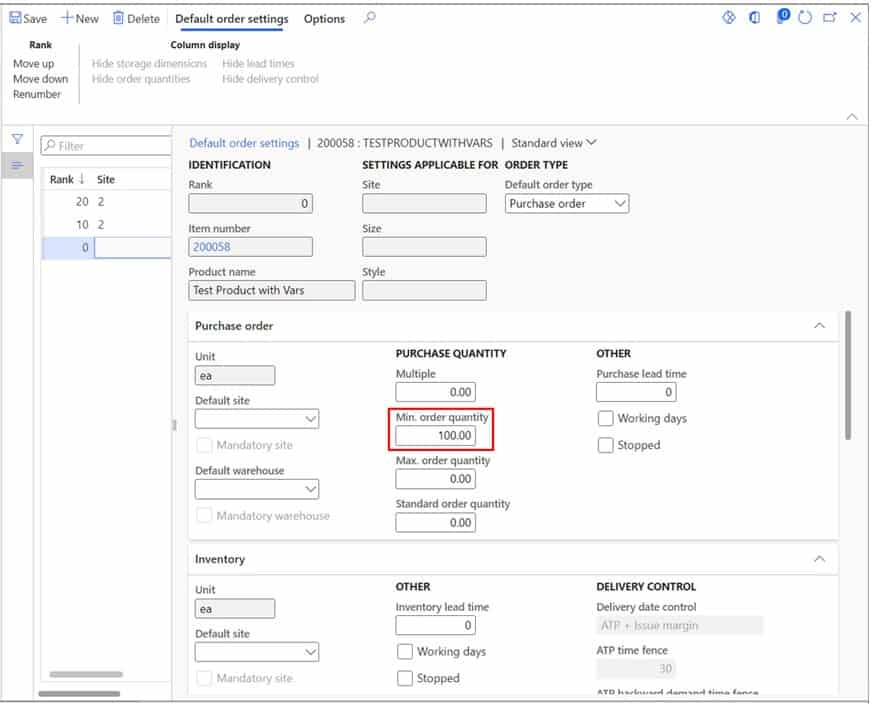
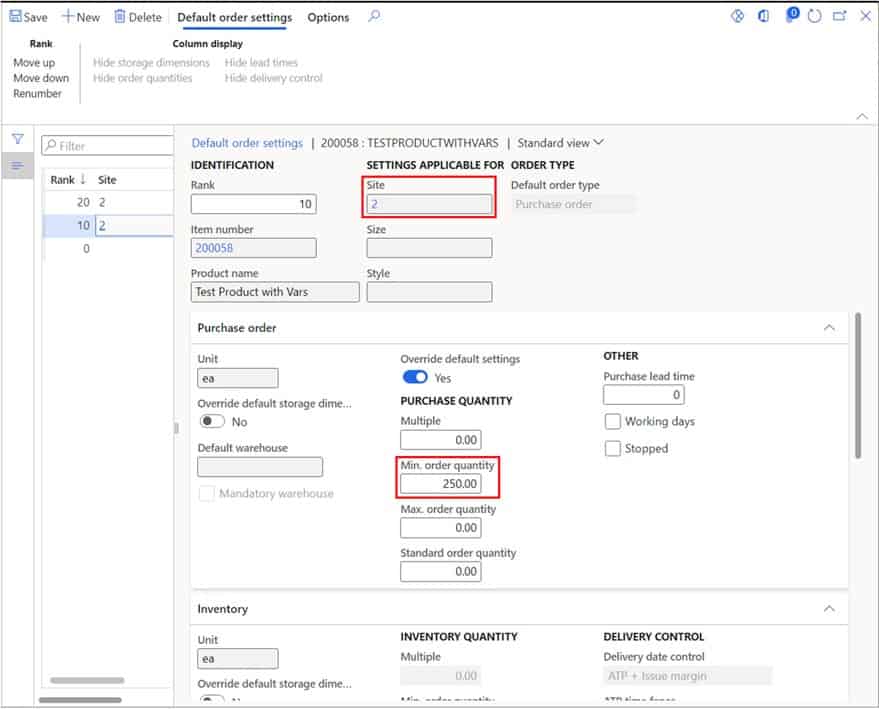
Now I will create another default order setting record for site 2 that has a minimum order quantity of 250.
Next, I will create another default order setting record for site 2 but also a for a specific size dimension which has a minimum order quantity of 500.
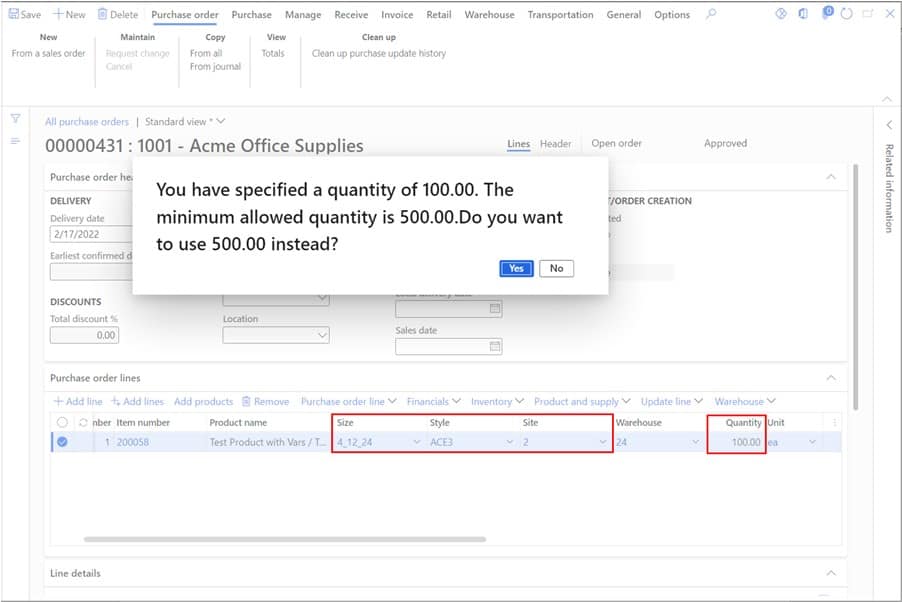
Now let’s take a look at how this works on a purchase order. When I select the size dimension “4_12_24” for site “2” and try to enter a quantity that is less than 500 you can see it triggers the minimum order quantity warning message for the default order setting record with 500 minimum order quantity.
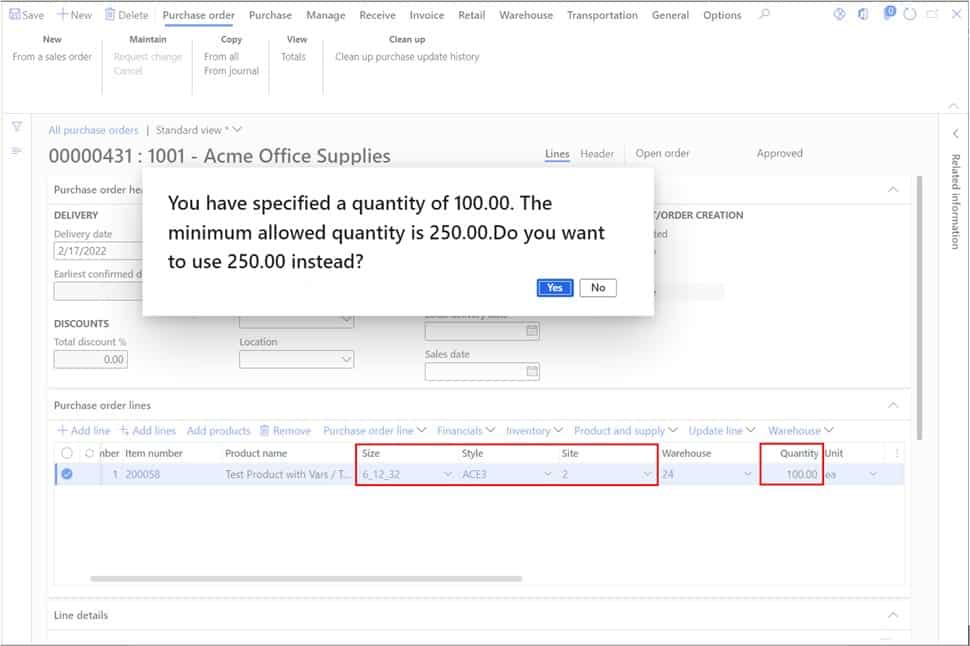
Now when I change the size dimension to “6_12_32” and enter the same 100 quantity it triggers the minimum order quantity warning for 250.
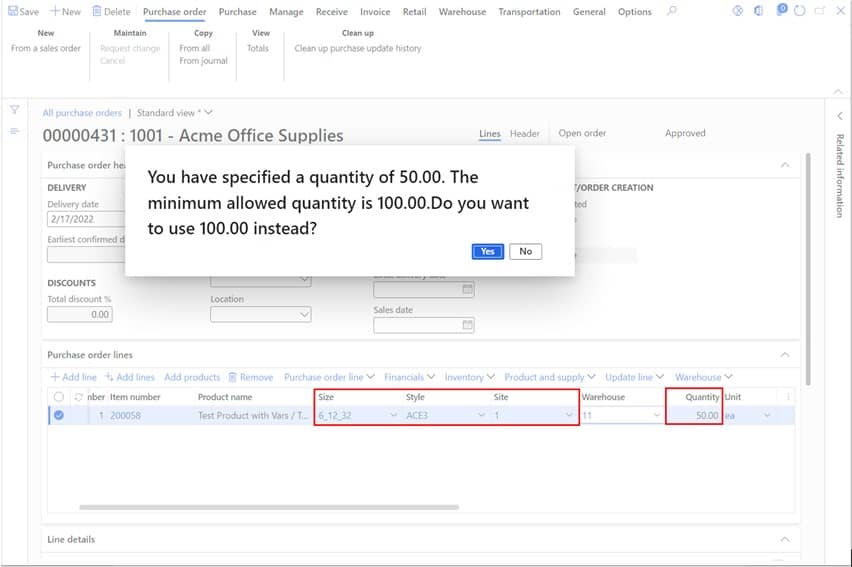
Now if I change the site from “2” to “1” it triggers the minimum order quantity for the zero rank default order setting record. I hope this clarifies the purpose of the rank field and the dimension fields in the update pane of the form.
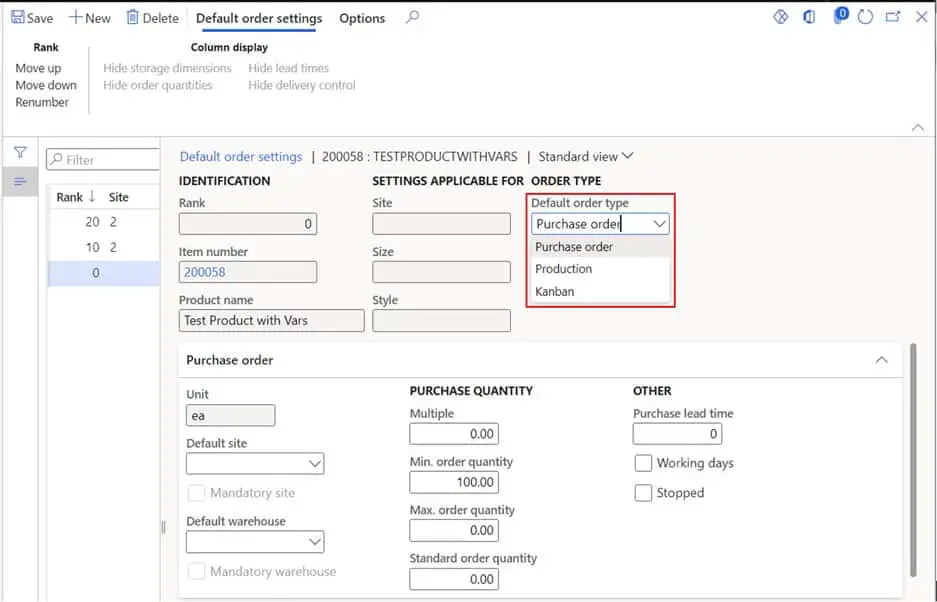
Now let’s move on to the individual fields on the form. One of the most important fields on the form is the default order type. Master planning will use this default order type to either create a planned purchase order, planned production order, or a planned Kanban.
Although you can only have one default order type per default order setting record, some clients I’ve had in the past have had items that they manufactured 75% of the time and only purchased when pricing and lead time made sense. In these cases, you can set the default order type to the order type used most often and use the “Change to” button on the planned orders list page to change the planned order to a different order type as needed.
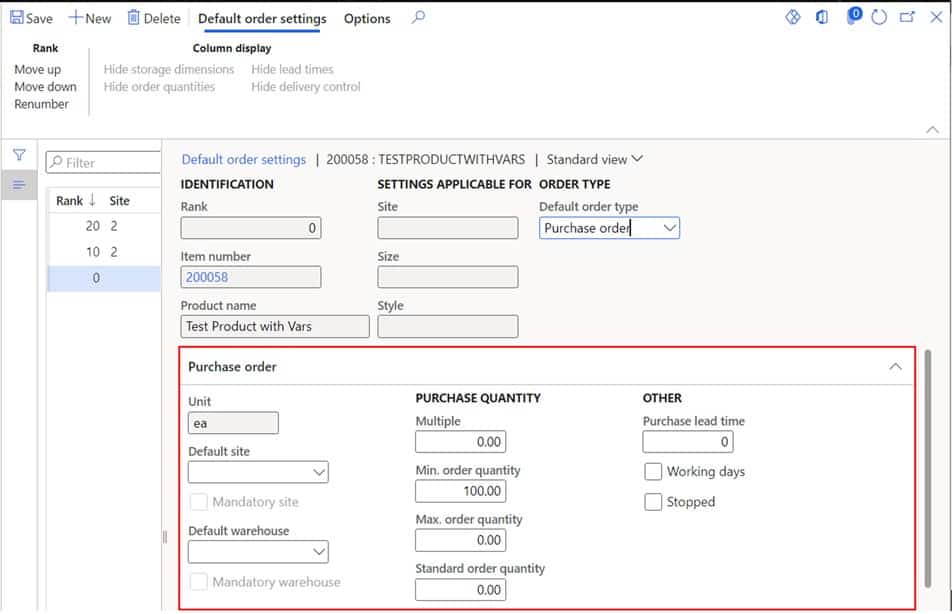
Default Order Settings: Purchase Order Tab
In the following sections we will go through each fast tab on the form and go through what each field does. The fields on the purchase order tab controls default settings for purchase orders, planned purchase orders, RFQs, and purchase agreements.
- Default site – This is the site that will default on the purchase order. This is not to be confused with the site field that we discussed earlier in the upper portion of the form.
- Default warehouse – This is the warehouse that will default on the purchase order.
- Multiple – The multiple field ensures that that when the person placing a purchase order for this item enters the quantity it is a multiple of the number in this field. Master planning will also respect this setting and ensure that planned order quantities are multiples of this number. If the user enters a quantity manually that is not a multiple of this number, the user will receive a warning message like the one in the example above.
- Minimum order quantity – This represents the lowest quantity in the inventory unit that can be ordered. Master planning will also respect this setting and ensure that all planned order quantities meet this minimum. If a user manually enters a purchase order quantity below this quantity the system will give them a warning message as shown in the example above.
- Maximum order quantity – The maximum order quantity works similarly to the minimum order quantity. Master planning also respects this value. However, be careful with this setting because setting a maximum quantity can cause master planning to split up planned orders that would normally be a smaller number of planned orders into multiple planned orders if they exceed the maximum quantity.
- Standard order quantity – If you are using standard costing this is the standard lot size quantity for the item. This quantity will be used when doing BOM and formula cost roll ups.
- Purchase lead time – The purchase lead time is used to calculate the expected delivery date for the product on the purchase order. Master planning will use this lead time to plan and net requirements. If you have lead time set on the trade agreement and the “Find trade agreements” parameter set on the master planning parameters, master planning will use the lead time on the vendor trade agreement to determine delivery dates.
- Working days – The working days flag will mean that lead time will be calculated using only working days (open days) on a warehouse specific calendar.
- Stopped – Selecting this option will prevent this item from being added to a purchase order. If the item is already on a purchase order it cannot be processed any further.
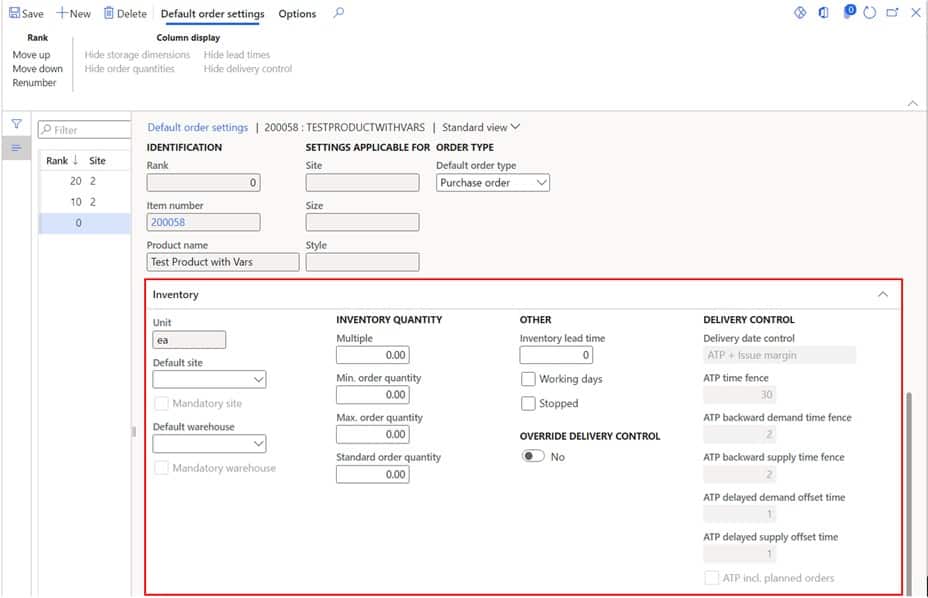
Default Order Settings: Inventory Tab
The inventory fast tab controls things like transfer orders, planned transfer orders, production orders, and planned production orders.
- Default site – This is the site that will default on the production order or transfer order. This is not to be confused with the site field that we discussed earlier in the upper portion of the form.
- Default warehouse – This is the warehouse that will default on the production order or transfer order.
- Multiple – This field ensures that that when the person placing a production order or transfer order for this item, the quantity is a multiple of the number in this field. Master planning will also respect this setting and ensure that planned order quantities are multiples of this number. If the user enters a quantity manually that is not a multiple of this number, the user will receive a warning message like the one in the example above.
- Minimum order quantity – This represents the lowest quantity in the inventory unit that can be ordered. Master planning will also respect this setting and ensure that all planned order quantities meet this minimum. If a user manually enters a production order or transfer order quantity below this quantity, the system will give them a warning message as shown in the example above.
- Maximum order quantity – The maximum order quantity works similarly to the minimum order quantity. Same thing here, be careful with this setting because setting a maximum order quantity can cause master planning to split up production orders or transfer orders that would normally be a smaller number of planned orders into multiple planned orders if they exceed the maximum quantity.
- Standard order quantity – This is the standard lot size quantity for production. This will come into play during cost rolls.
- Inventory lead time – This field is typically only used for very simple production lead times where you don’t have routes set up. If you want more accurate production lead times, I suggest setting up a production route where you can define the exact cycle times.
- Working days – This works the same way as described above except this is used for production and transfer order planning.
- Stopped – Selecting this option will prevent this item from being added to a transfer order or production order. If the item is already on a transfer order or production order it cannot be processed any further.
- Override delivery control – This selection allows you to override specific delivery date controls for this product that are set at the global level on the accounts receivable parameters in the “Shipments” tab in the “Delivery control” fast tab.
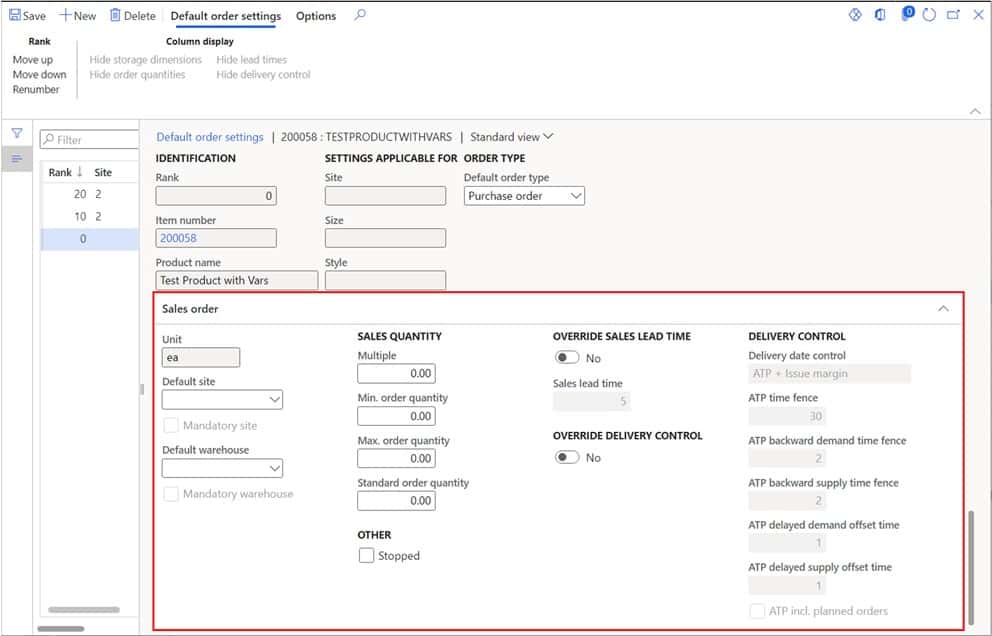
Default Order Settings: Sales Order Tab
- Default site – This is the site that will default on the sales order. This is not to be confused with the site field that we discussed earlier in the upper portion of the form.
- Default warehouse – This is the warehouse that will default on the sales order.
- Multiple – This field ensures that that when the person placing a sales order for this item the quantity is a multiple of the number specified in this field.
- Minimum order quantity – This represents the lowest quantity in the inventory unit that can be ordered on a sales order.
- Maximum order quantity – The maximum order quantity works similarly to the minimum order quantity for the sales order.
- Standard order quantity – This is the standard order quantity when this item is added to a sales order. This quantity will default as the standard quantity.
- Stopped – This selection will not allow the product to be added to a sales order. If this item is already on the sales order and you select this option, the item will not be able to be processed on the sales order.
- Override sales lead time – If you have a default sales lead time defined on the accounts receivable parameters in the shipments tab you can override that global lead time to make the lead time specific for this item. This will set the requested ship date based on the requested delivery date that is set on the sales order.
- Override delivery control – This selection allows you to override specific delivery date controls for this product that are set at the global level on the accounts receivable parameters in the “Shipments” tab in the “Delivery control” fast tab.
Takeaways
Default order settings are a core product setup that is used in almost all cases where you would have a physical product. If you are using master planning, this setup is basically mandatory. I hope this post has clarified what these settings are used for as well as the often misunderstood ranking system associated with default order settings.