

Although Dynamics 365 Finance and Operations has thousands of fields for many different purposes, I have found that in every implementation there are always cases where a custom field specific to that industry or business needs to be added. Traditionally, in older versions of Dynamics AX and Dynamics 365 Finance and Operations adding a custom field required a developer to add the required custom field.
However, now in D365 Finance and Operations a user with the system administrator security role or the “Runtime customization power user” role can create a new field through personalization. This is a real field that will hold data and can be added to a data entity which means data can be loaded into the field with the data entity.
There are a few caveats to be aware of though.
- The field cannot be used in any sort of business logic. These fields are not visible in visual studio so developers cannot access them with X++ code. The primary purpose of this type of custom field is just to hold data. If you need the custom field to have any other sort of functionality, they will need to be created in the traditional way through visual studio.
- Lookup fields that look up values from other tables are not supported.
- There is a limit of 20 custom fields per table. As long as you don’t need more than 20 custom fields on any given table you should be fine.
In this post we will go through not only how to create a custom field in Dynamics 365 Finance and Operations, but also how to add the custom field to a data entity and maintain the field after creation.
Create a Custom Field
Custom fields can be created on almost all tables in Dynamics 365 Finance and Operations. To create a custom field, navigate to the form where you want to add the field. In my case I am going to add a custom field called “License number” to the sales order header so I will navigate to Sales and marketing > Sales orders > All sales orders. On the sales order list page, I can add a new custom field by right clicking on any one of the column headers and clicking the “Insert columns” option.
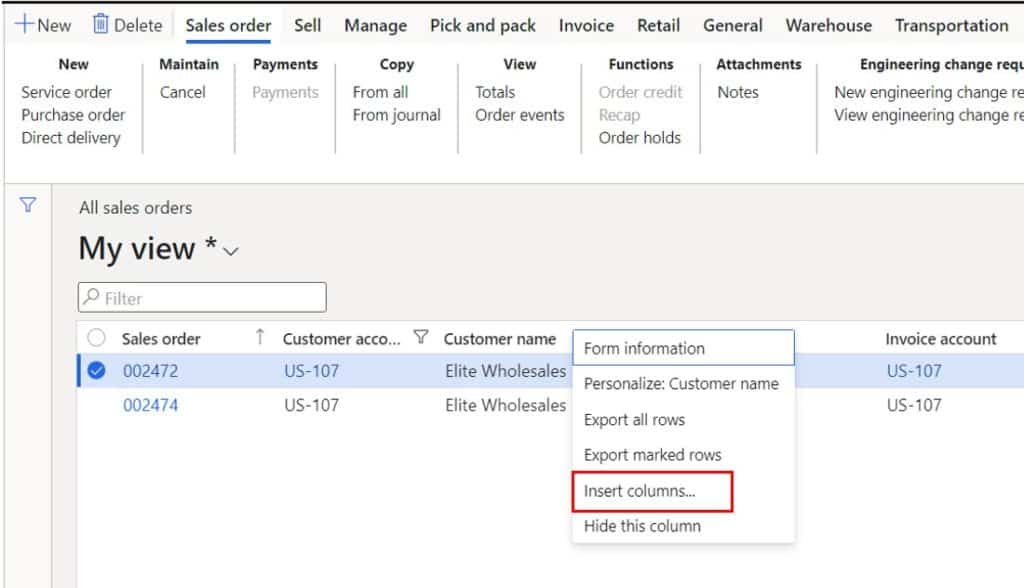
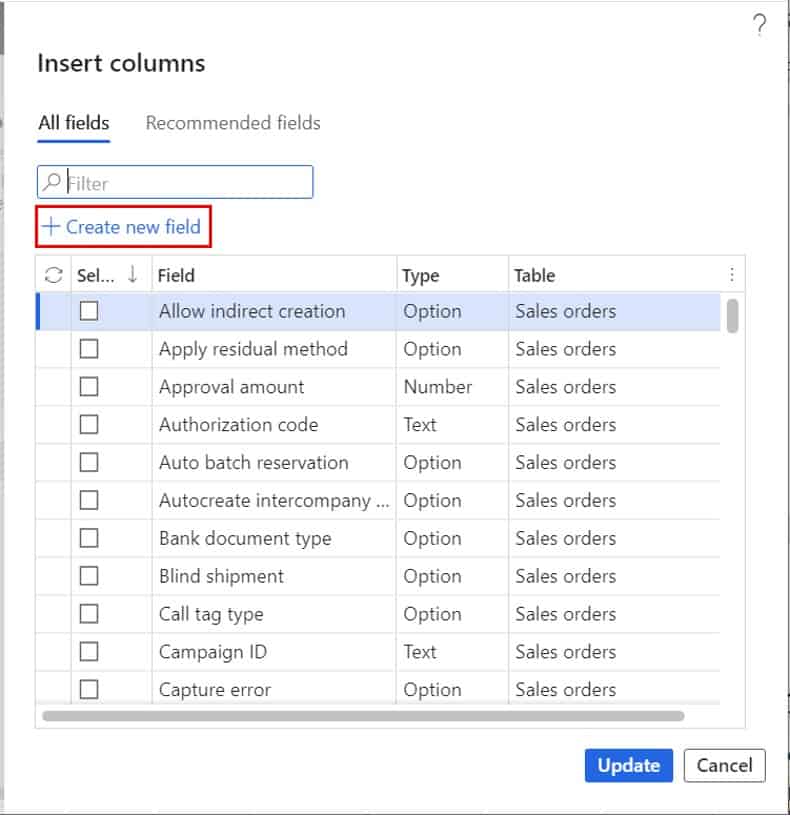
On the “Insert columns” flyout pane click the “Create new field” button.
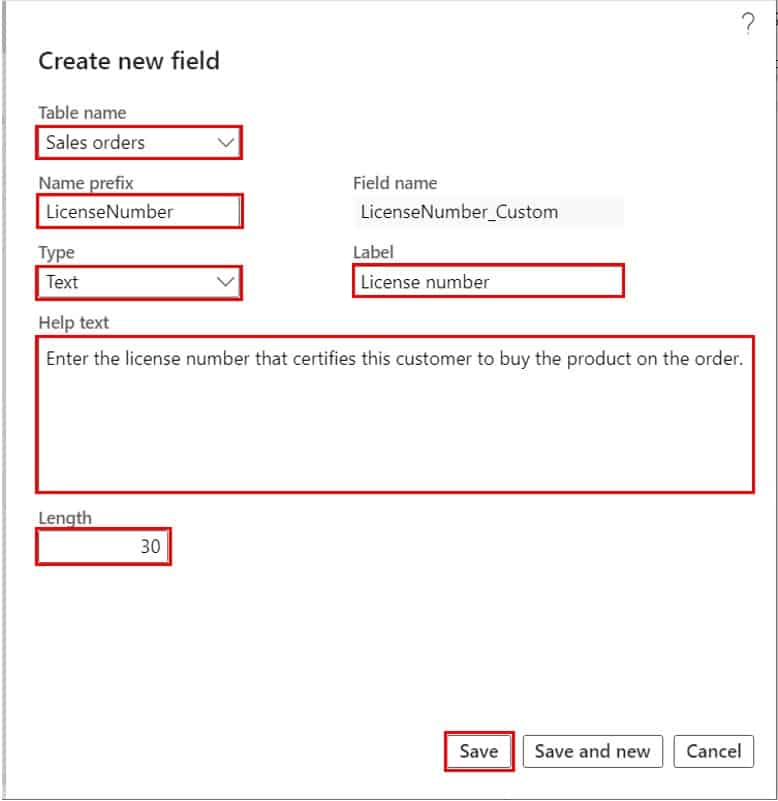
In the “Create new field” form fill out the following details and metadata about the new custom field:
Table name – This indicates the table that the field will be added to. This requires a bit of knowledge about the table structure of D365 Finance and Operations but typically the table is obvious.
Name prefix – All custom fields are suffixed with “_Custom” to indicate a custom field created through personalization. The name prefix field should be the name of the field without any spaces similar to a database field name.
Type – This is where you select the type of field you are creating. The options are:
- Text – This is a free text field that will require you to identify the field character length of the field.
- Number – This is an equivalent to an integer data type that only allows whole numbers.
- Decimal – This is the equivalent of a real data type that allows decimal places
- DateTime – This will be a date field that will capture the date as well as the time.
- Date – This is just a simple date field that will only capture the date.
- Pick list – This is like an enumerated value field. If you select this option, you will be prompted to define all the allowable values in the dropdown.
- Checkbox – This is a Boolean data type that allows for a yes or no selection.
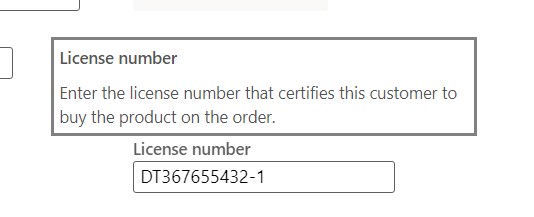
Help text – This is the text that will appear when you hover your mouse over the field to give the user an idea of the purpose of the field.
Label – This is the label that will be displayed to the user in the Dynamics 365 Finance and Operations user interface.
Next click the “Save” button to create the new field.
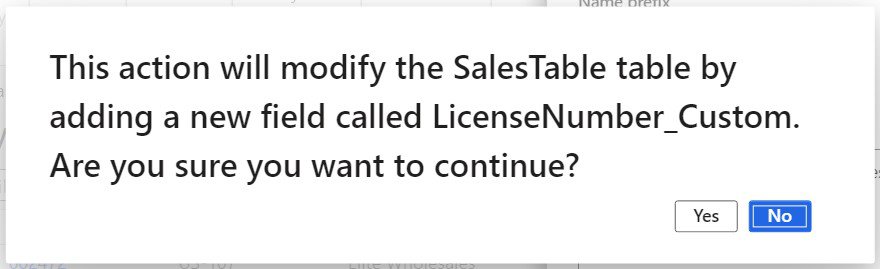
Click the “Yes” button to create the field.
Next, refresh the entire browser. Open up a record on the form where you added the custom field and personalize the field onto the form. For detailed instructions on how to personalize a field on a form please see this post.
Now you should see the field you created on the form and you should be able to save data into the new field.
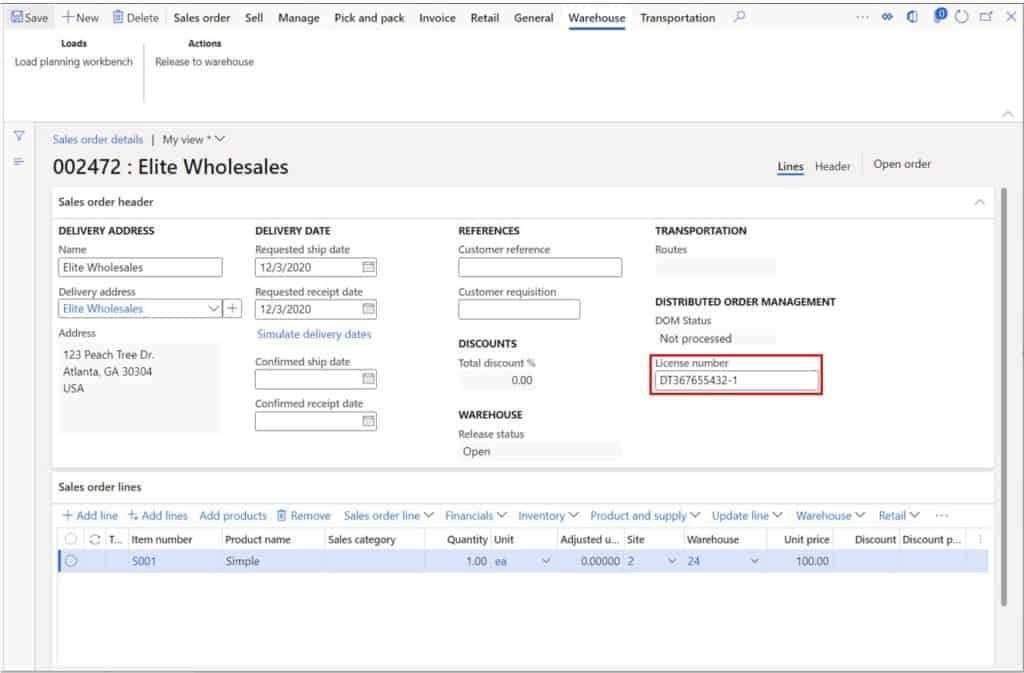
If you hover over the field, you will also see the help text you added for the field.
Add Custom Field to a Data Entity
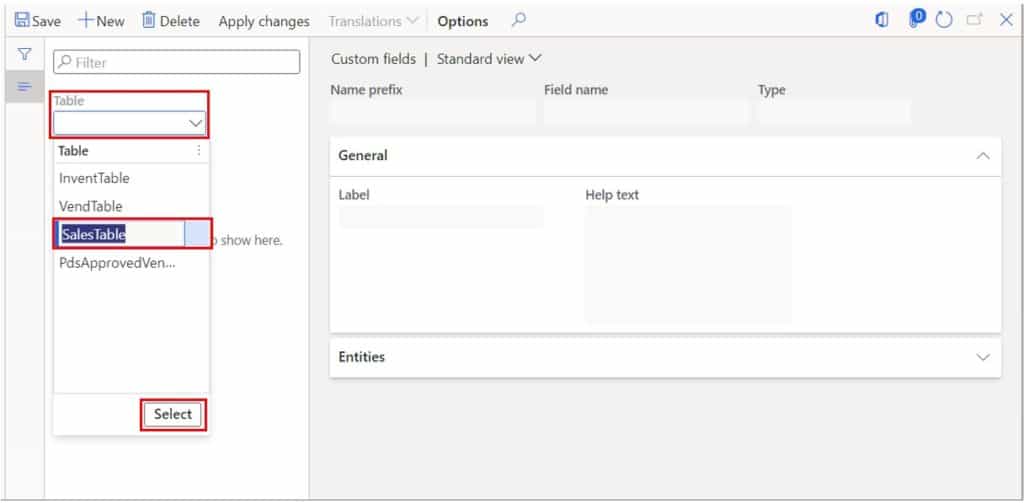
Now that you have created the new field the next question is how do I load data and populate this custom field or how do I report on this field? The answer is to add it to a data entity. To add a custom field to a data entity, navigate to System administration > Setup > Custom fields.
Click the dropdown in the “Table” field and select the table where you added your custom field and click the “Select” button.
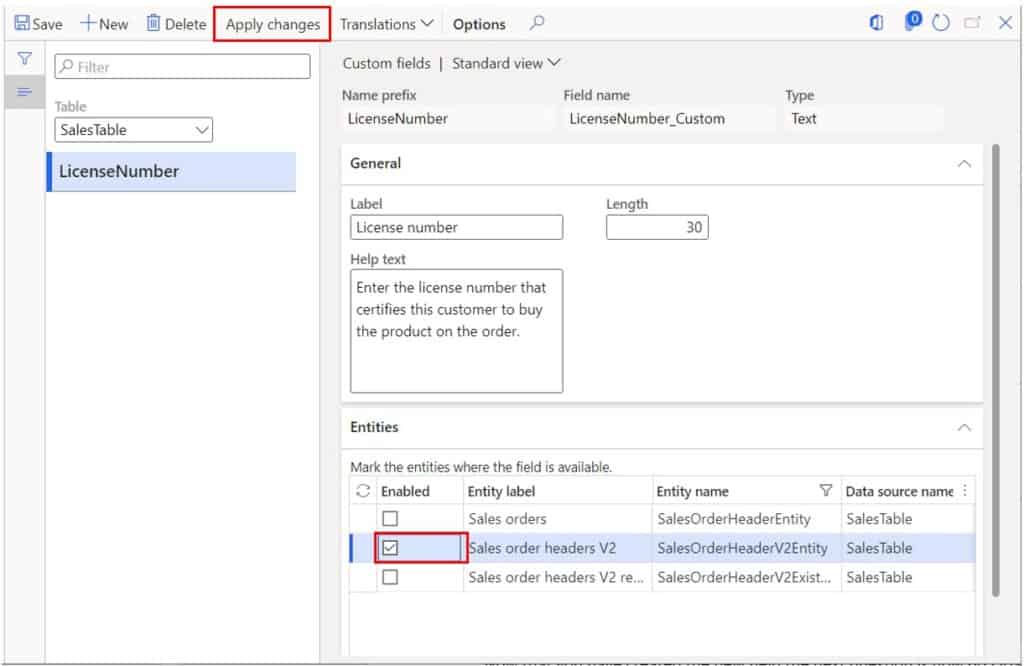
This will show you the custom field you created, and the field details you entered during the creation of the field. You are able to change certain details like the “Label”, “Field length”, and “Help text” but other details like the “Name prefix”, “Field name” and “Type” cannot be changed. If you need to change any of the locked fields, you will need to delete the field and start over. Further in the post we will go over how to delete the custom field.
To add the custom field to a data entity simply find the data entity you want to add it to and click the enable “Checkbox” next to it. Then at the top of the form click the “Apply changes” button. You will need to click the “Apply changes” button after any change you make to the custom field even deletion of the custom field.
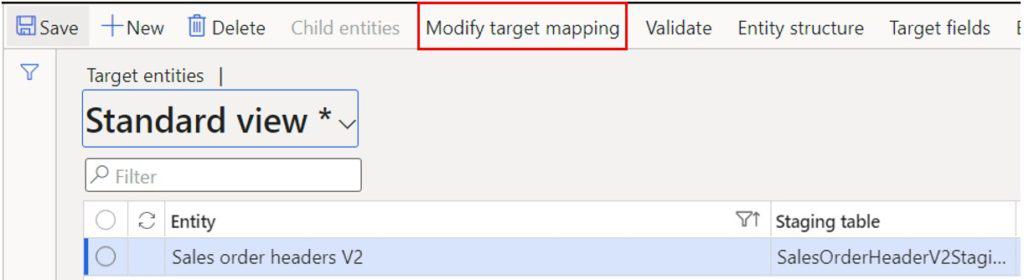
Now if we navigate to the data entity workspace and click on the “Data entities” tile we can find the data entity and click the “Modify target mapping” button.
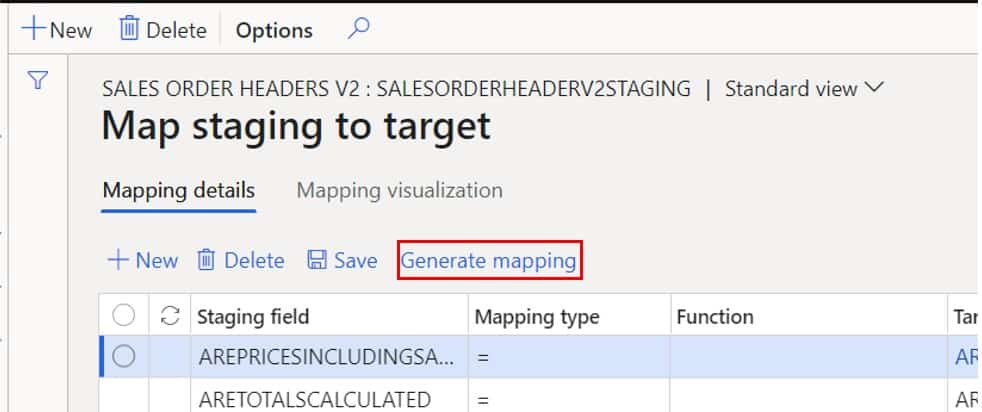
Click the “Generate mapping” button which will refresh the mapping fields.
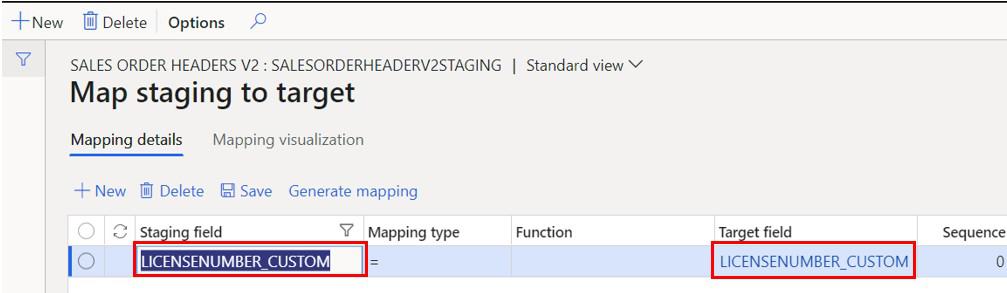
Now if you filter for your field you will see it in the list.
Can Other Users See the Custom Field?
Yes, other users can see your custom field, but they will need to personalize the field onto the form. Another way you can expose the field to all users is to have a system administrator export the personalization and apply the personalization to all users. For detailed steps to export and import personalization see this post.
How to Delete a Custom Field
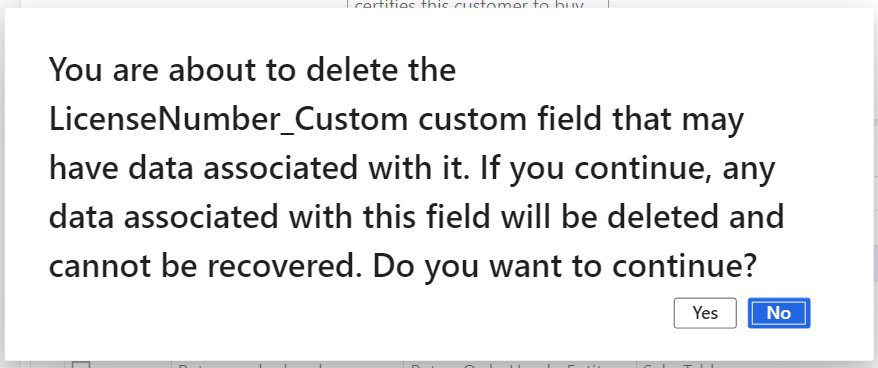
If you made a mistake or you just want to get rid of a custom field, you can delete a custom field by navigating back to System administration > Setup > Custom fields. Click the dropdown on the “Table” field and select the table where your custom field was created then click the “Select” button. Click the “Delete” button.
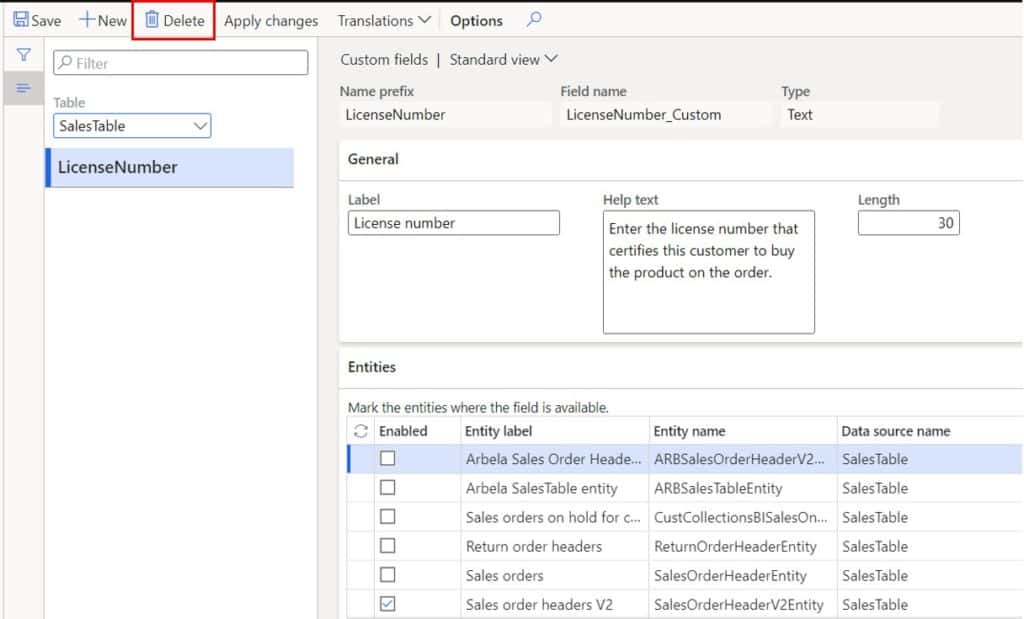
Click the “Yes” button on the information window to confirm the deletion. If you have entered data into the custom field, you will be asked for a second confirmation.
After you delete the field do not forget to click the “Apply changes” button or the field deletion will not take effect.
Takeaways
The ability to create a custom field with no code is an extremely powerful tool that Dynamics 365 Finance and Operations provides that can save you time and money in development costs. Although there are some limitations to using the custom field, they are perfect for fields that only need to hold data and do not drive any business logic.
If you create a custom field and then decide that you do need the field in business logic you can always export the data for that field, create the field in visual studio, and upload the data back into the system so you are really not painting yourself into a corner even if something changes!