Alerts are a very power piece of functionality in Dynamics 365 Finance and Operations. Alerts give users the power to set up custom automated alerts that trigger upon user defined events. This allows users to monitor the creation, changes of certain fields, records or data sets and get alerted to due dates and deadlines. In a dynamic changing ERP system, alerts allow users to be proactive and take the necessary actions to do their jobs more effective and efficiently.
Setup
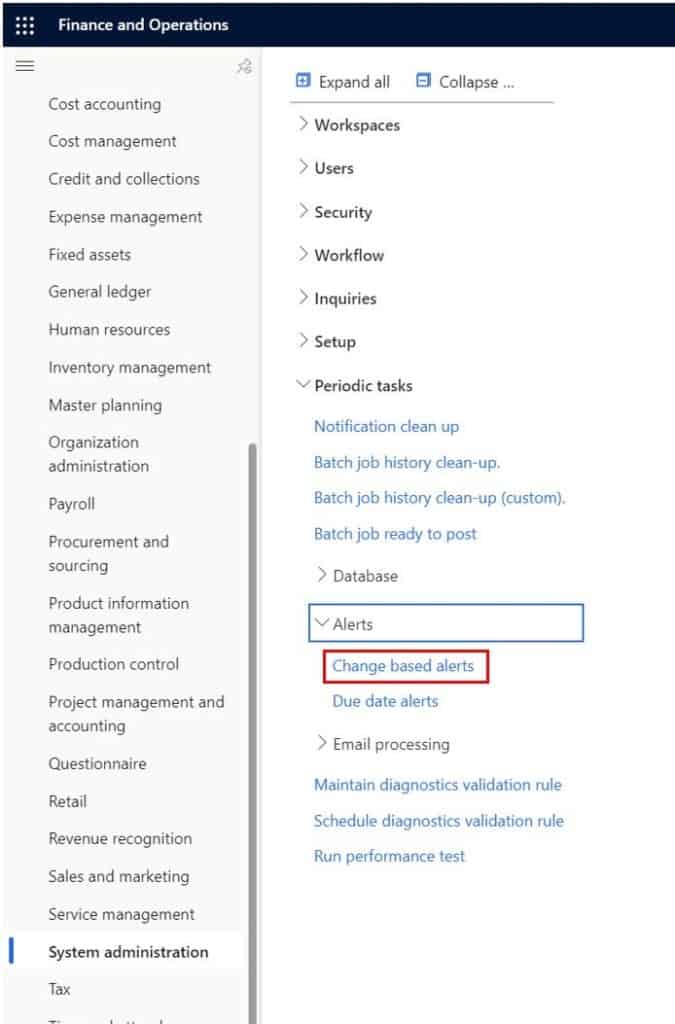
Alerts are fired from the system by two recurring batch jobs. So, before we set up our alert to test, we need set two batch jobs to run on a recurring basis. One is the “Change based alert” batch job and the other is “Due date alerts”. The former will trigger alerts when changes occur to fields or records and the latter will trigger alerts when date based alerts are set to fire.
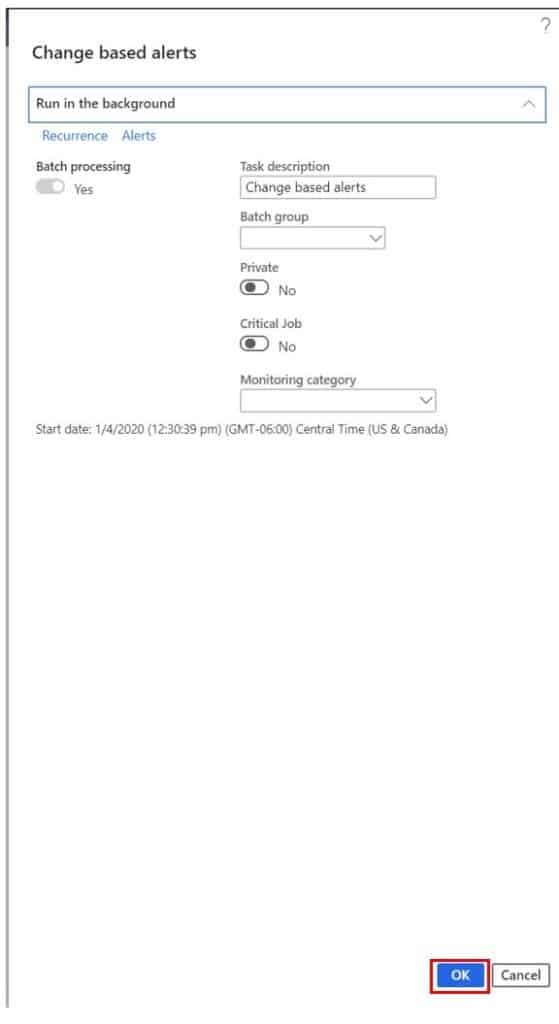
- To do this navigate to System administration > Periodic tasks > Change based alerts.
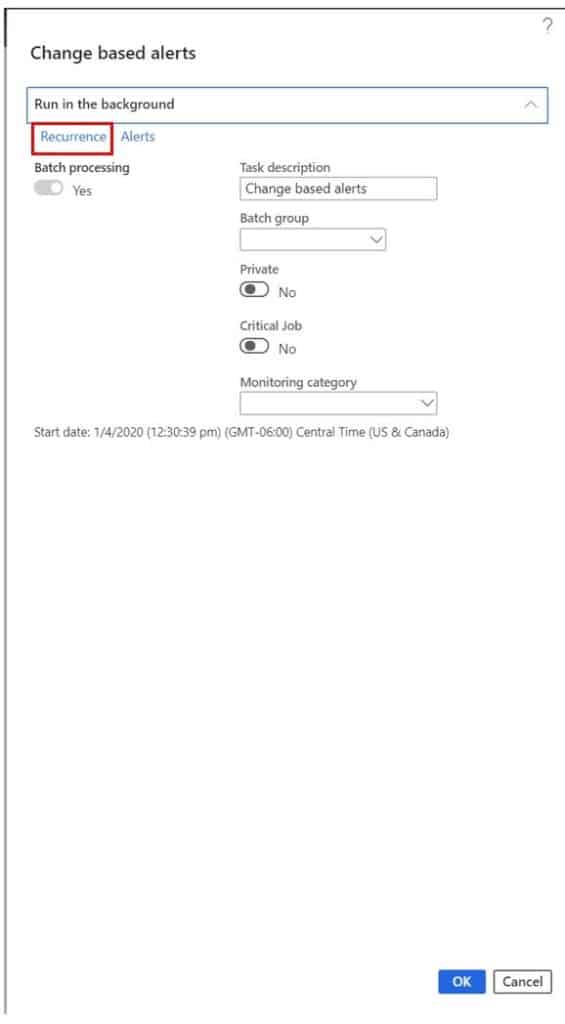
On the batch job form we can set the recurrence by clicking the “Recurrence” button.
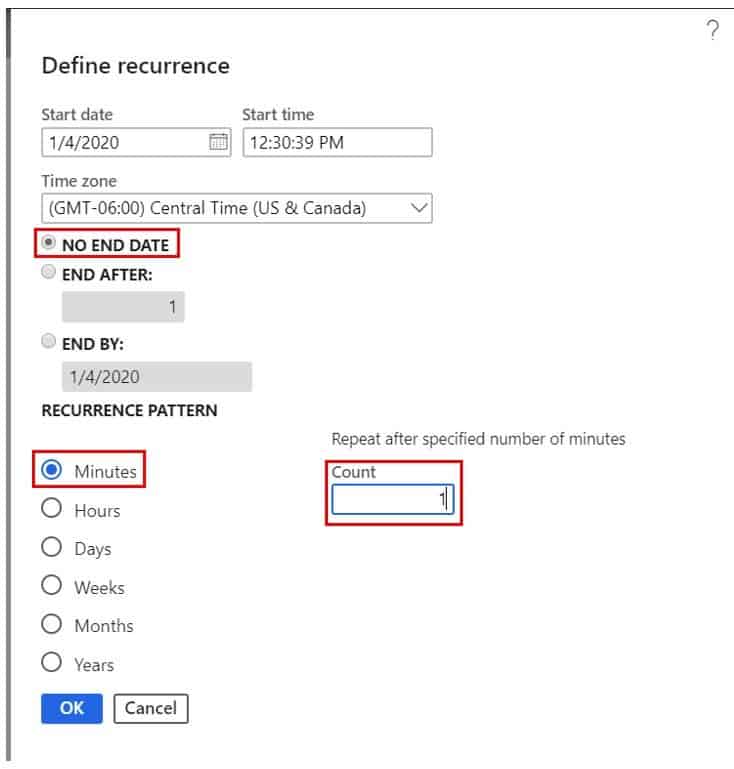
- Here we can define that we want the job to run in perpetuity by selecting “No end date” and we can select how often we want the job to run in the lower section by selecting a unit of time and the number of units.
- In this case I am going to have the batch job run every minute.
- Click “Ok” on the recurrence form.
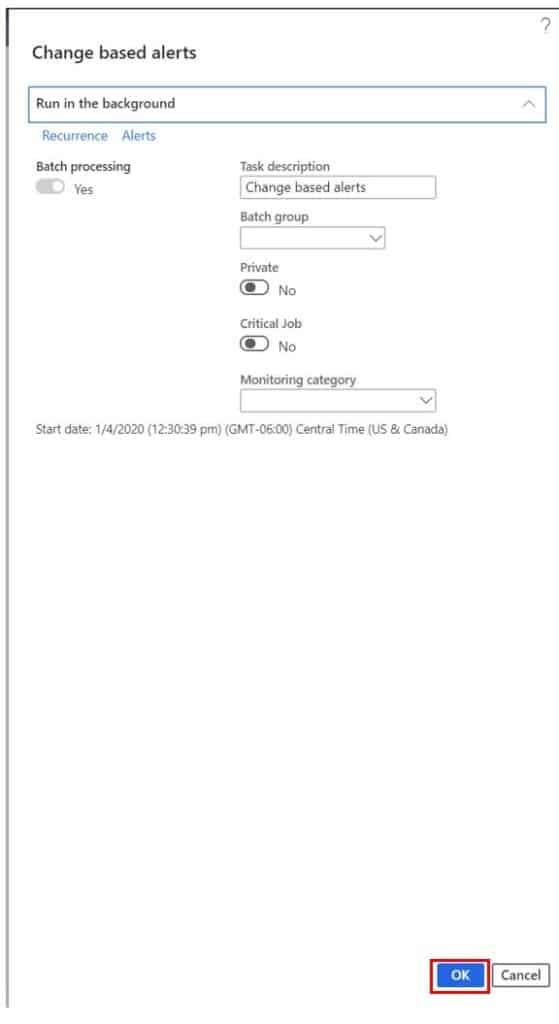
- Now back on the “Changed based alerts” batch job form click “Ok” to send the job to the batch schedule.
- Click “Ok” on the recurrence form.
- Now back on the “Changed based alerts” batch job form click “Ok” to send the job to the batch schedule.
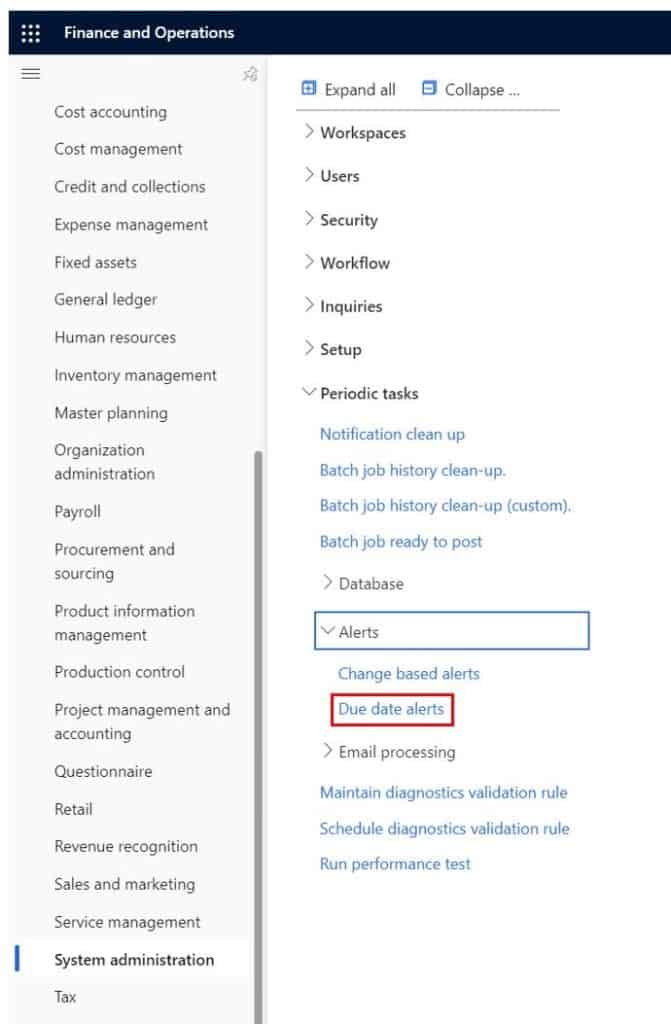
Next we need to do the same thing with the “Due date alert” batch job. Navigate to System administration > Periodic tasks > Due date alert.
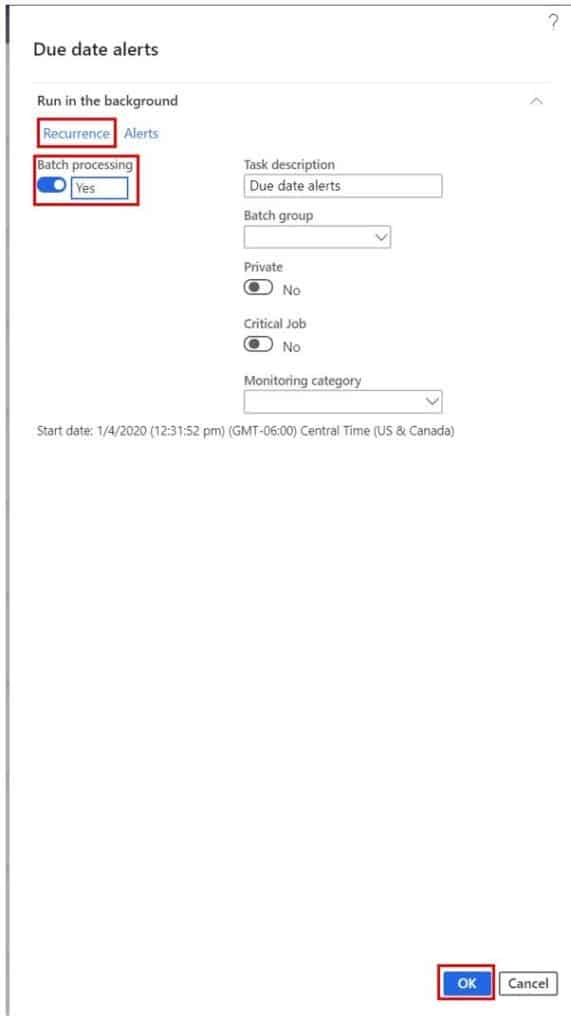
Set the recurrence for this batch job the same way you did for the “Change based alerts” and click “Ok” to but the batch job in the batch schedule.
How to Use Alerts
Now that we have the alert batch jobs in place, we can set up an alert to test the functionality. For example, we will set an alert to fire when any vendor gets put on hold.
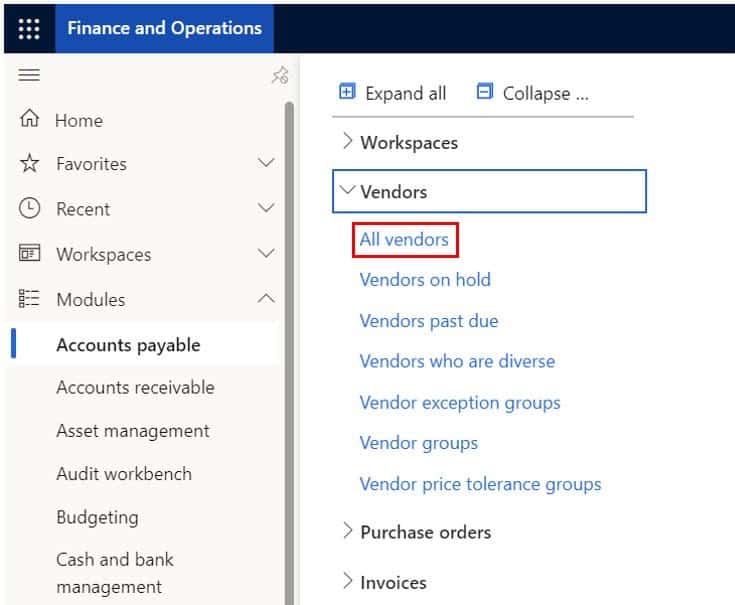
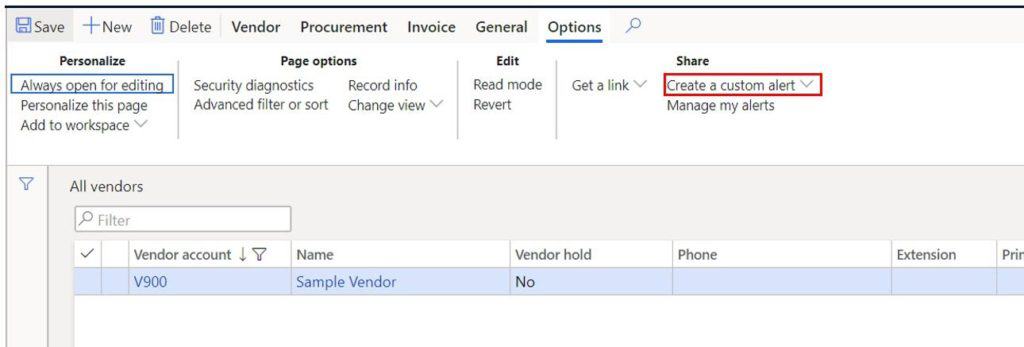
- To do this we will navigate to Accounts payable > Vendors > All vendors.
Click the “Options” tab in the ribbon click the “Create custom alert” button.
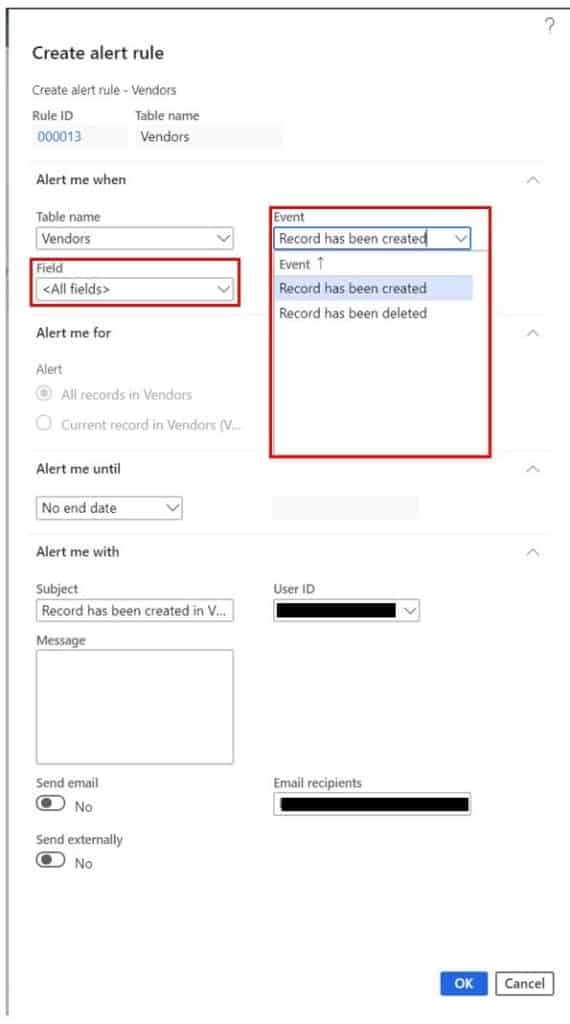
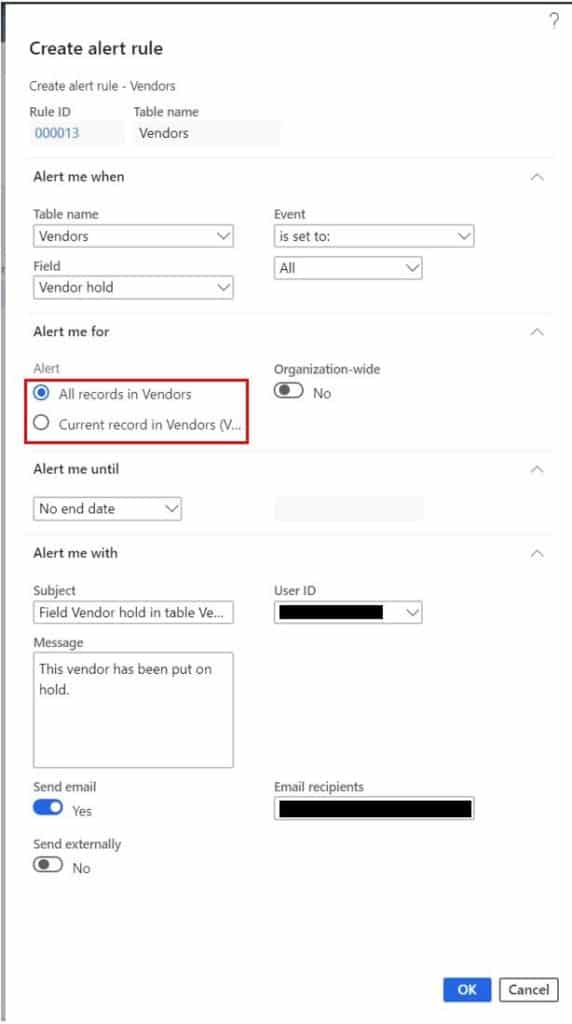
This will open the alert setup form. Here you can set up the details of the alert. Notice that when the “Field” field is set to “< All fields >” the “Event” options are limited to “Record has been created” and “Record has been deleted”.
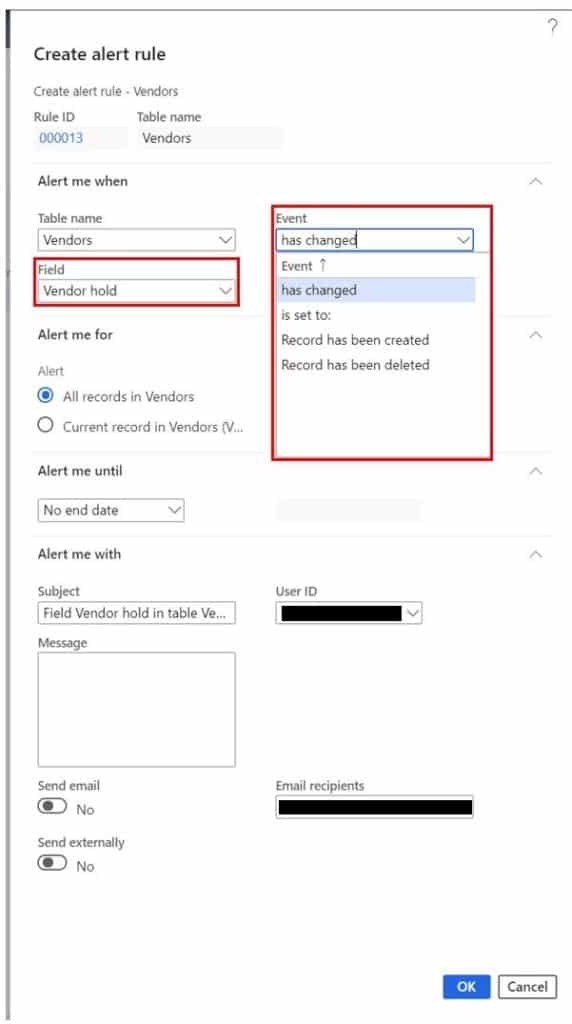
In my example I want to fire an alert when a vendor record gets put on hold.
So, I need to change the “Field” option to “Vendor hold”. Then when I click the drop down, I have a different set of events I can subscribe to.
- In this case I will select “Is set to:” which allows me to then define the specific value I am looking for to trigger the alert. I will set the value field to “All”.
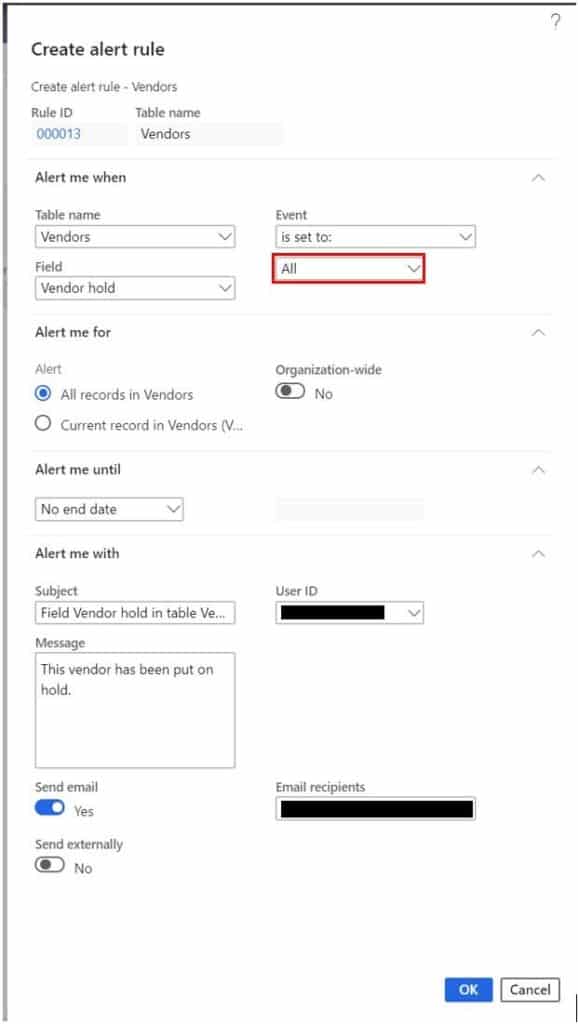
Next, in the “Alert me for” section I can choose to be alerted for the specific Vendor record I am currently on by selecting “Current record in Vendors”, or I can choose “All records in Vendors” to be alerted in the case that any vendor gets put on hold.
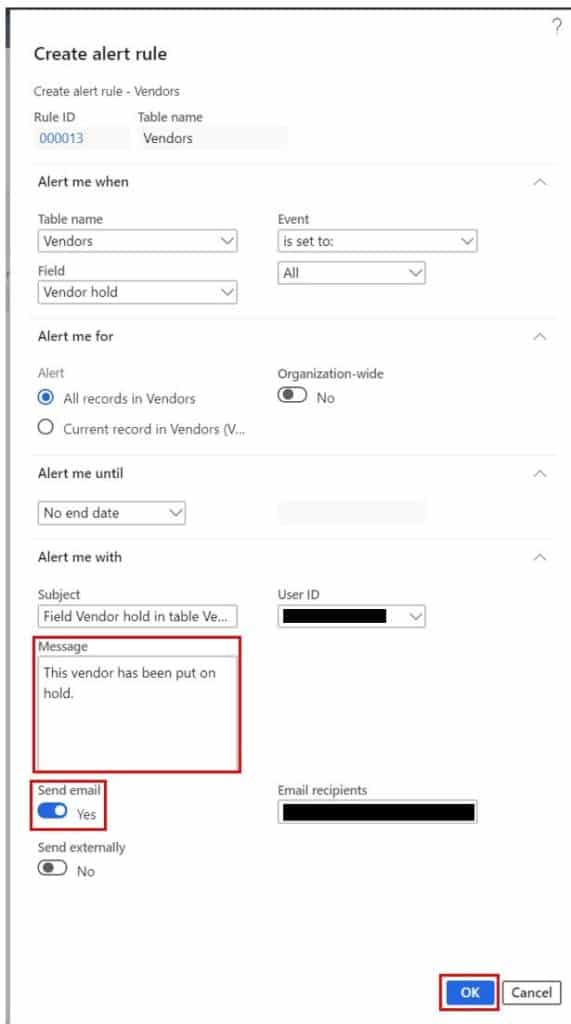
- In the “Alert me with” section we can define how we want to be alerted. In this case I want to be alerted in Dynamics 365 Finance and Operations and I also want an email to be sent to me.
- I will enable the “Send email” flag. By default, the email will be set to your users’ email address, but you can change to be an email address that forwards to a distribution list.
Note: There is additional setup required to enable the email functionality. Email templates associated with alerts and exchange server setup are required for this functionality to work.
- If you are using Microsoft flow you can also trigger a business event by enabling “Send externally”.
- Once all the alert settings are complete, I can make the alert active by clicking the “Ok” button.
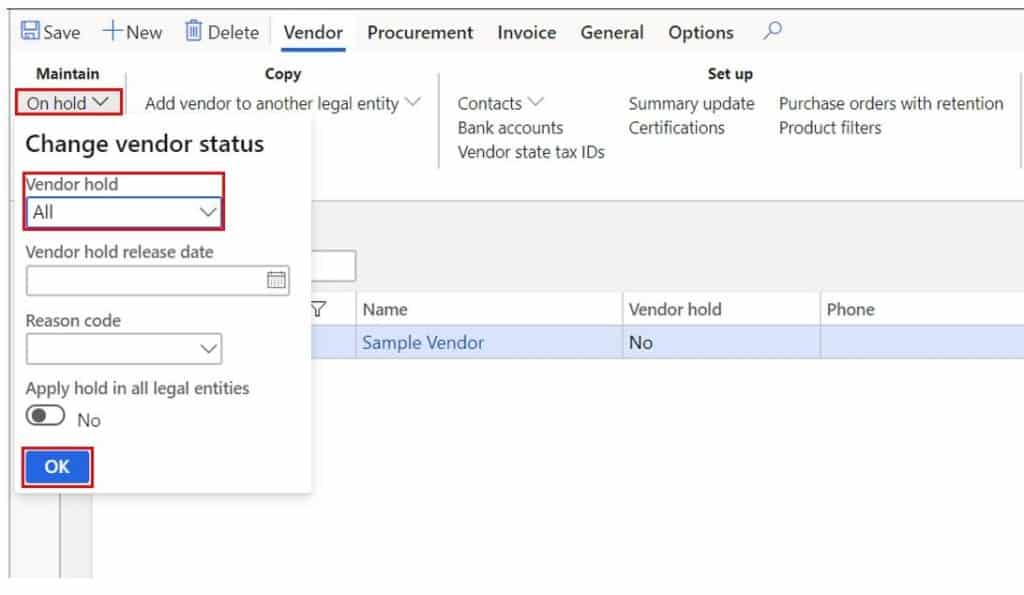
Next I am going to trigger the alert by putting this vendor on hold. To do this I will navigate back to my vendor and click the “On hold” button in the “Vendor” tab in the ribbon and select the “All” option in the “Vendor hold” field and click “Ok”.
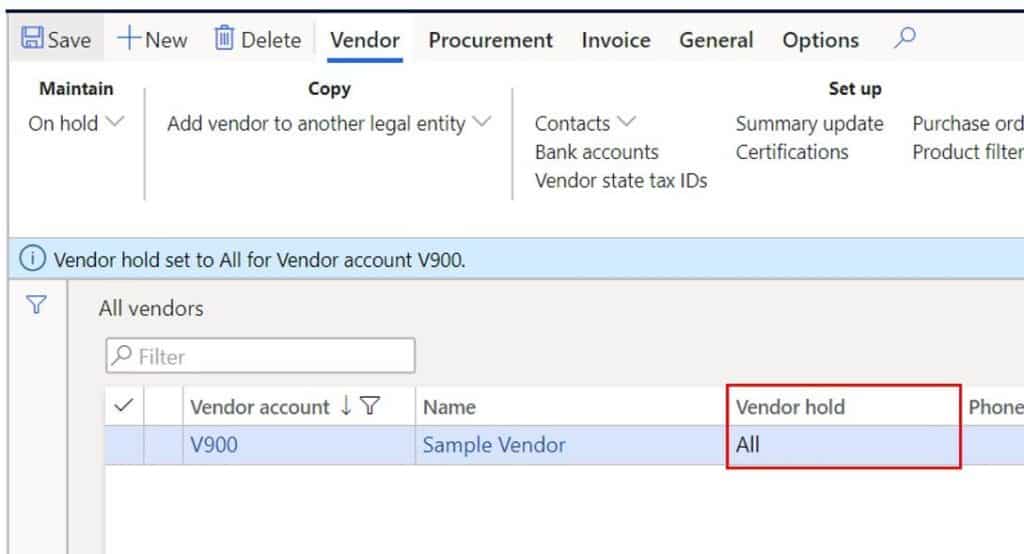
This will update the vendor hold field to “All” which means the vendor is now on hold.
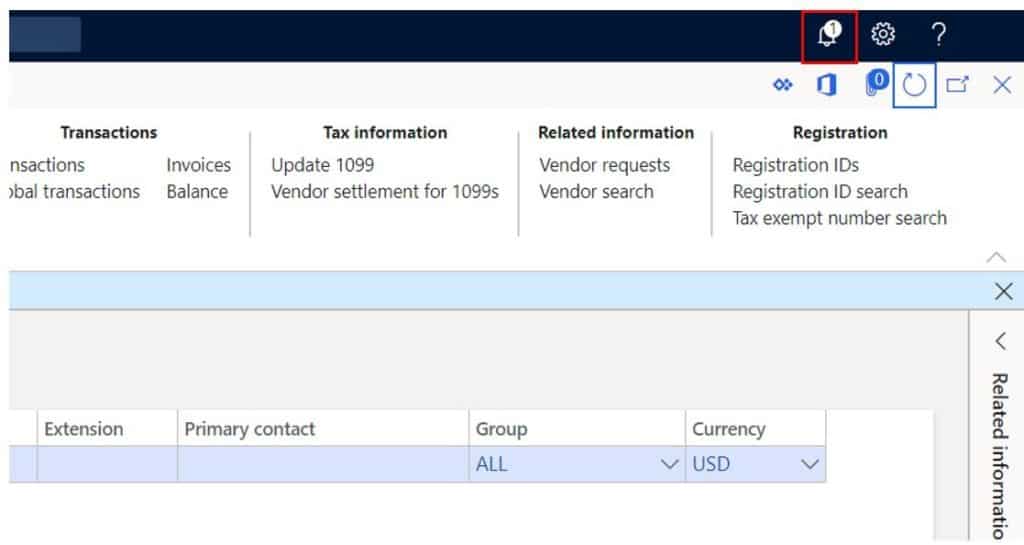
I can refresh the form and now you can see in my notification center (the bell icon) that I have a new message.
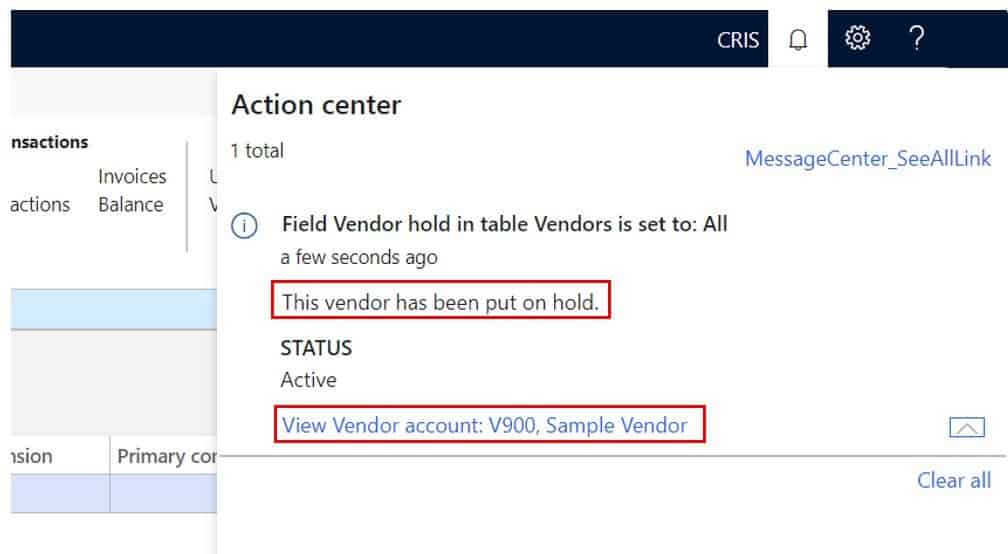
- If I click on my notification center and expand the message, I can see that I have an alert which is telling me that vendor “V900” has been on hold.
- If I click on the hyper link provided, I am taken directly to the vendor list page where I can find the vendor and view the change.
Manage Alerts
Because alerts are a very useful feature you may, over time, create numerous alerts for different purposes. Dynamics 365 Finance and Operations provides each user the ability to manage their alerts by enabling or disabling and even deleting them when they are no longer needed.
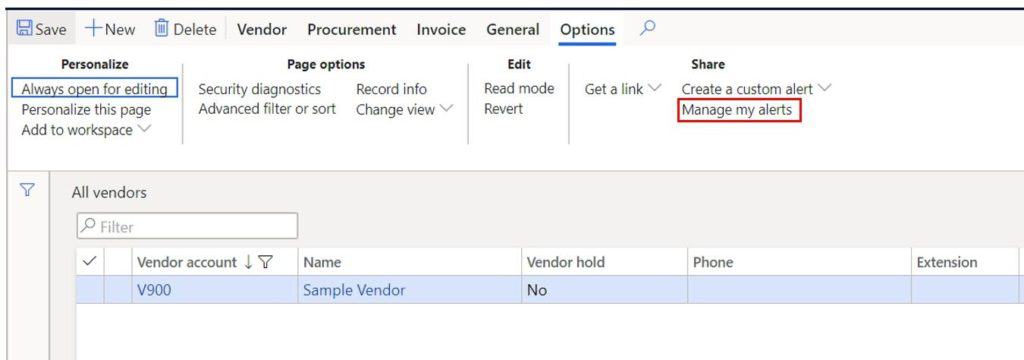
- You can manage your alerts by clicking the “Manage my alerts” button right underneath the “Create a custom alert” button in the “Options” tab of the ribbon.
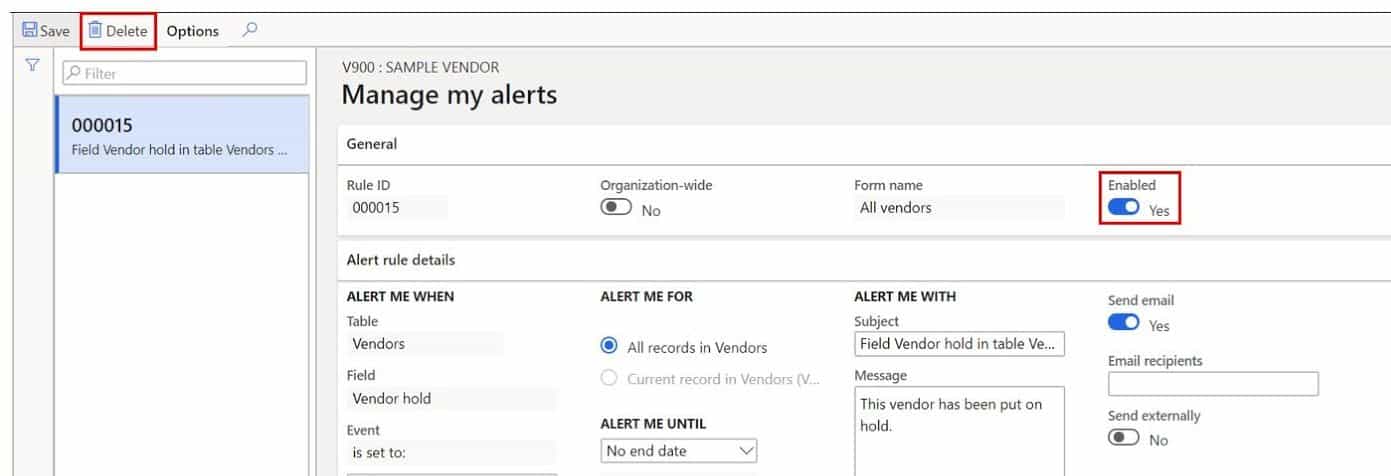
In this form you can disable or enable any alert rule you have created by toggling the “Enable” slider. If you no longer need the alert or want to clean up your alerts you can delete any old or outdated alerts.
Takeaways
When Dynamics 365 Finance and Operations first came out the alert functionality, which was standard in prior versions, was not available. I think Microsoft saw how important this functionality was and rightfully restored this functionality to the standard product.
As part of any end user training I always show users how to take full advantage of this functionality because it really does let you work more efficiently and removes some of the worry of things slipping through the cracks.
I hope this walk-through was a helpful look into the alert functionality and will give you the tools to feel confident using it yourself.

