

Inventory status is technically a storage dimension and makes up one of the numerous inventory dimensions you could enable for your Dynamics 365 Finance and Operations (D365) implementation. The inventory status feature in Dynamics 365 Finance and Operations is an extremely helpful feature and in older versions Dynamics AX 2012 there was no such dimension in the standard AX product.
In short, the inventory status dimension is a way to indicate user defined purposes of specific quantities of inventory. This allows us to set aside inventory sitting in the same physical location for two different purposes.
The inventory status also has blocking functionality which in addition to being able to segregate and quarantine inventory without moving it to another location, or warehouse, we are also able to prevent certain inventory from being picked and shield it from being netted for MRP calculations.
In this article I will take you through all the main inventory status features and touchpoints in the system to give you a full understanding of the pervasiveness and power of this feature.
Inventory Dimension
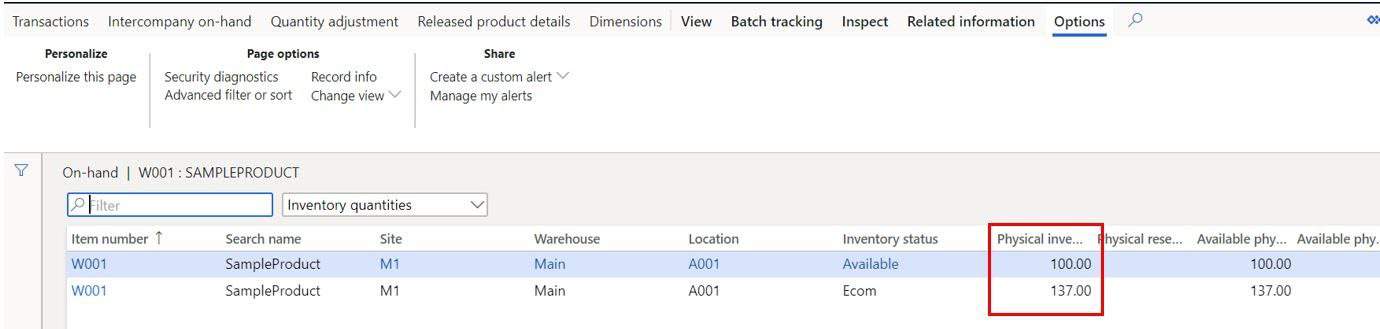
Inventory status is an inventory dimension first and foremost which means you can view your on-hand inventory by inventory status. This means that you could have inventory for the same part in the same location but break out by different statuses indicating different purposes.
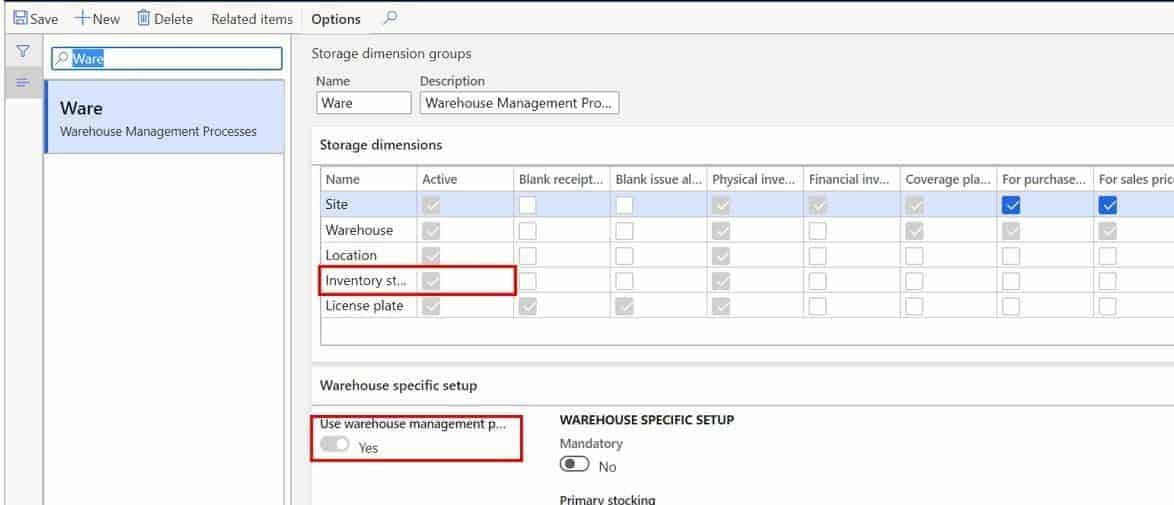
The inventory status dimension can only be activated by enabling the “Use warehouse management processes” flag on the storage dimension setup. If this flag is not enabled the system will not let you enable the inventory status flag.
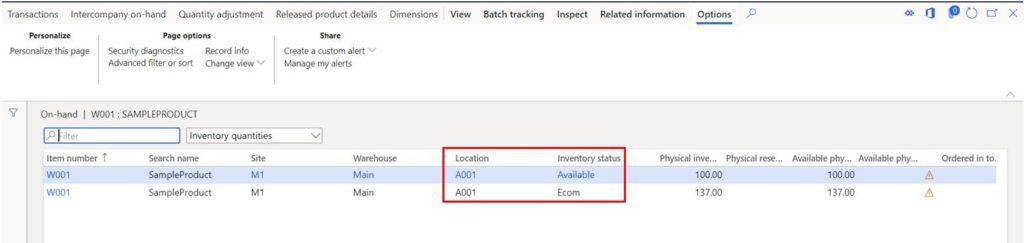
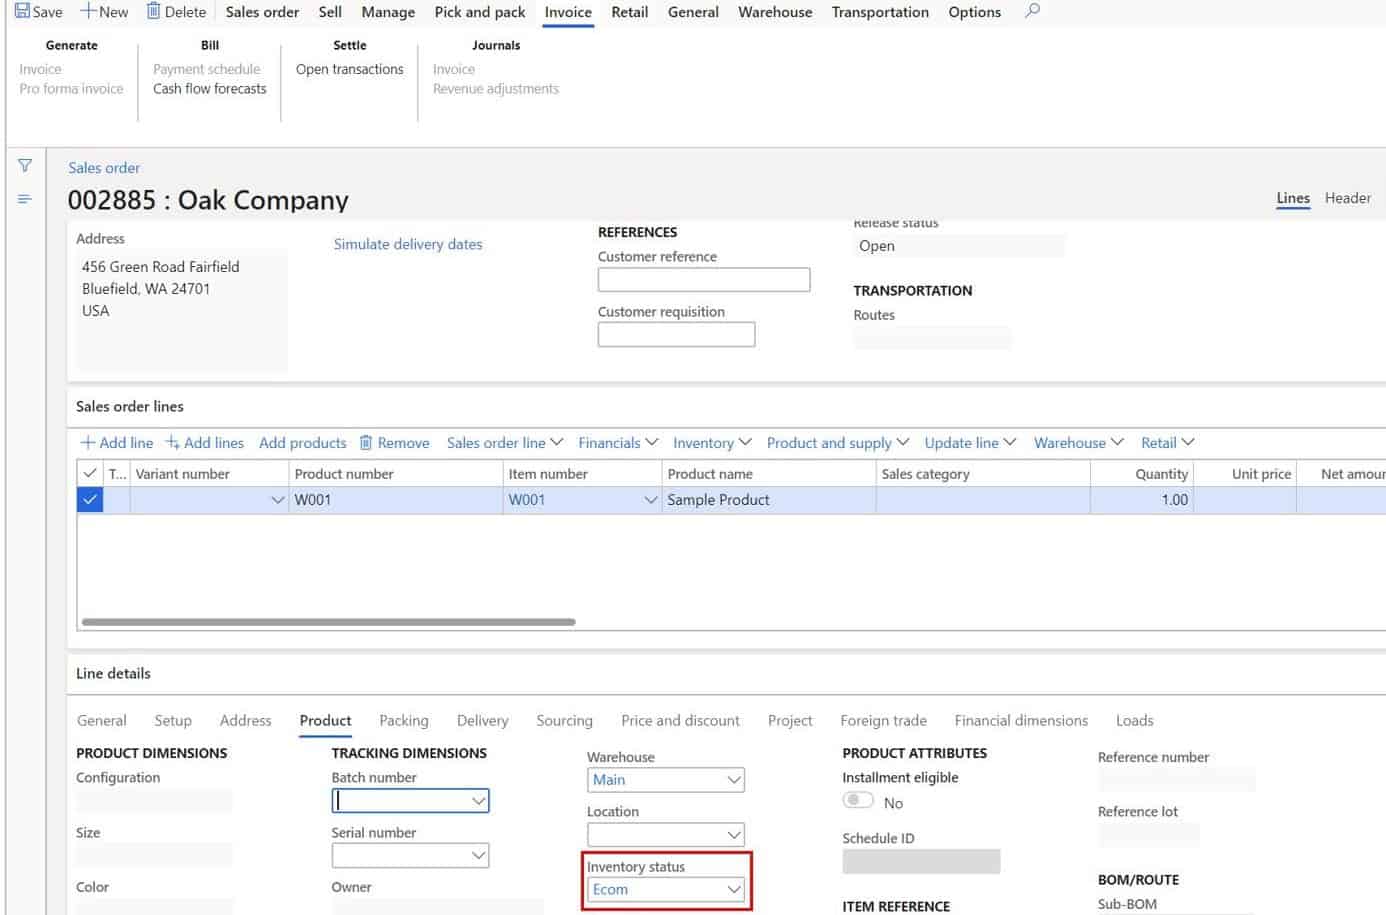
In the example below we can see the two on-hand inventory records that show that we have physical on-hand inventory in the same “A001” location but we can see that 137 has a status of “Ecom” and the other 100 has a status of “Available” in this case we can see in our on-hand inventory how much we have set aside for ecommerce distribution and how much is available for general uses, for production orders, or distribution to brick and mortar stores.
However, this is not the end of the story. Depending on how your warehouse and processes are defined there may be additional configuration and considerations to take into account to ensure that the inventory is used for its desired purpose. You will see example of what I mean later in this article.
Master Planning
Because inventory status is an inventory dimension it can be used in master planning. The two major ways inventory status are used in master planning, is planning by the inventory dimension and utilization of the inventory blocking functionality to shield certain on-hand quantities with certain inventory statuses from being included in the MRP netting calculation.
Planning By Inventory Status
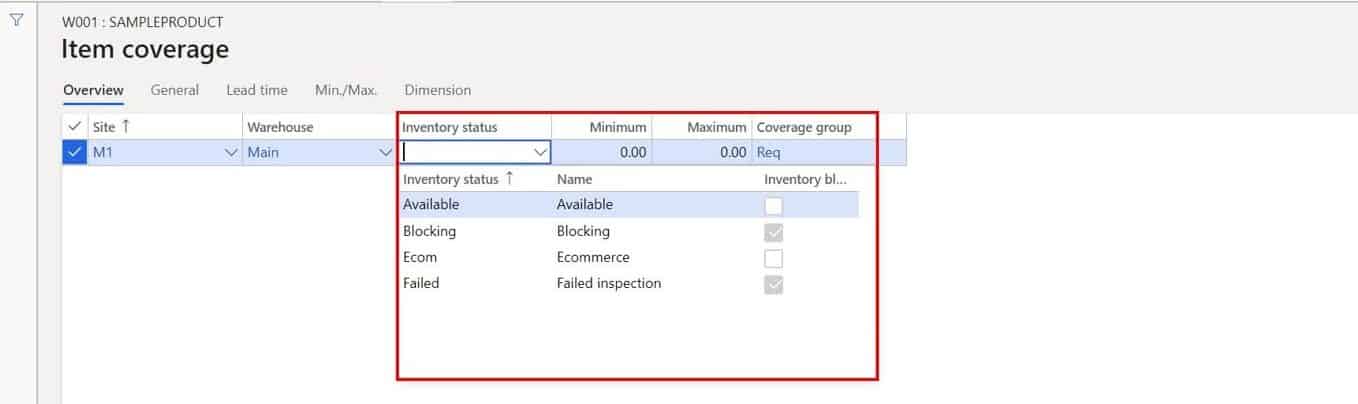
In Dynamics 365 Finance and Operations you can plan down to any inventory dimension you choose including inventory status. You can enable the planning by status on the storage dimension setup form. Product information management > Setup > Dimension and variant groups > Storage dimension groups.
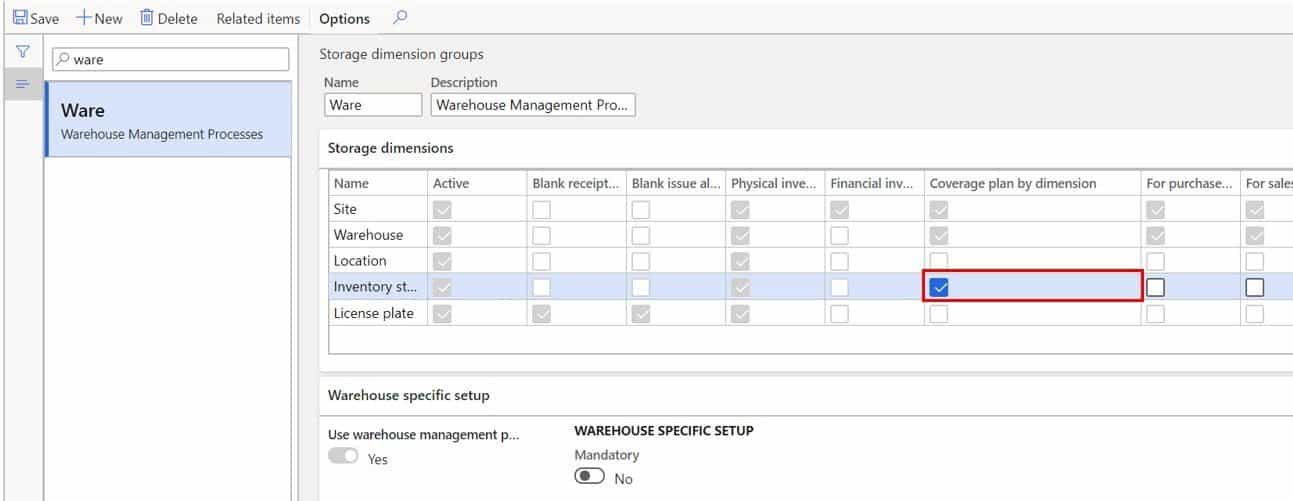
This will enable the inventory dimension on the item coverage form where you can specify your safety stock or mins and maxes by warehouse. By that same token you could also upload demand forecasts by status to have more granularity in your planning.
When a source of demand is entered (sales order, production order, demand forecast line, etc.) it can be entered with a specific inventory status and MRP will create planned orders according to the inventory status of that demand. This can be a powerful configuration, but it also has some drawbacks that I have come across and should be considered before you implement this type of planning.
First when you implement planning by inventory status you now have to worry about entering the correct inventory status when you enter sources of demand. There are ways of defaulting inventory status but you should consider what the business process flow would look like for the person entering orders that now has to determine the purpose for each order line.
The second drawback is that for second and third level demand where a single production order or purchase order may be pegged to several different sales order lines or forecast lines with different statues MRP will take the default inventory status specified on the warehouse or the site instead of the inventory status specified on the original source of the demand. So, for any type of production scenario where you may have multiple levels of sub-assemblies you may start to see problems with this approach.
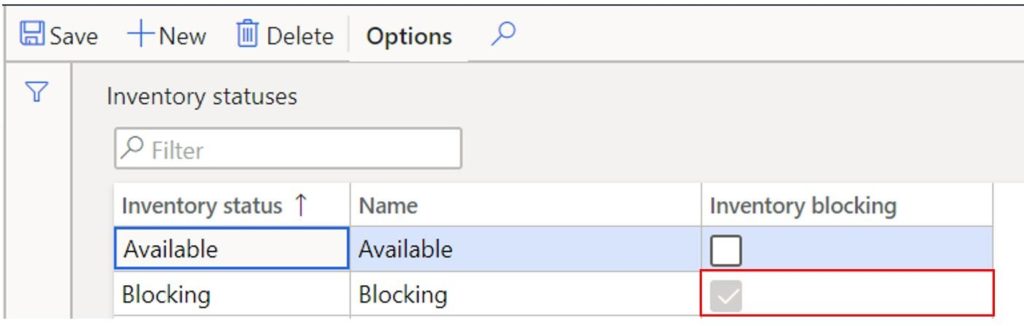
Inventory Blocking
On the inventory status record there is a blocking flag. This flag indicates that whenever a given quantity of inventory that is assigned with this inventory status should be blocked. What happens in the background is that Dynamics 365 Finance and Operations will create a blocking record that will create an inventory reservation which will remove it from the MRP netting calculation.
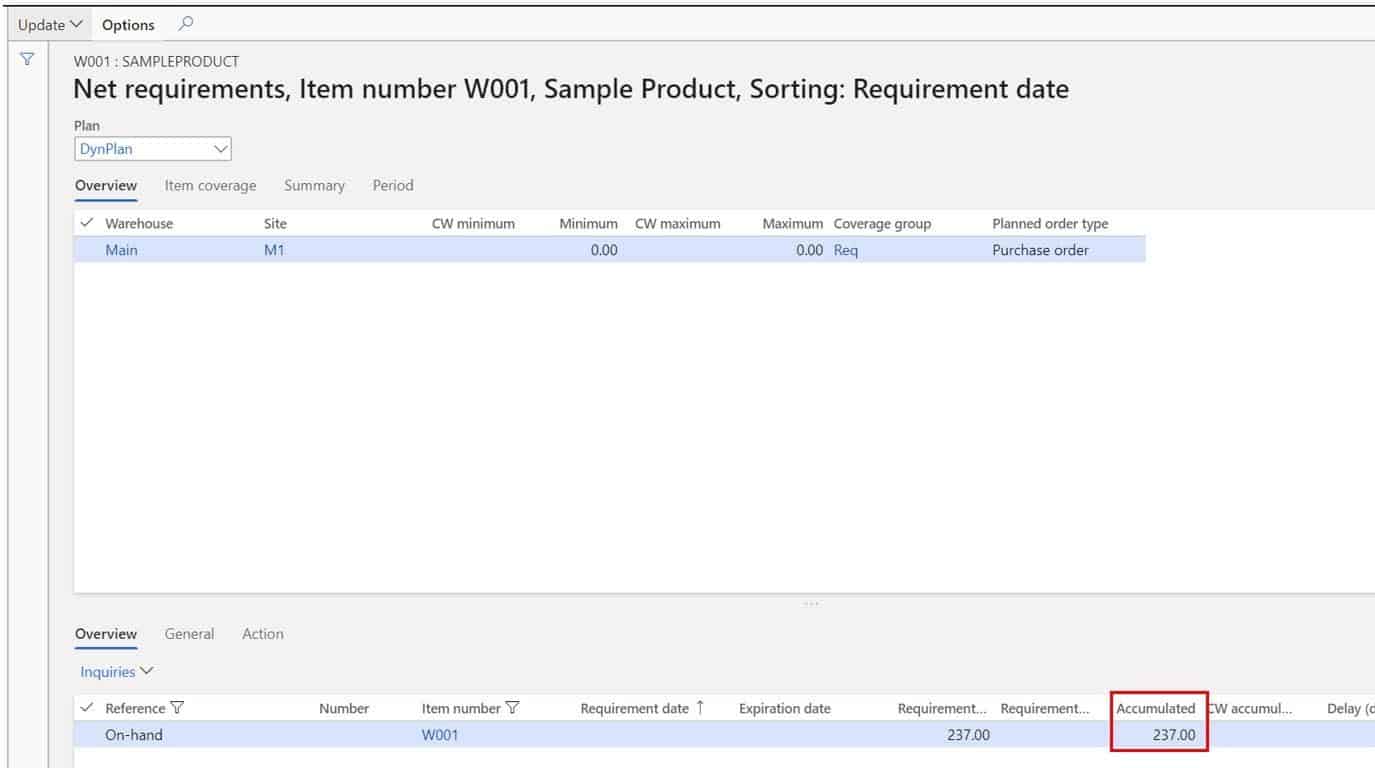
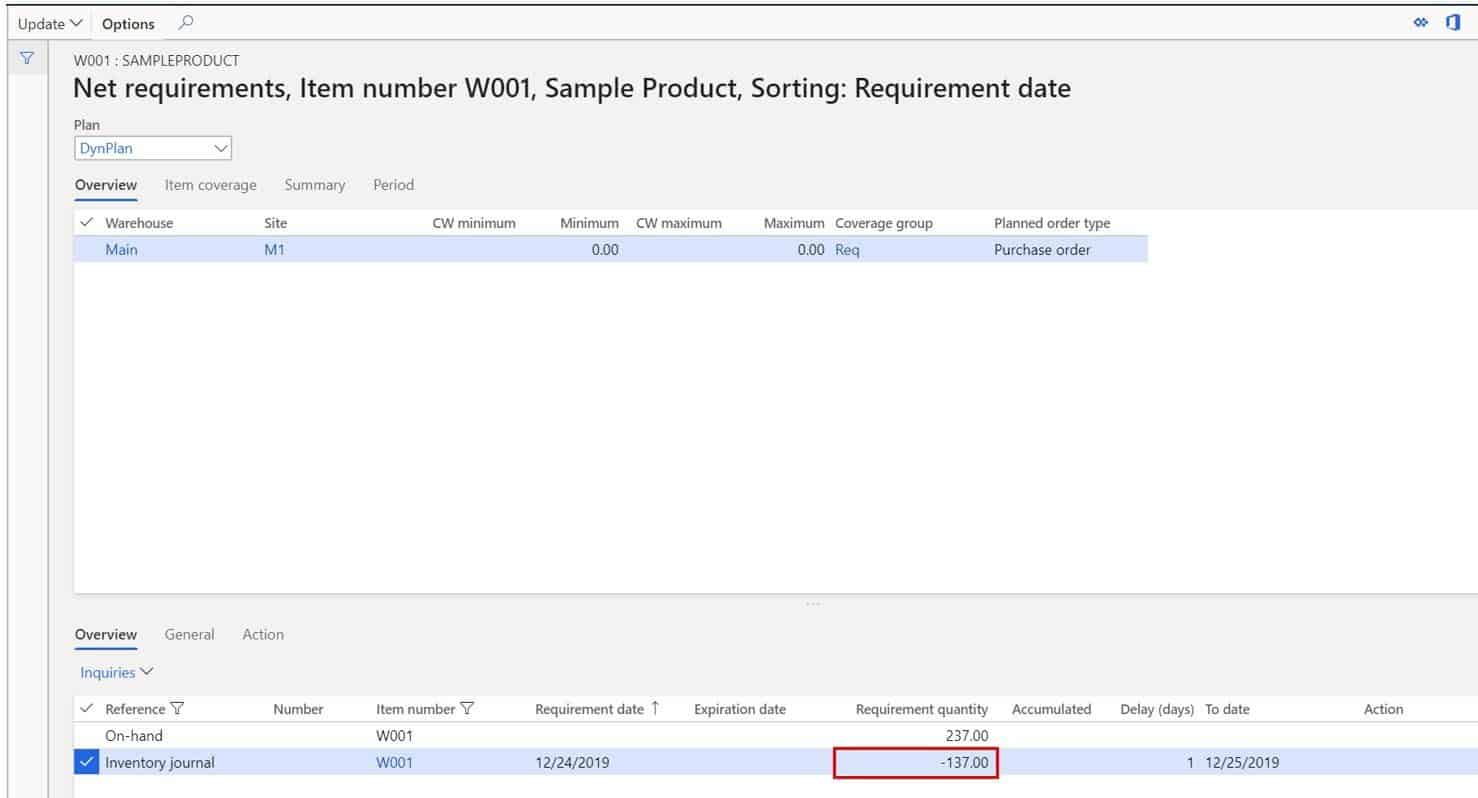
In the example below we will run MRP before and after we change the inventory status and see the calculation effect on MRP. In the example below we have item “W001” which has 237 total units on hand. Let’s run MRP and then look at the net requirements.
You can see that MRP nets a total of 237 units available on hand for use.
Let’s now go and change the inventory status from “Ecom” which does not have an inventory blocking designation to the “Blocking” status which does.
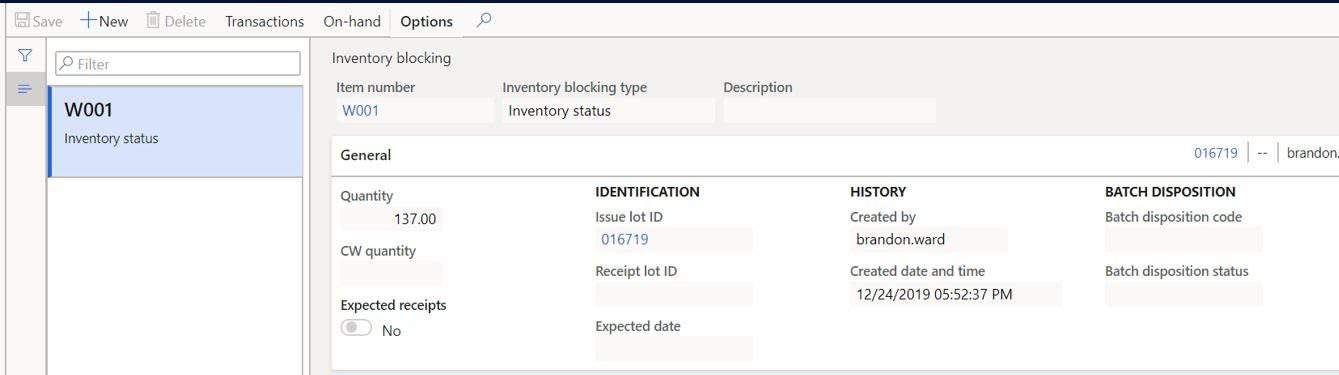
After we change the inventory status you can now see that we have a physical reservation against 137 units of item W001. Let’s run MRP again and check out the net requirements results.
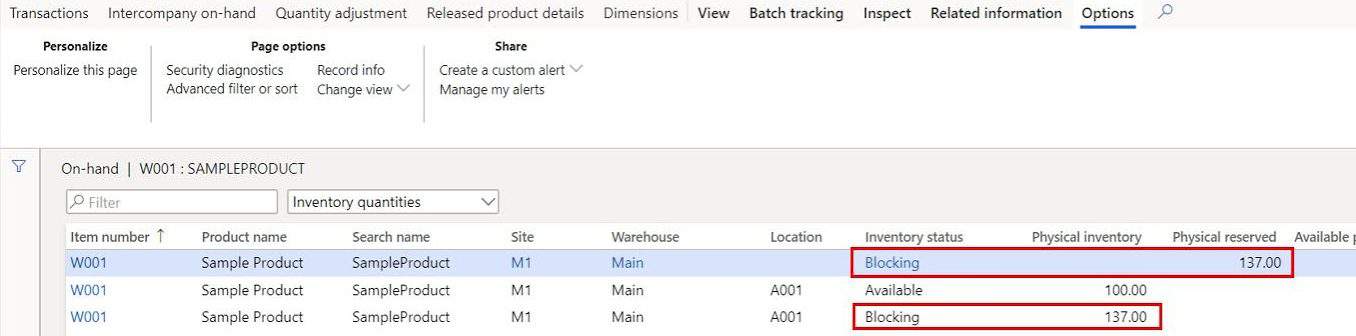
You can see that now MRP has reduced the number available to 100 by subtracting out the 137 units that we set to “Blocking”.
Let’s now take a look at the blocking record that gets created in the background. You can see that we have a blocking record that was created when we changed the status to an inventory status with “Inventory blocking” enabled.
Pretty cool. This is a powerful tool you can use to make sure certain types of inventory are or are not included in the MRP calculation.
Inventory Movements
During specific warehouse processes it may be required to not only move inventory, but also change the status of the inventory during the movement. Some examples may be where you are moving certain inventory to a quarantine or quality inspection location, or moving certain inventory to be used as parts for repairs in an RMA zone of the warehouse.
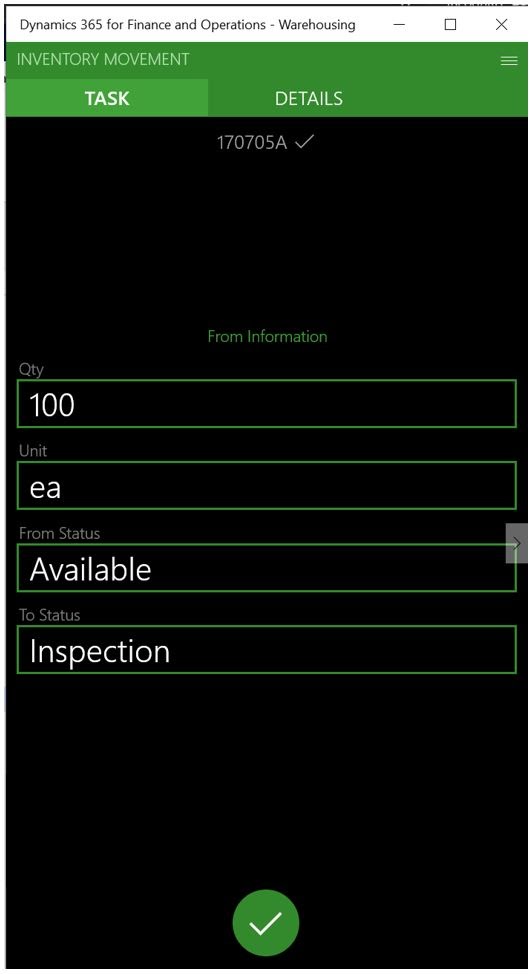
With the inventory movement functionality in the warehouse management mobile application you are able to not only move the inventory, but change the status during the movement.
In the example below you can see that we are moving a quantity of 100 and we are changing the inventory status from “Available” to an “Inspection” status.
Quality Orders
Inventory status plays an important role in the quality management process. The ability to automatically disposition given lots and quantities to available or blocked inventory statuses based on the outcome of the quality test can dramatically streamline the quality process. The test group associated with the quality order can be configured to update the inventory status based on the outcome of a quality test. Below I have provided an example of the process.
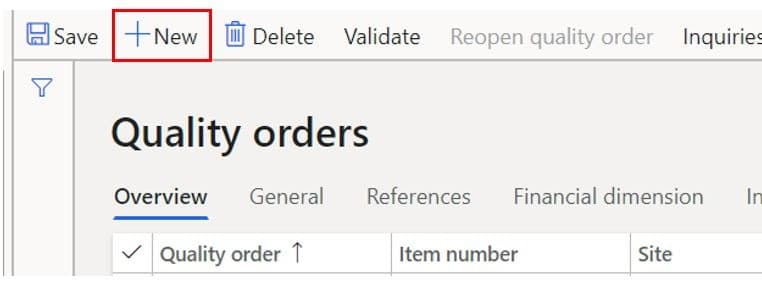
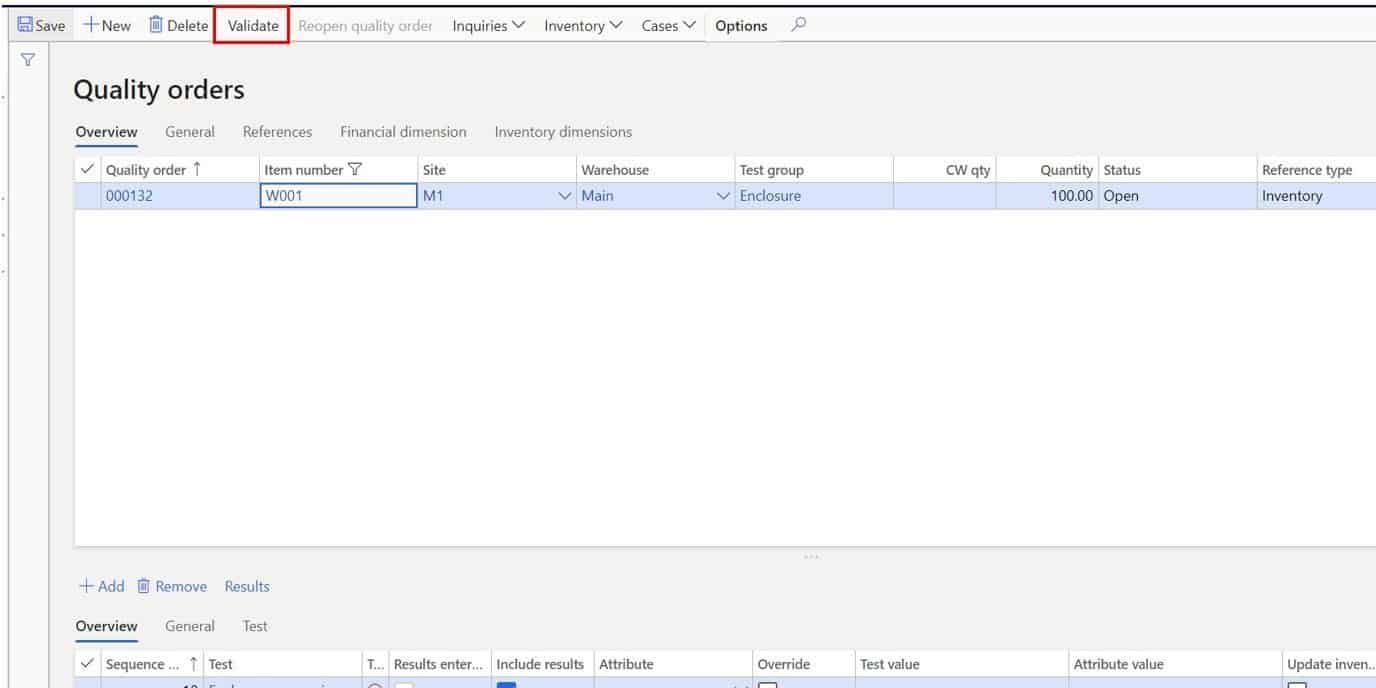
To create a quality order, navigate to Inventory management > Periodic tasks > Quality management > Quality orders.
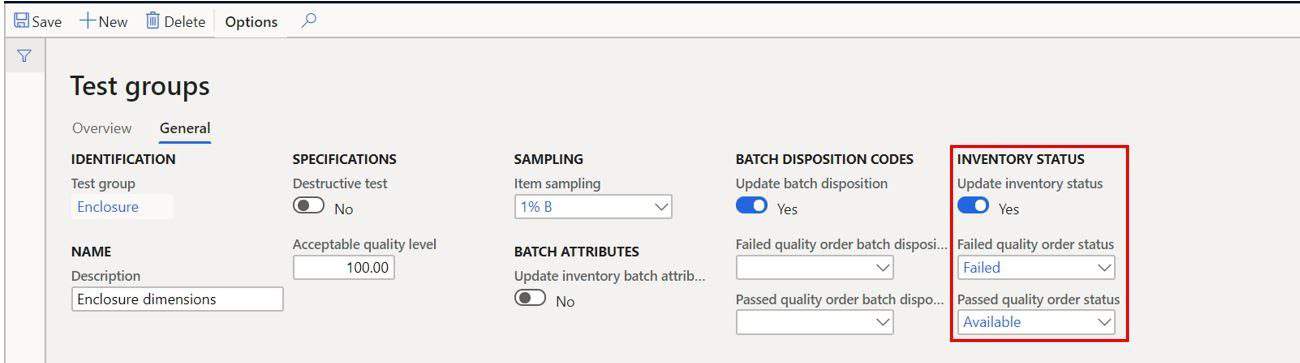
Click the “New” button to create a new quality order and select the item you are performing the quality test on. Enter the test group and quantity to be tested. In this case I will choose the test group where we have enabled the “Update inventory status” flag.
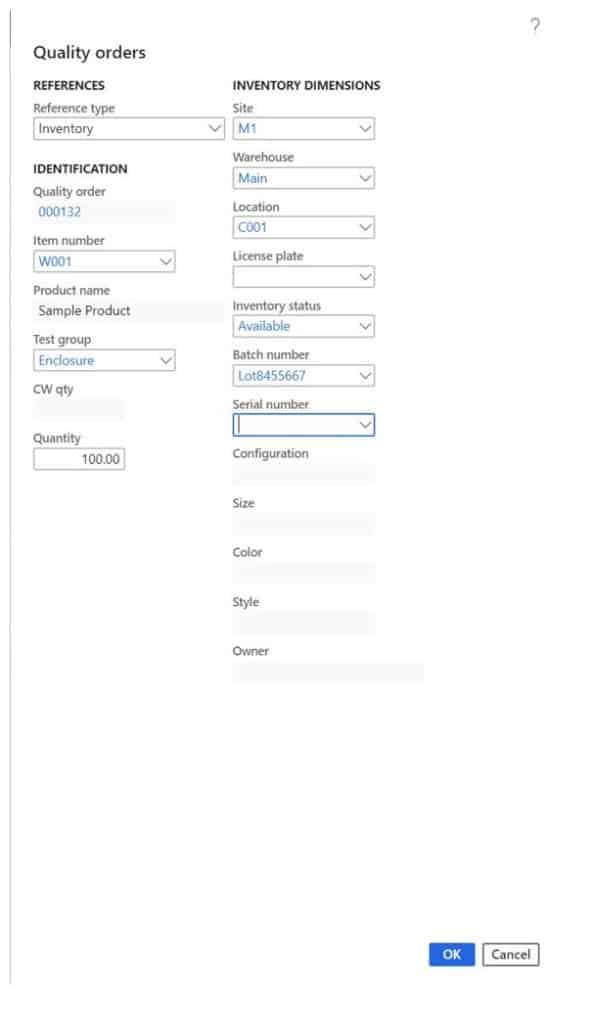
Click the “Ok” button.
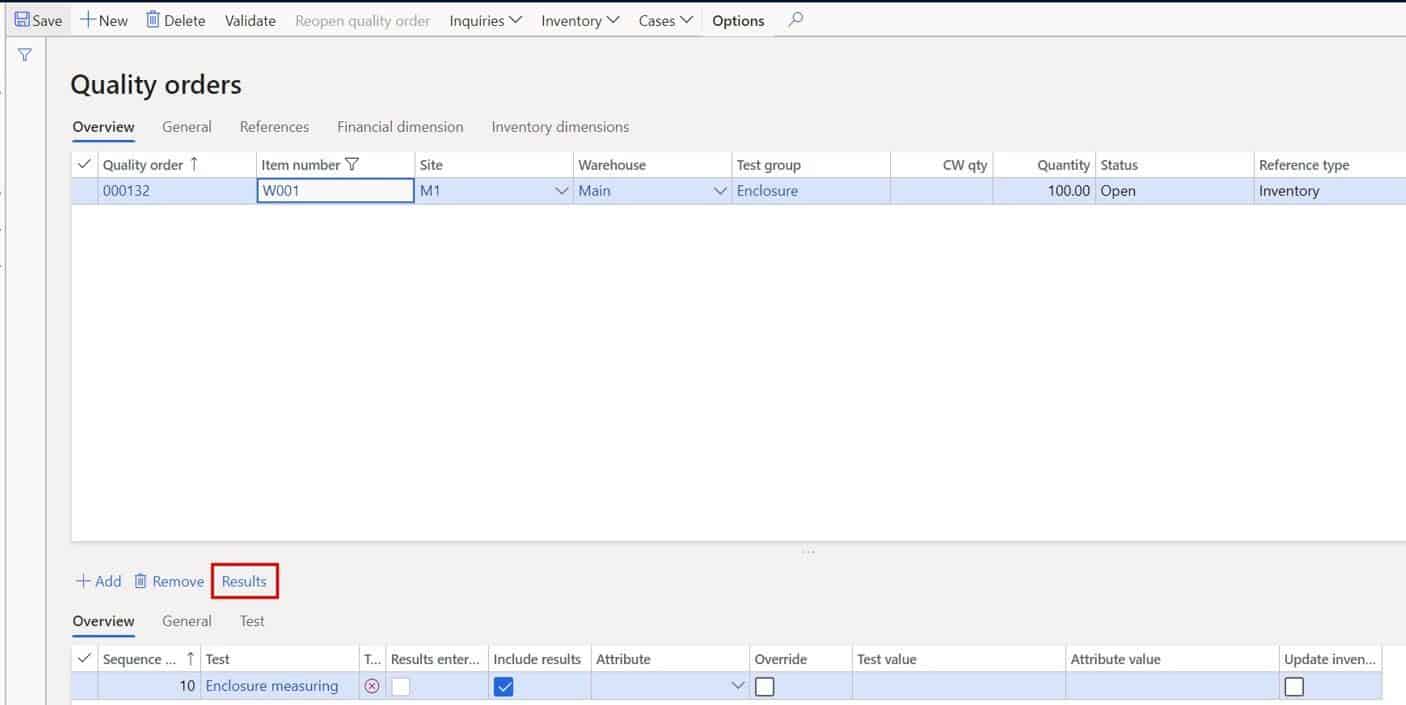
In the “Overview” section you can enter the results of the test by clicking the “Results” button.
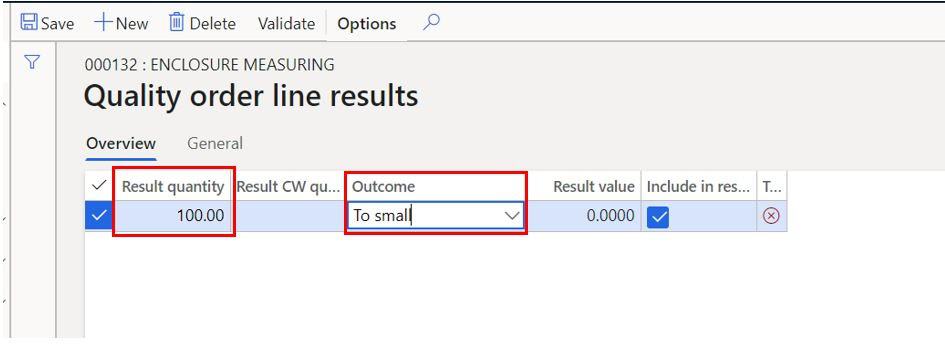
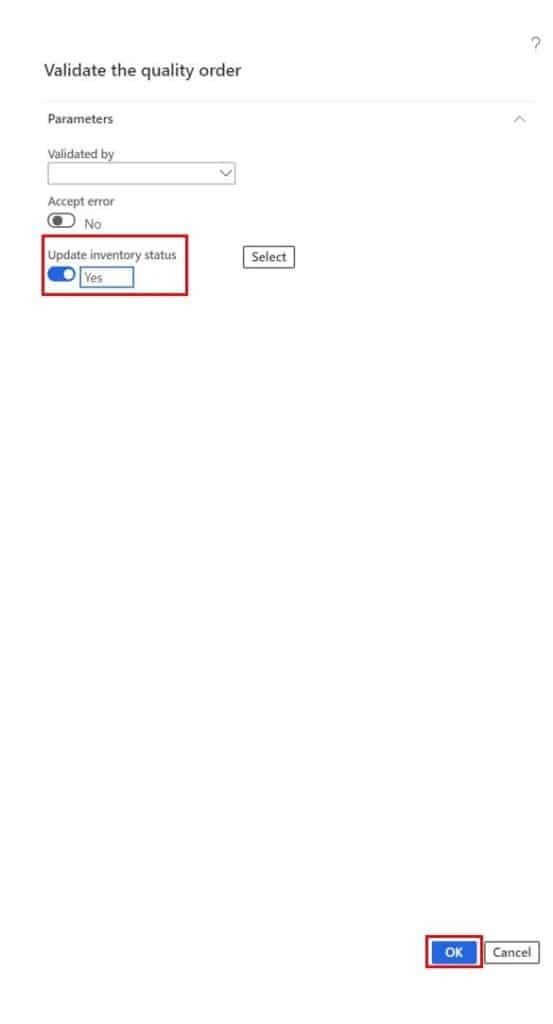
In the results quantity we will enter the quantity and outcome. In this case we are entering a failed outcome to illustrate the status change.
Next we will validate the quality order by clicking the “Validate” button. Here we can enable the “Update inventory status” slider and click “Ok”.
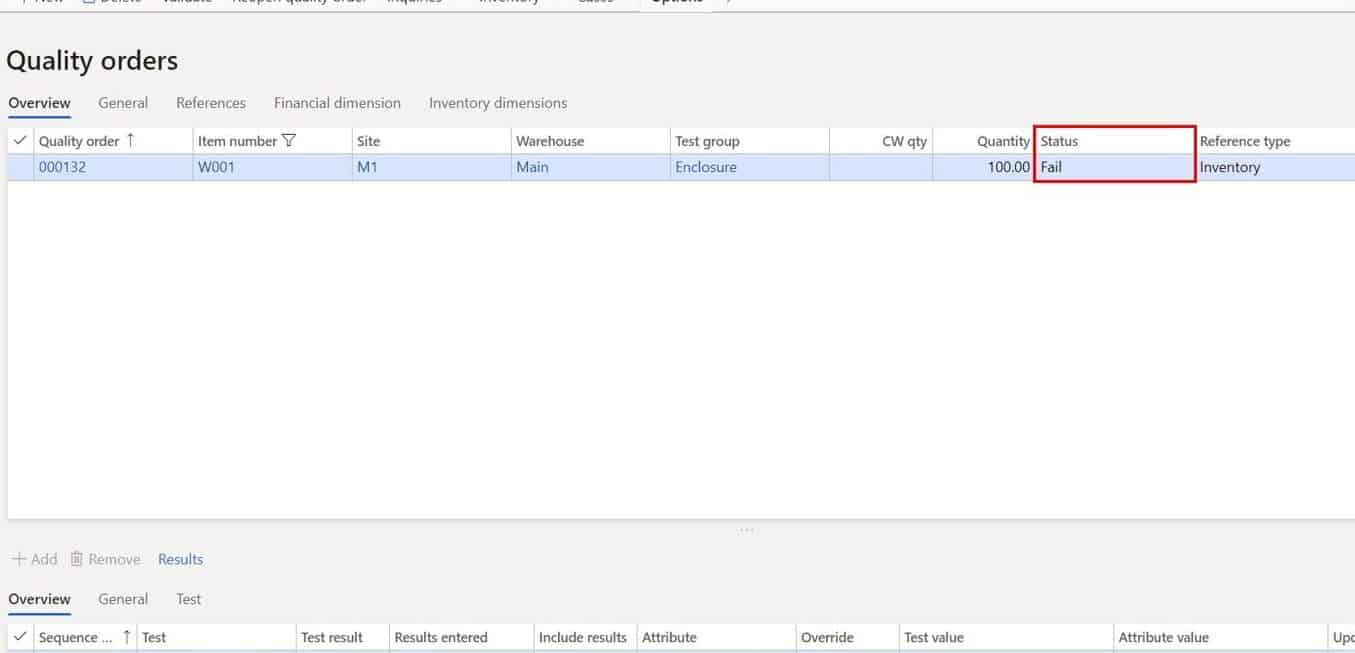
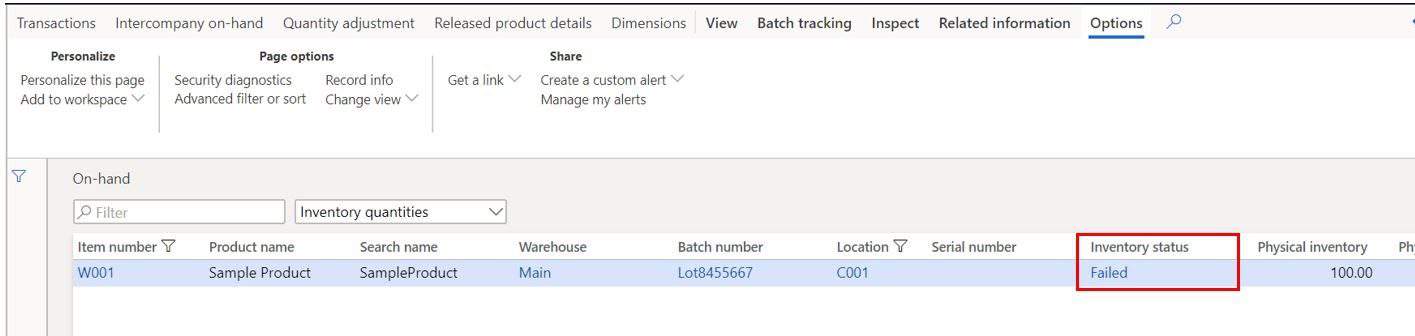
In this case you will notice that the quality order is failed, and the inventory status has changed to “Failed”.
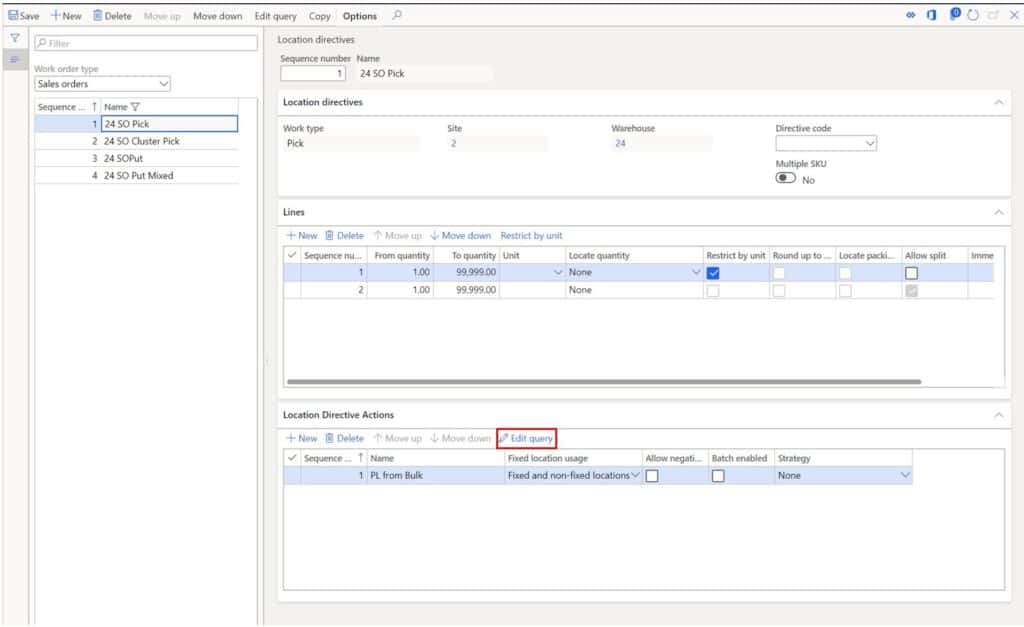
Location Directives
Location directives are the core of the warehouse management functionality in Dynamics 365 Finance and Operations. Location directives give us a way to configure the specific pick and put logic underpinning each warehouse process. The flexibility of the location directives allows us to filter which items we pick and where we put inventory. Inventory status can be employed in these queries to facilitate sophisticated warehouse business processes.
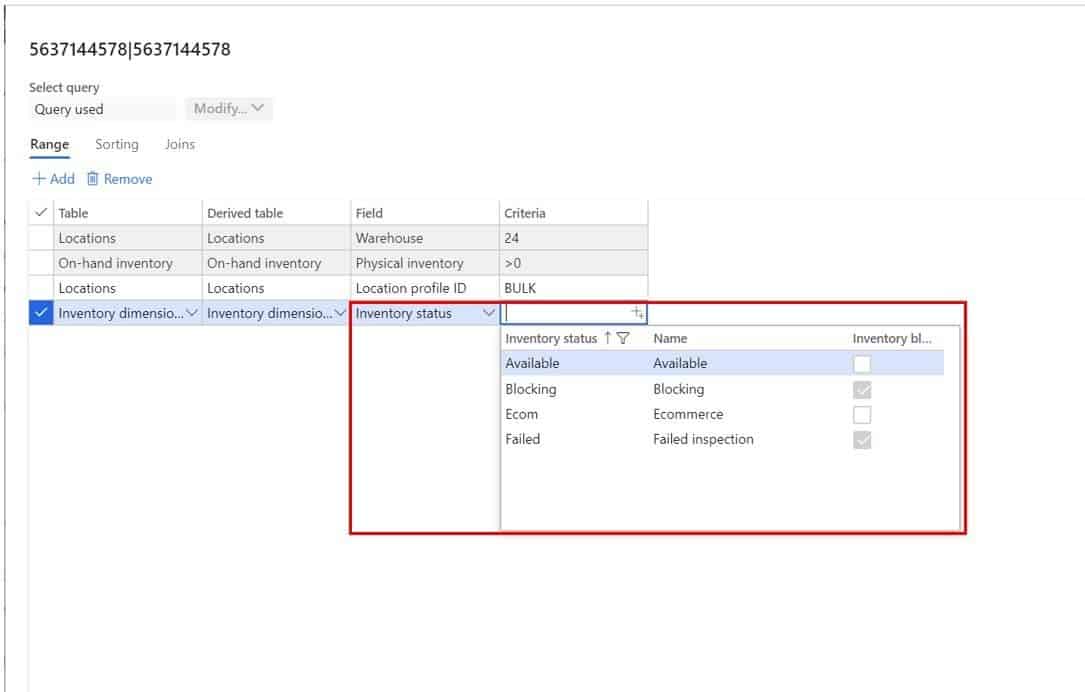
In the example below we can see a sales location directive for the sales picking process. If we click the “Edit query” button in the “Location directive actions” section, you can see that the pick work generated from this location directive will try to pick items that are in locations associated with the “BULK” location profile. We can further filter this query down to only select items with a specific inventory status. This gives us a way to only pick items that are for a specific purpose.
If you are looking for more information about how location directive work and how to set them up see my article called Location Directives and Work Templates: Explained.
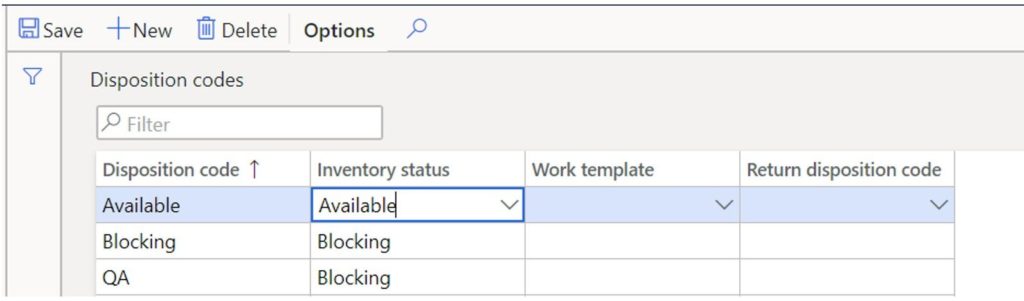
Disposition Codes
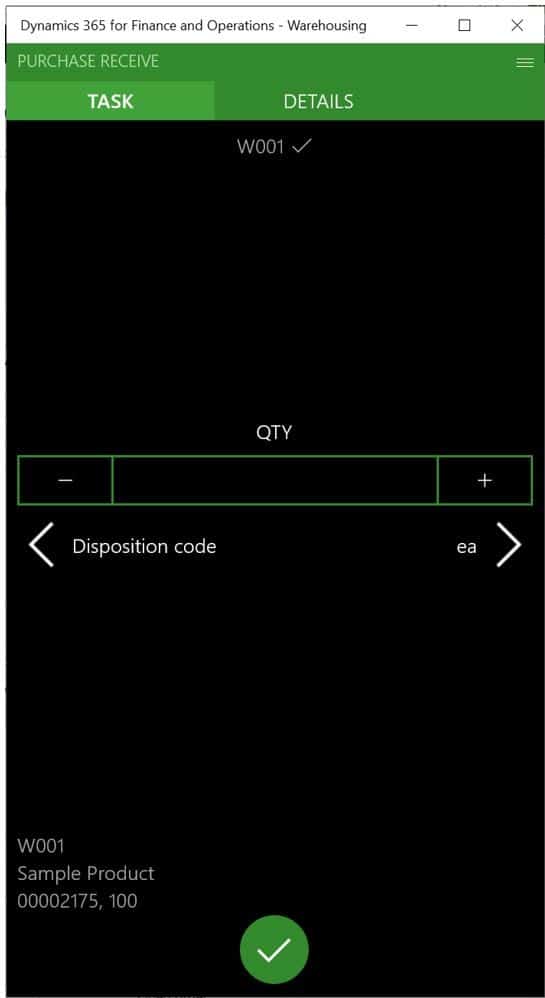
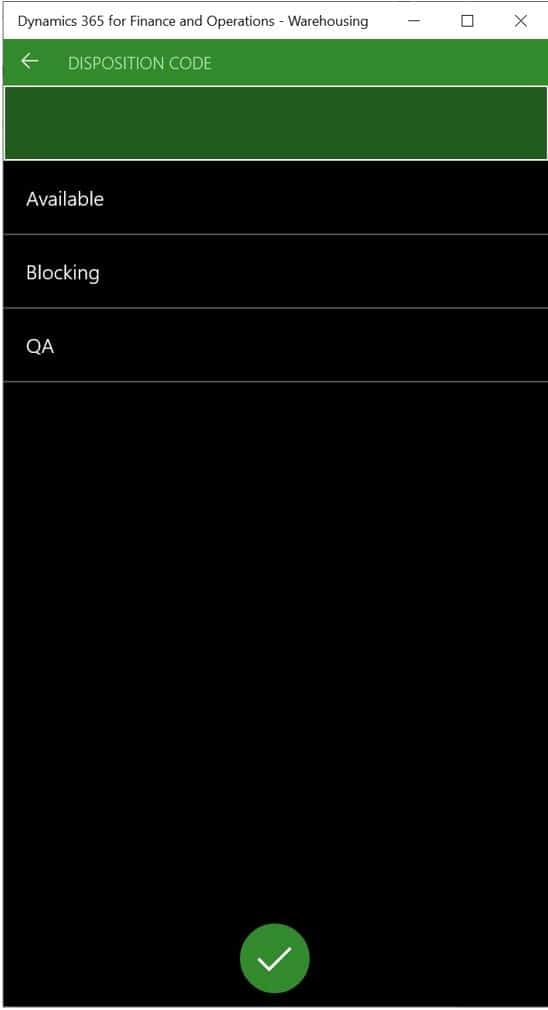
During the inbound process, whether that is RMA receipt, purchase order receipt, or even reporting a production order as finished, the warehouse mobile application for Dynamics 365 Finance and Operations allows us to specify a disposition code during the process. This can not only be used in location directives to trigger different location directives based on disposition, but it can also be used to set a specific inventory status based on a selected disposition.
Disposition codes can be set up in Warehouse management > Mobile device > Disposition codes.
Here you can see we can a disposition code with an inventory status associated with it.
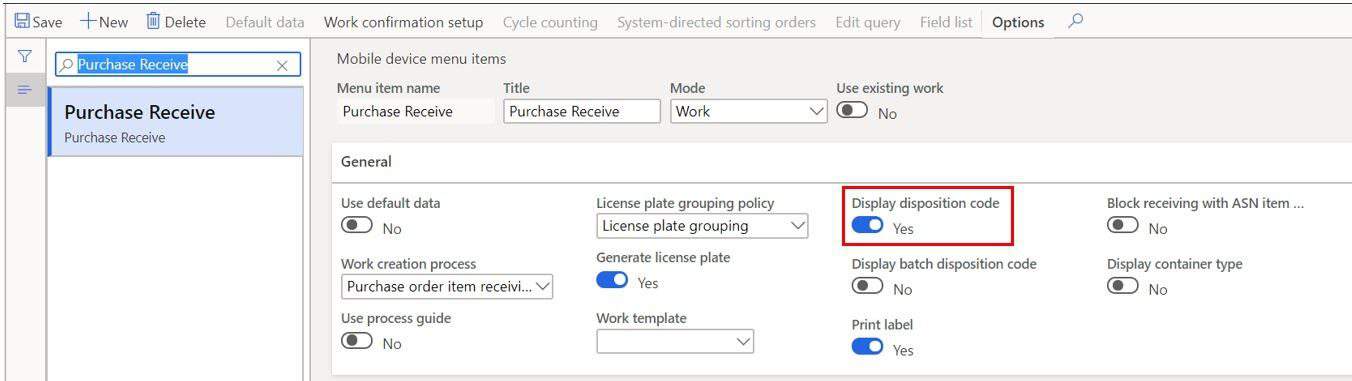
Then we can enable the disposition code to be used on the mobile device by going to Warehouse management > Mobile device > Mobile device menu items.
On the menu item you can enable the “Display disposition code” slider. This will make the disposition selection available on the WMS mobile application.
Default Item Status
With the default item status setup we can define default inventory status for specific customers and vendors when you add the item to a sales order or a purchase order.
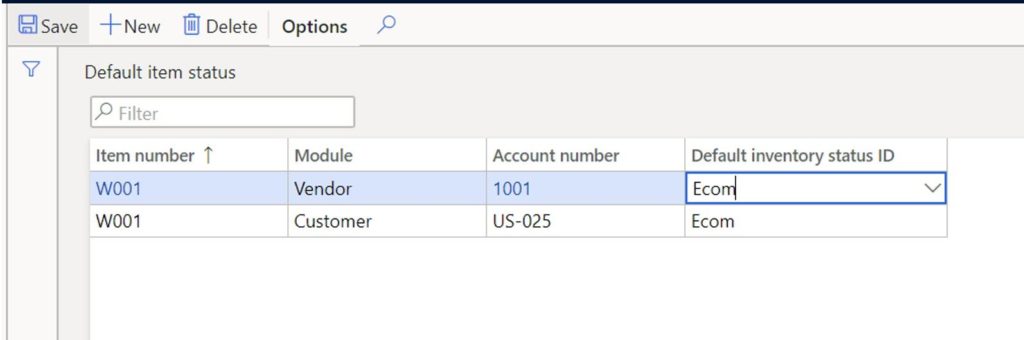
This functionality can be used to configure different warehouse processes based on a particular vendor or customer. For example, you may have a vendor where you never need to do quality checks and you just want to put the inventory away and for all other vendors you need to route the inventory to inspection.
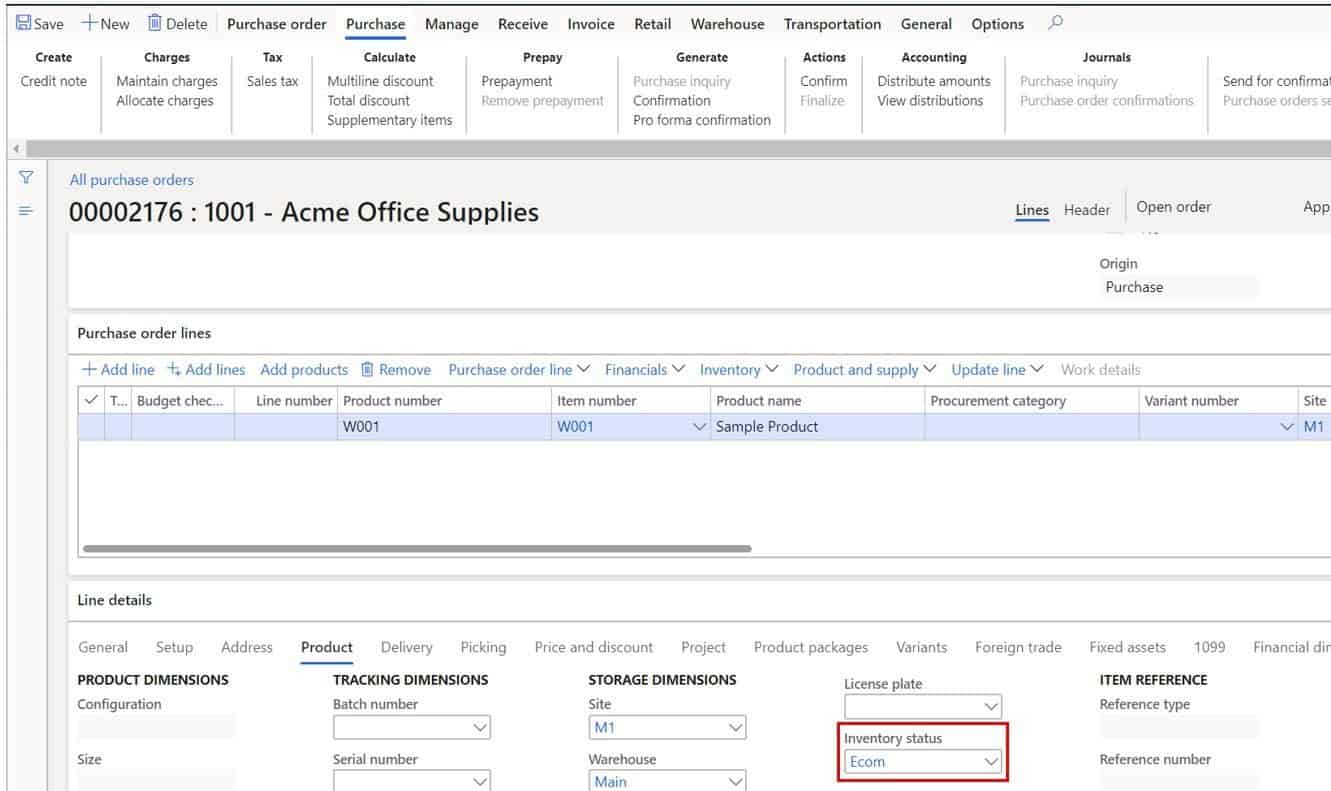
Below you can see that the purchase order we have created for the vendor we specified above in our default item status configuration has defaulted the “Ecom” inventory status on the purchase order line.
In the case of customers, you may have certain customers where you need to stage orders or take them to an inspection location prior to shipment. With default item status you can ensure that the correct inventory status is defaulted on the respective order.
Takeaways
I hope this article has illustrated the many uses of inventory status and its integration throughout the application. The examples shown in this article are not comprehensive there are many more ways inventory status could be creatively used, but I hope I have sparked your interest and have given you a good starting point.