
In Dynamics 365 Finance and Operations Location profiles control the behavior of locations in an advanced warehouse management enabled warehouse. Location profiles can also enforce certain warehouse rules like allowing mixed items, batches, and licenses plates. They can also be used in location directives to locate locations associated to certain profiles.
In this post we will go through the setup of location profiles and all of the different controls, behavioral components, and best practices related to location profiles.
Location Profile Setup
Location profiles are a prerequisite for setting up warehouse locations for advanced warehouse enabled locations. To create a location profile, navigate to Warehouse management > Setup > Warehouse > Location profiles.
Click the “New” button to create a new location profile record and enter the location profile ID and name. Next, we will go through each of the fields on the location profile form and discuss what each one does and some things you may need to know.
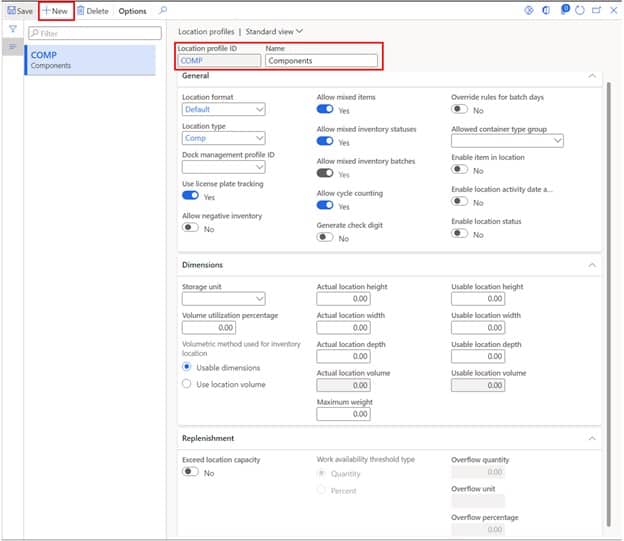
Location format – The location format field is used if you want to have the system generate locations based on a predefined format. Typically, in a real implementation this is not used because warehouse locations are already defined, and you would just import the existing locations into D365. So, what I usually do is create a location format called “Default” that I use on all my location profiles.
Location type – The location type field is self-explanatory, so I’ll skip to what this field is typically used for. Usually, this field is used in location directives to locate different types of locations. It is also used in things like the warehouse management parameters to identify a packing location, staging location, or final shipping location.
Dock management profile ID – Dock management profile allows you to ensure that items from the same shipment, load, order, wave, or work order type are not placed in the same staging location or shipping dock location. This is useful if you have out bound staging lanes that you need to be organized or grouped in a particular way. Location directives will respect the dock management profile when evaluating and creating the work to be executed.
Use license plate tracking – This determines whether or not the license plate inventory dimension is tracked at locations assigned to this location profile. If you are implementing advanced warehousing and not using license plates, there are still cases where you may need to enable license plates. For example, if you have a multi-step picking sales order picking process with a staging step the location where you stage the picked goods will need to be license plate controlled. Additionally, the receiving location and final shipping location must be license plate tracked. However, with recently released Microsoft features it is possible now to receive directly into a non-license plate controlled location using a combination of work policies and specifically configured mobile device menu items.
Allow negative inventory – This field should be used with extreme caution. When you use advanced warehouse management you typically never allow negative inventory. I’m sure there are valid reasons for using this functionality, but I have never seen this used in over a decade of implementing Dynamics AX/Finance and Operations. That said unless you have a very good reason leave this unchecked.
Allow mixed items – In some warehouses, certain product has a defined fixed location and there should never be more than one item in a location. If you select this option, the system will take this into account when evaluating location directives as well as manual movements. If you were to move product into a location with a different item and you had this option set, you would get an error.
Allow mixed inventory statuses – In some warehouses there may be areas in the warehouse where quarantined product is kept, or customer owned product is kept and needs to be physically segregated from other product. If you do not select this option, you will not be able to move product to locations where the status of the product you are moving is different than the product that is currently being stored there. This also means that you will not be able to change the inventory status of a portion of the quantity, for instance for a certain batch, in that location without first moving it to a different location.
Allow mixed inventory batches – In some cases product must be physically separated by batch when it is stored in a warehouse. If you do not select this option locations can only contain one batch.
Allow cycle counting – There are some locations in a warehouse like staging locations, quality locations, and receiving locations where we typically do not want to cycle count. Not selecting this option will prevent the system from creating cycle count work for locations that have this selected on the location profile.
Generate check digit – This field is supposed to control whether or not a check digit is generated when a location is created with this location profile however in my testing it does not work this way. If you need to generate a check digit you can click the “Generate check digit” button or have the “Generate check digits for location” checkbox checked when creating a new location. If you need to load check digits into the system, check out this post.
Override rules for batch days – On the warehouse management parameters the “Number of days to mix batches” parameter ensures that product cannot be put into a location that has a difference in expiration date greater than the number put into this field. However, on the location profile if you select the “Override rules for batch days” flag the system will ignore this parameter setting for locations associated to the location profile.
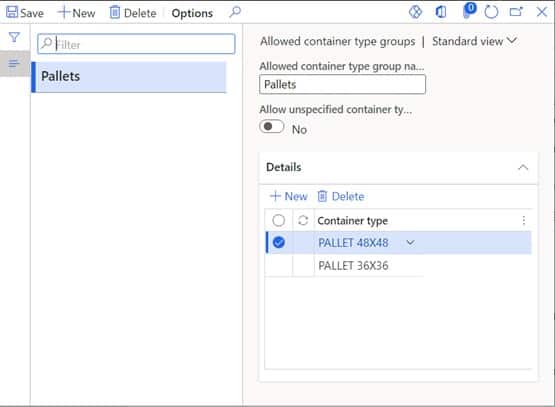
Allowed container type group – Here you can select an allowed container type group. This will ensure that only container types that are part of this group can be put in locations associated to the location profile. Container types are associated with license plates so when a license plate is directed to a location the system will evaluate the container type associated to the license plate and determine whether or not the license plate can go into that location. Below is an example of an “Allowed container type group” that contains different types of pallets.
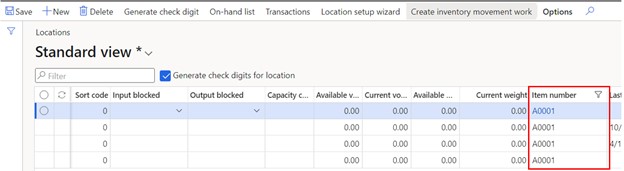
Enable item in location – If you enable this option the system will populate the “Item number” field on the warehouse locations form. This option is useful if you have single product locations and want to report on location utilization with product detail. If you have more than one product at a location this field will still be blank.
Enable location activity date and time – Selecting this option will enable the “Last activity date and time” field on the warehouse locations form. This date is a bit deceptive because it only updates on warehouse management related activity it does not update for all transactions. For example, if there is cycle count done on the location, it will count this activity but if there is a counting journal posted it will not count that as activity. So if you are looking at inventory transactions and trying to figure out why your last activity is different than the last inventory transaction date that is why.

Enable location status – If you select this option this will enable a field called location status. Location status has three values: “Empty”, “Picking”, or “Storage”. “Empty” just means there is no current inventory in the location. “Picking” means there is pick work completed against the location. “Storage” is a location with no pick work associated. Movement work does not factor into this designation.

Storage unit – This is the unit of measure for the volume calculation.
Volume utilization percentage – This indicates how much of the volume (usable or actual) should be utilized in location directive logic.
Volumetric method used for inventory location – There are two options here: “Usable dimension” and “Use location volume”. Depending on which option you chose you will need to fill in either the actual dimensions or the usable dimensions.
Actual location height, width, depth – If you choose the “Use location volume” option you will fill in these fields and then the system will use this data along with the product physical dimension data to determine if product can physically fit into the location.
Usable location height, width, depth – If you choose the “Usable dimension” option you will fill in these fields and then the system will use this data along with the product physical dimension data to determine if product can physically fit into the location.
Maximum weight – If locations associated with the location profile have a maximum weight you can define this and D365 will use weight associated with the product and evaluate that against the maximum weight for the location for advanced warehouse management directives.
Exceed location capacity – If you have a pick location that needs to be replenished throughout the day you can enable the location over capacity feature. This allows you to stack up replenishment and it makes the replenishment available when the location goes below a threshold. When you enable this flag, the other field on the form will become enabled.
Work availability threshold type – This determines if the threshold will be a quantity based threshold based on quantity and unit or a capacity percentage based on location volumetrics. Volumetrics are better suited to non-uniform pallets.
Overflow quantity – This is the quantity at which the replenishment work will become unblocked and available to be processed. If you use this option, make sure you populate the overflow unit.
Overflow unit – The overflow unit is used with the “Overflow quantity” setting to determine when the threshold is met which will unblock the replenishment work.
Overflow percentage – This is the capacity threshold calculated by the location volumetric. When the location capacity drops below this threshold the replenishment work will become unblocked.