
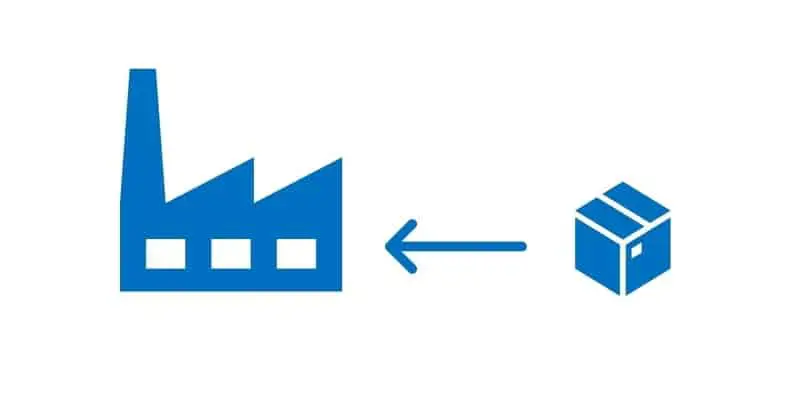
The return process is a core process in the order to cash cycle. In Dynamics 365 Finance and Operations, processing a return order can be very simple or configured to be more complex. In this post I will walk you through step by step how to process a return order in D365.
The return order process can be configured to have different steps during the return receipt into the warehouse depending on your unique business requirements. Some businesses will have a quality step and possibly remanufacturing or repair processes. In this article I am going to take you through a standard return order process following the flow outlined below.

I am demonstrating this return order process in a Contoso demo environment, so depending on the environment you are working in, there may be additional configurations required.
Create The Return Order
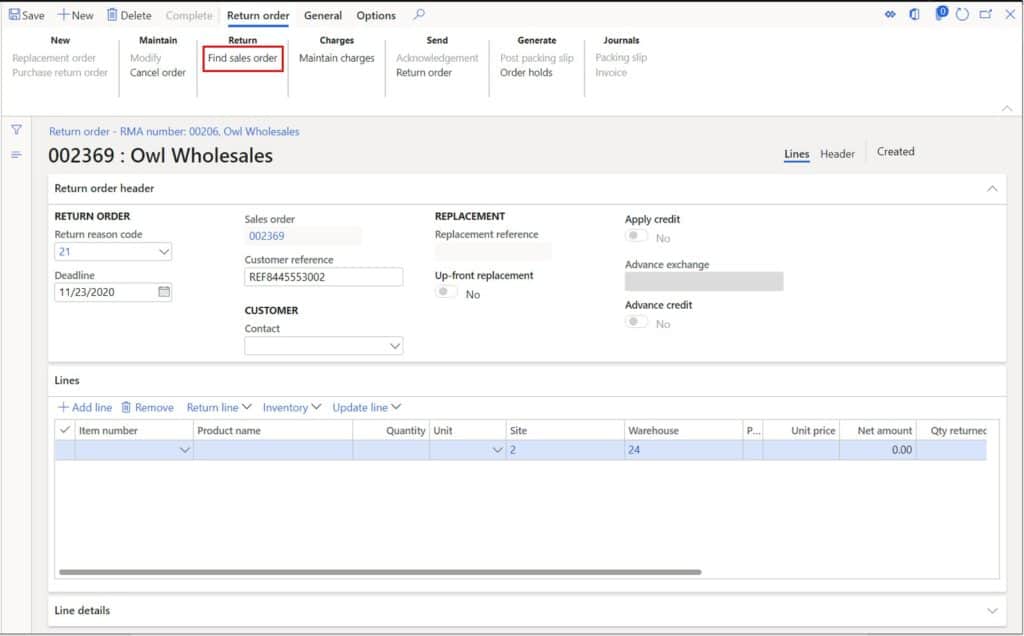
When the customer calls in and requests to return product, we can immediately create the return order by navigating to Sales and marketing > Sales returns > All return orders.
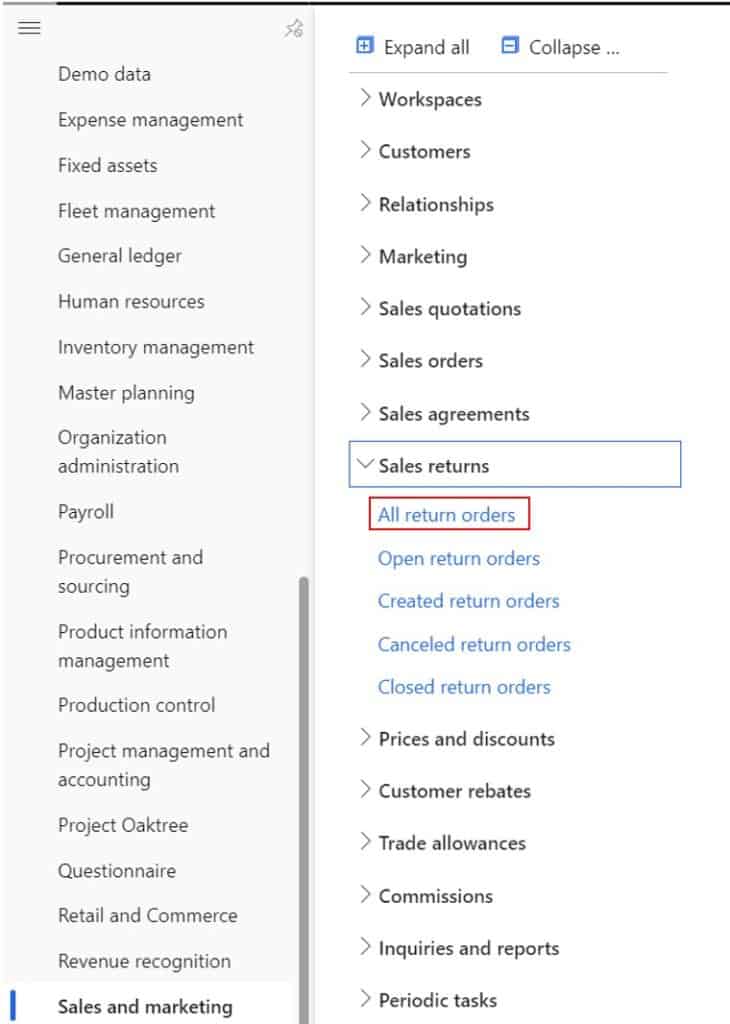
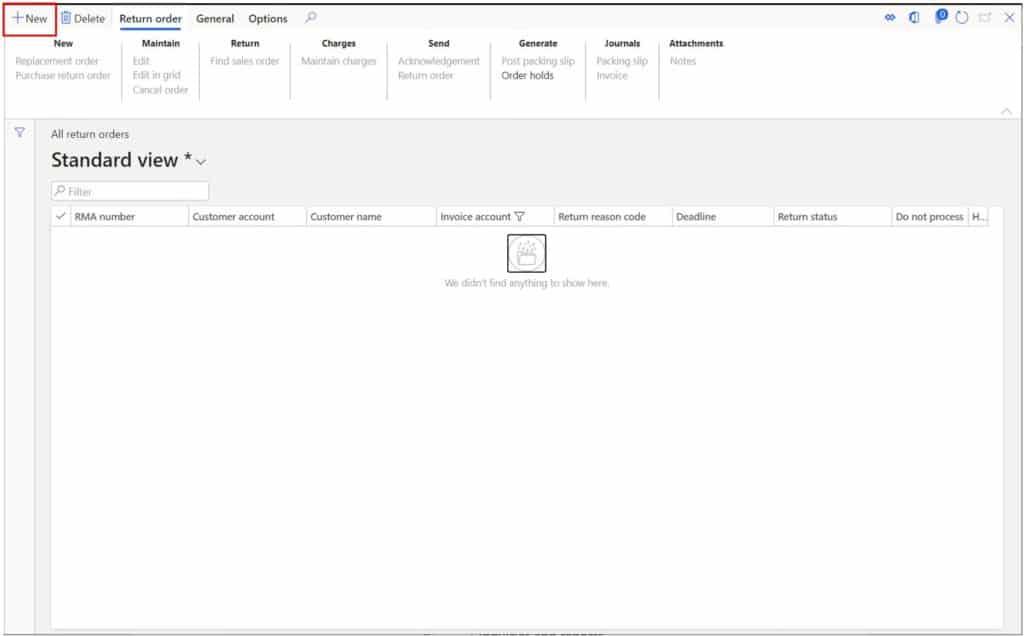
Click the “New” button in the top left corner of the form.
In the “Customer account” field select the customer that will be returning the product. If you know the name of the customer, you can start typing the customer name in the dropdown list and it will auto-filter the list for you.
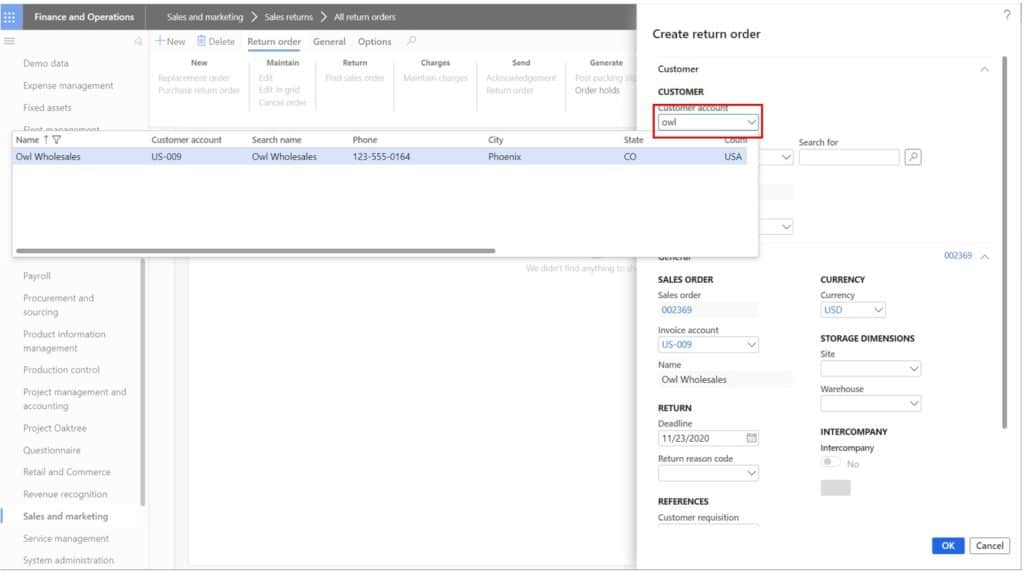
In the “General” section select the “Site” and “Warehouse” where the product will be returned. If the customer will always be ordering from and returning to the same site and warehouse you can default these fields by selecting them on the customer master record in the “Sales order defaults” fast tab.
You can additionally set the “Deadline” field which indicates the return deadline for the order. This date can be set to default to a specified number of days out into the future on the “Accounts receivable parameters” on the “General” tab of the parameter form, in the “Sales setup” tab.
The “Return reason code” field is used to indicate the reason for the return. In some cases, you may know this when the return order is created and in other cases you may not know the reason until you receive the product. This field can be left blank until you receive the product.
If the customer wants to add a reference or if you want to reference the original customer purchase order number, you can enter those in the “Customer reference” and “Customer requisition” fields respectively.
The RMA number can either be system generated or manually entered. Best practice is to let the system automatically generate the RMA using a configured number sequence. For more on number sequences in D365 see this post.
Click the “Ok” to create the return order.
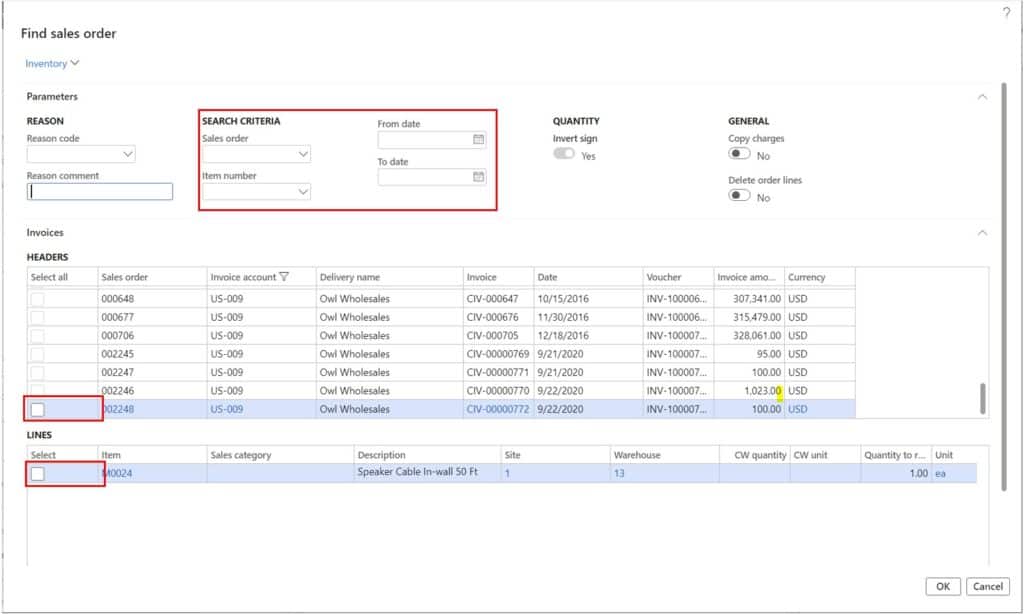
There are two options when creating the return order. The first is to use the “Find sales order” button to use a previously invoiced sales order to reference for the return.
The benefit of this is that there is a link between the original sales order and the return so if someone accidentally tried to create another return against the same order and same product for the quantity that has already been returned the system will prevent it.
Another benefit is that the product will be returned at the cost that it was issued at. The third benefit is that if the customer is returning a large order you can select an entire order to return instead of manually entering each line of the order.
The other option for creating a return order is to not reference an original sales order and just manually enter the return order.
If you choose to reference an existing sales order you can click the “Find sales order” button and select an order. The sales orders in the list are only invoiced sales orders so if you have shipped the order but not invoiced, it will not be in this list.
In the “Headers” section you are able to select the order by clicking the checkbox next to the order. This will select all the lines of the order. If the customer is only returning a few of the lines you can uncheck any of the lines not being returned.
At the top of the form you can also use the fields in the “Search criteria” section to filter for specific orders, items, order date ranges. When you have selected the sales order to reference for the return and the lines being returned click the “Ok” button. This will automatically transfer the lines to the return order.
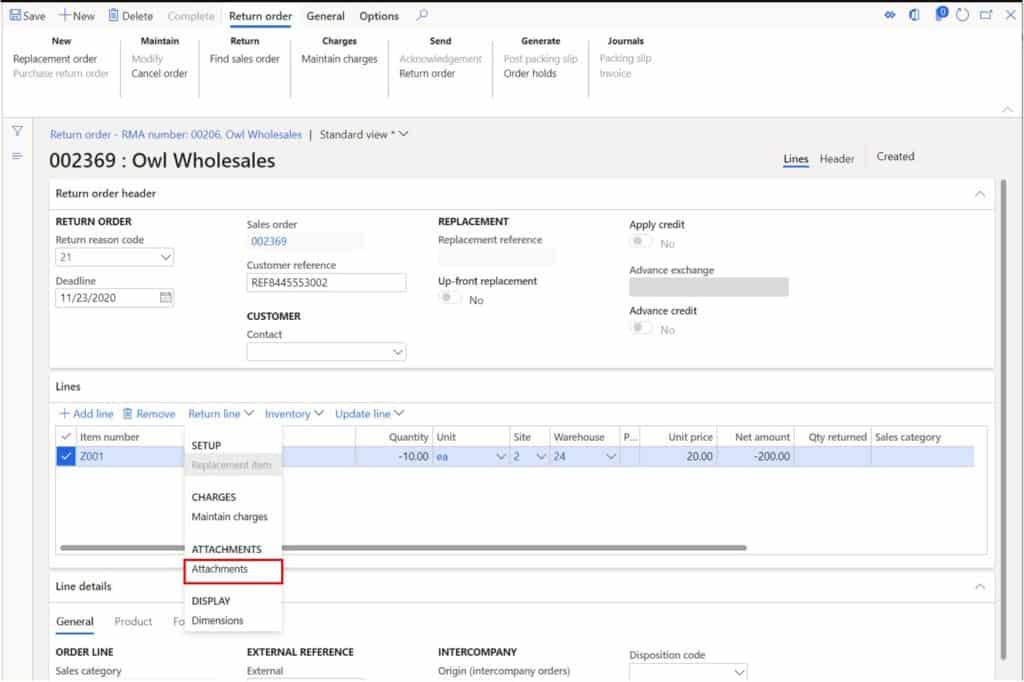
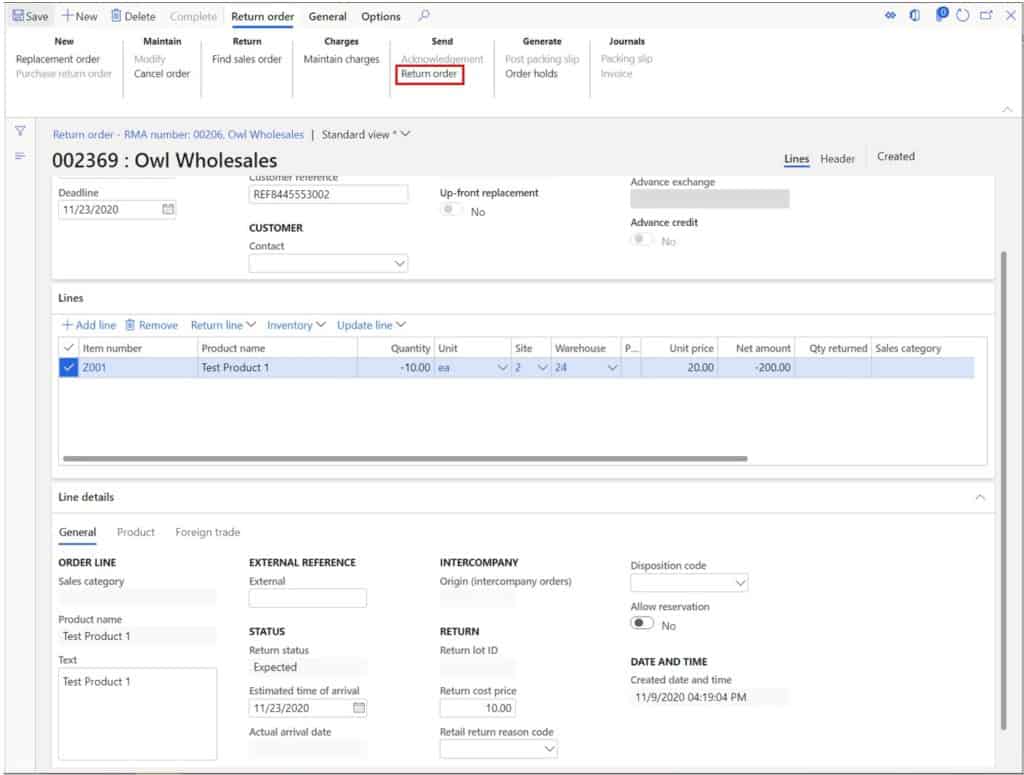
For this example, I will create the return order lines manually. In the “Item number” field, select the item that is being returned, in the “Quantity” field enter the quantity that is being returned and keep in mind the quantity must be negative.
The “Unit price” will default from either the trade agreement or the base sales price if there is no trade agreement. This will calculate the net amount for the line.
The “Return cost price” is the cost that the item will be returned at. Depending on the costing method used this may be different but if the original sales order is not referenced the current average cost, running average, or standard cost, will be used.

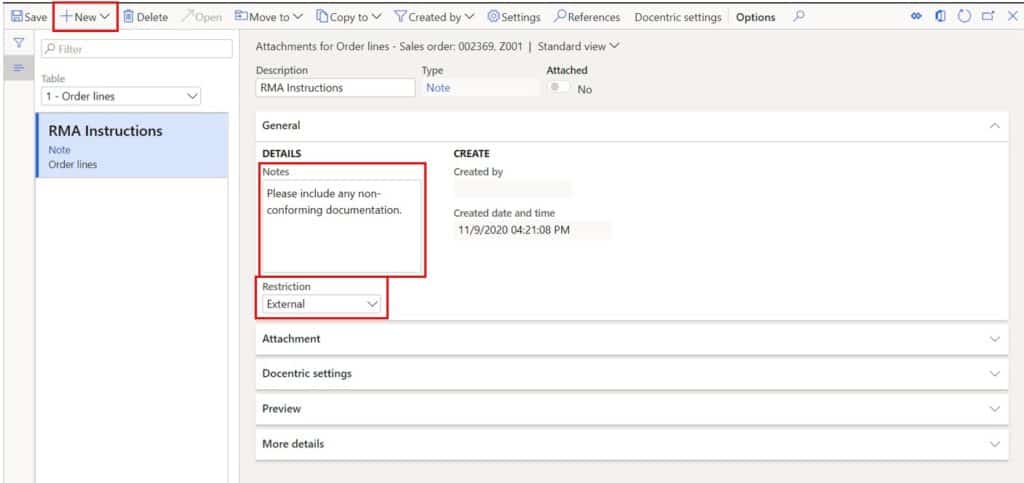
There may be cases where you need to attach a note with instructions regarding the return for specific items. You can do this by clicking the “Return line” dropdown in the “Lines” section of the return order and click the “Attachment” button.
Click the “New” button and select the “Note” option. In the “Description” field you can give the note a title. In the “Notes” field enter the note you want to print on the RMA printout. If you want the notes to be printed on the RMA set the “Restriction” to “External”. Close the form to save the note.
Print The Return Materials Authorization
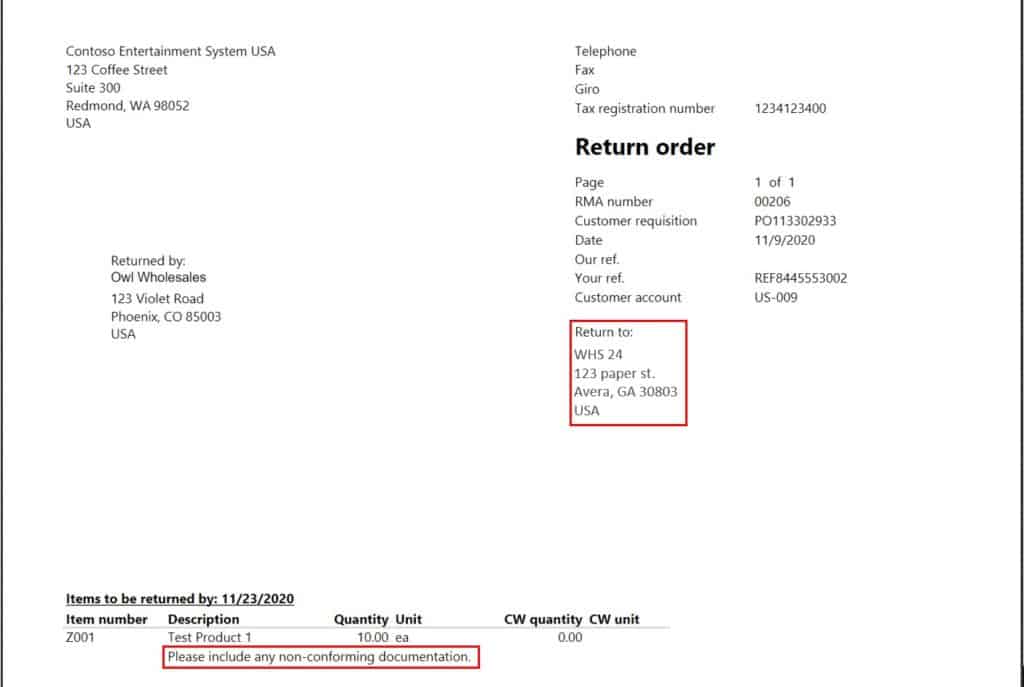
Now that the return order had been entered, we can send the returned materials authorization (RMA) printout to the customer with our instructions we entered in the note. Click the “Return order” button.
Select the “Print notes” option and click the “Ok” button to print the RMA.

As you can see the RMA has printed with the note that we entered with the relevant return information.
Receive The Returned Material
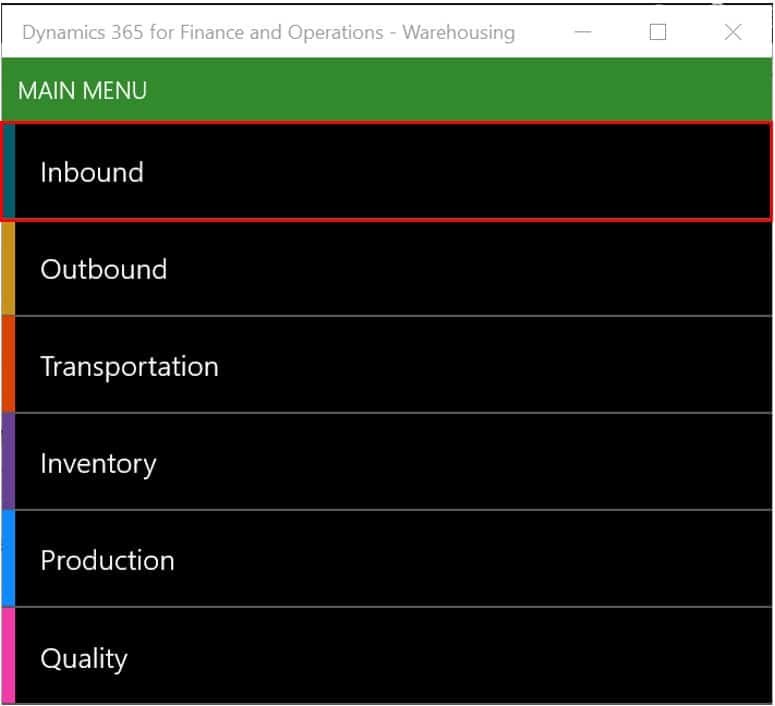
When the returned product shows up at the warehouse dock it will be time to physically register the receipt of that product. If you are using the advanced warehousing functionality with Dynamics 365 Finance and Operations, you can use the warehouse mobile application that runs on a handheld scanner to receive the product.
The warehouse mobile application menu structure is configurable so your mobile device menu may look different than mine. Open the warehouse mobile application and select the inbound menu.
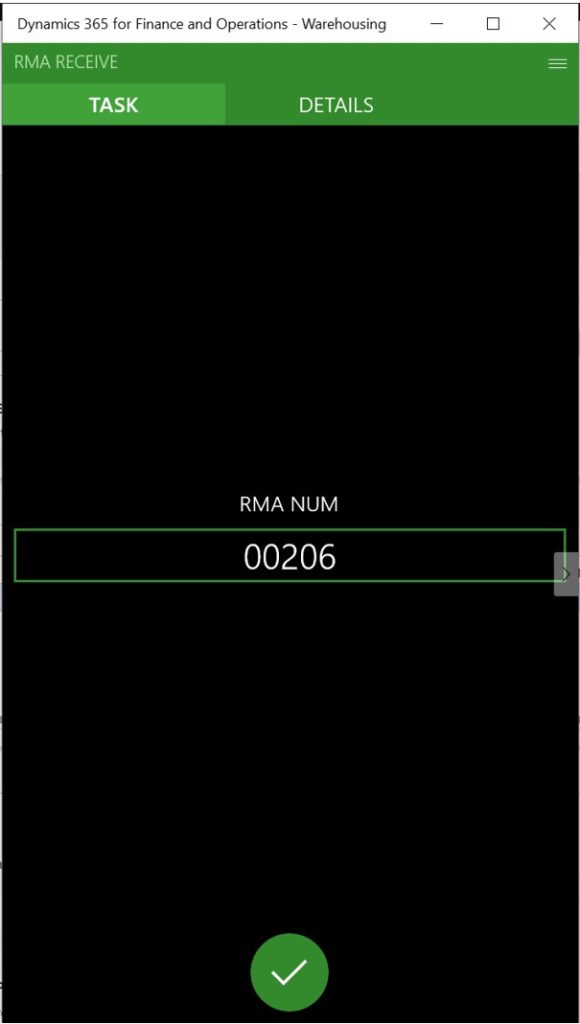
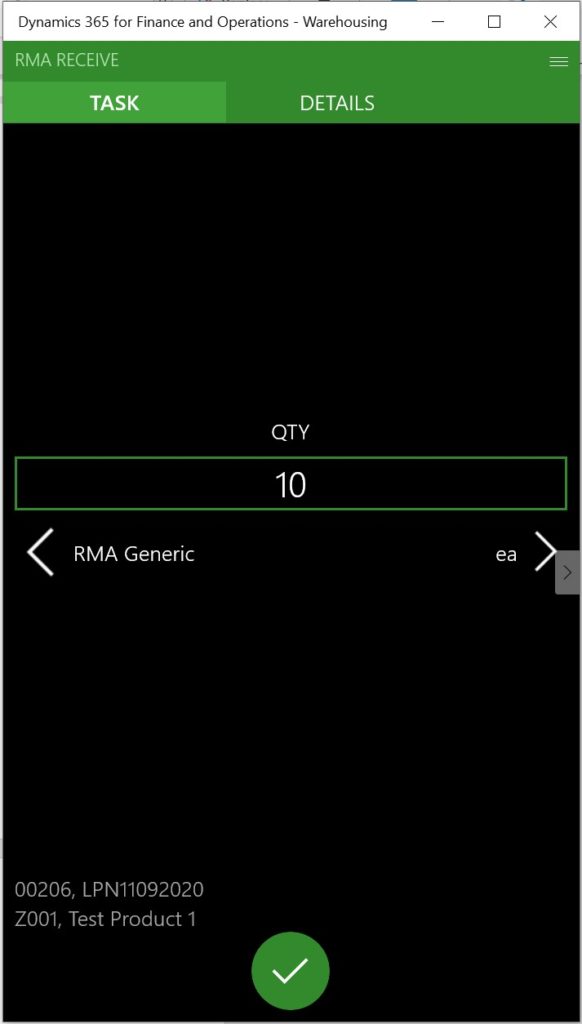
Click the “RMA Receive” menu.
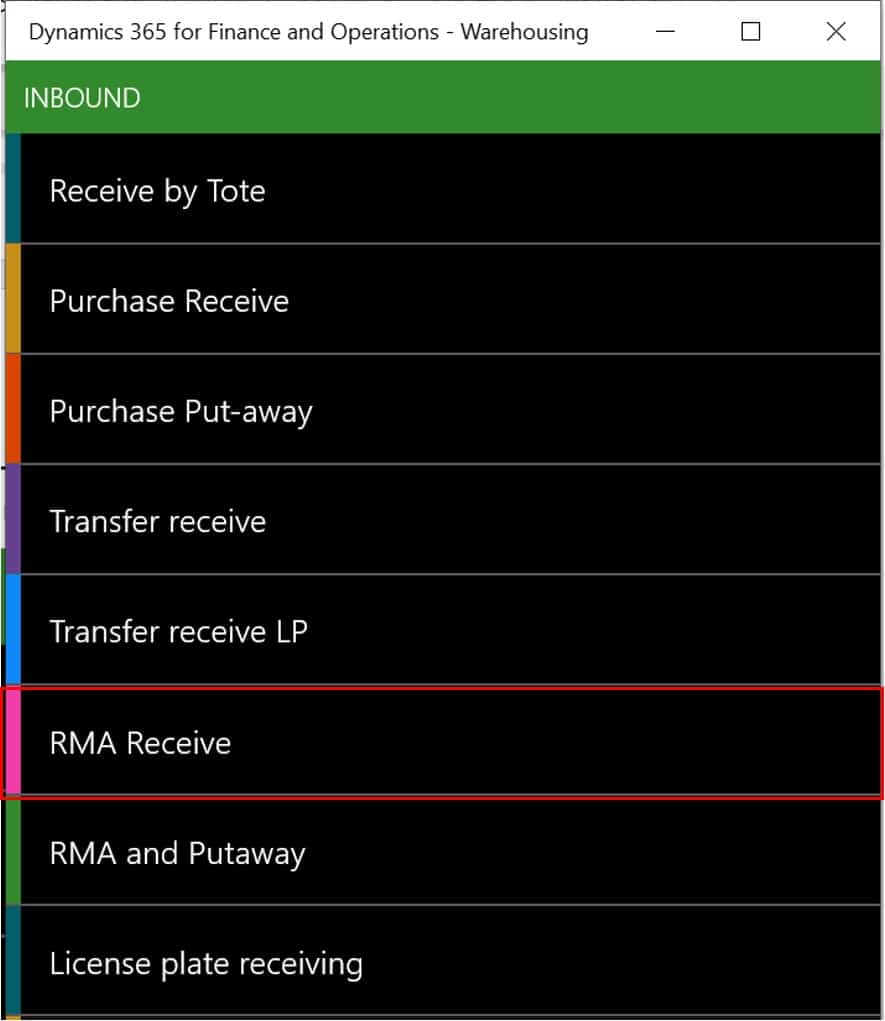
Here you will need to scan or type in the RMA number. For some clients I have added a barcode to the RMA printout that has this RMA embedded so the warehouse folks do not need to manually type it in.
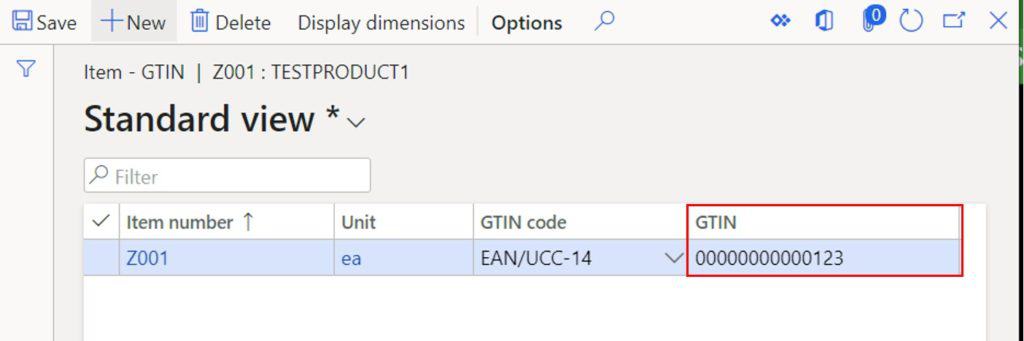
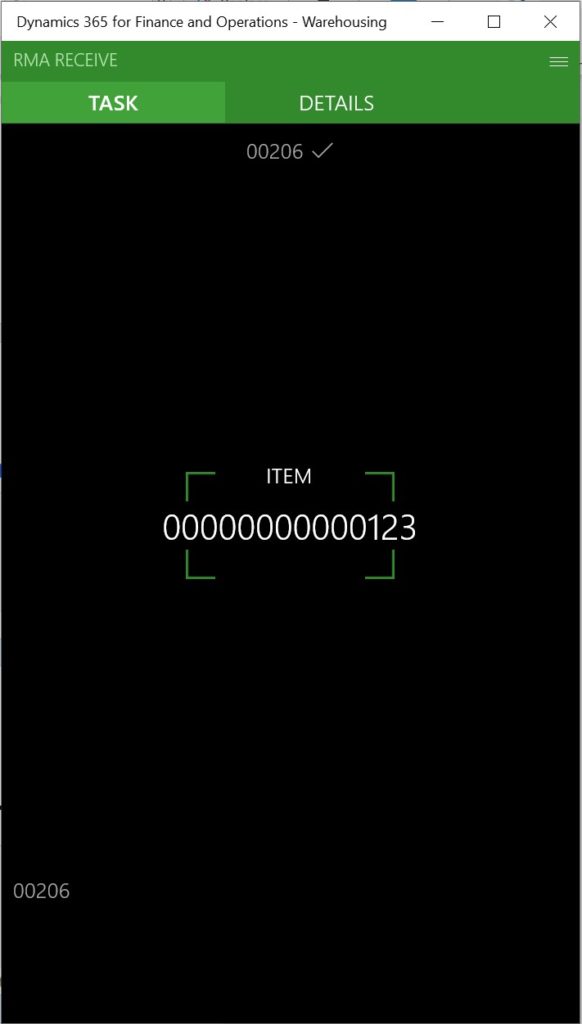
Next, we need to scan the item. Typically, the user will scan a barcode of some type whether that is a GTIN, UPC, or some other type of barcode. In this case I have set up a dummy GTIN number to scan.
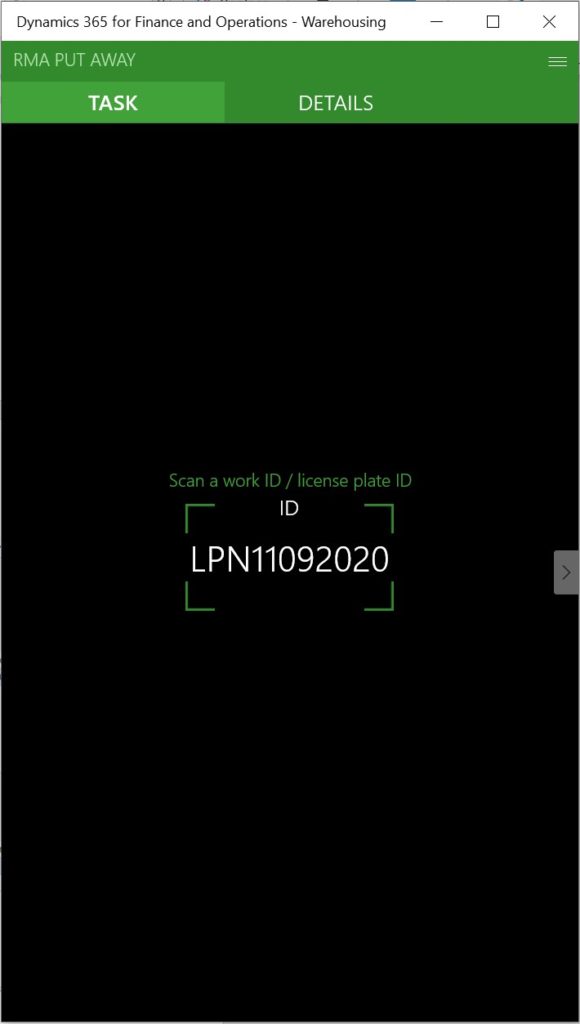
Next, we need to identify the license plate. If you are not using license plate tracking within the warehouse you can rescan the RMA number to act as a license plate. If you are using license plates scan the container license plate or pallet license plate.

Disposition And Put Away Material
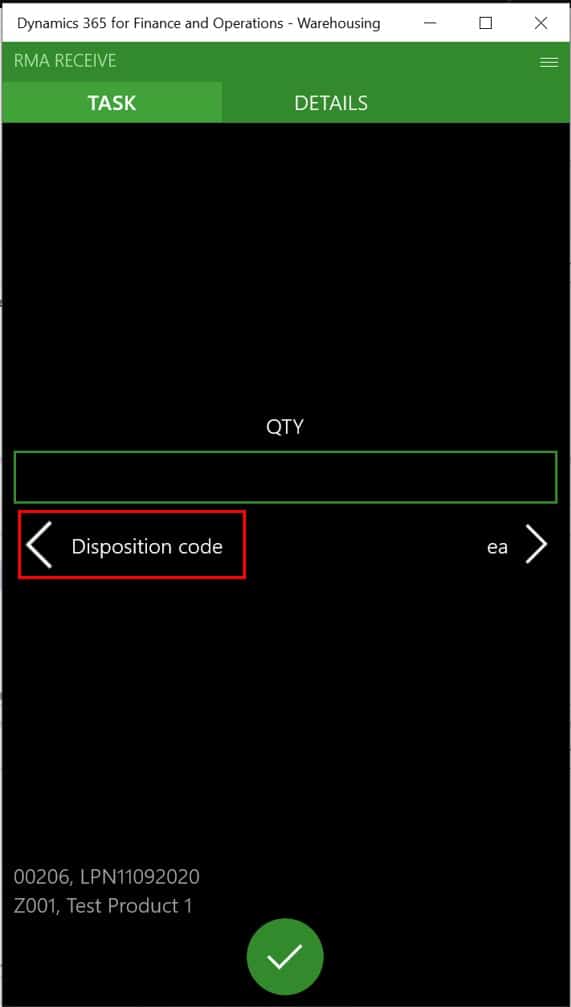
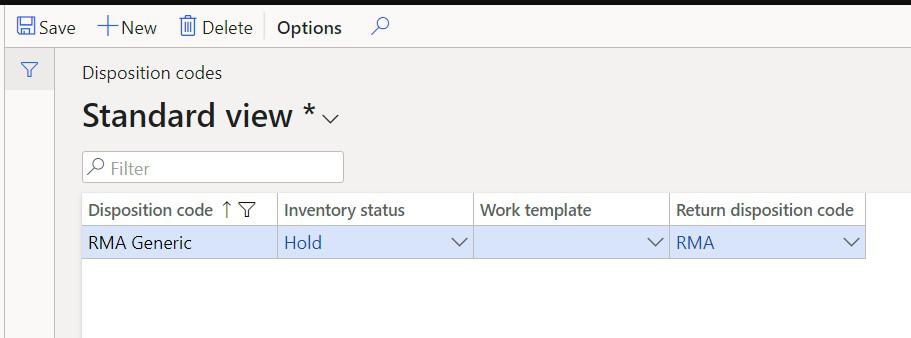
The next step in the process is to disposition the material. There are some cases where the material can be easily dispositioned by the warehouse receiving clerk and other cases where the warehouse receiving clerk may not be able to make that determination without an inspection of some sort. Click the “Disposition code” button to select a disposition code.
The next step in the process is to disposition the material. There are some cases where the material can be easily dispositioned by the warehouse receiving clerk and other cases where the warehouse receiving clerk may not be able to make that determination without an inspection of some sort. Click the “Disposition code” button to select a disposition code.
Here you can select a disposition code. For cases where the warehouse receiving clerk is not able to make the determination you can set up a generic RMA disposition that is nondescript. Additionally, the disposition code can be linked with a specific inventory status, or work template which means you could have a different inbound process or status depending on the disposition code selected by the user.
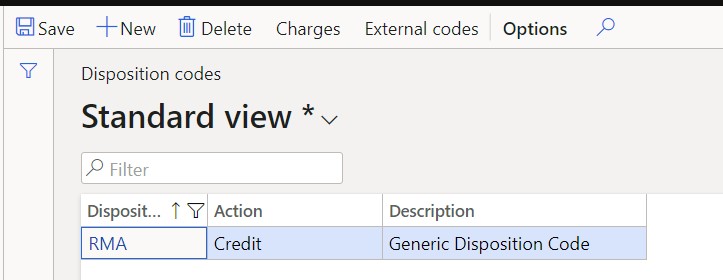
The disposition codes are related to return disposition codes which have different “Actions”. The actions determine what D365 does with the returned product and return order.
- Credit – This the most often used for returns. This will simply let you receive the product and then once invoiced, credit the customer account. This is the option most commonly used with advanced warehouse processes.
- Credit only – This is used when the customer is not going to bother with returning the product. This will eliminate the need to receive the product.
- Scrap – This will allow you to receive the order but immediately scraps the product. This option is not used very often because most businesses have some sort of process and movement to a location in the warehouse before it is scrapped.
- Replace and credit – This is similar to the “Credit” option except it will also create a replacement order automatically.
- Replace and scrap – This is similar to the “Scrap” option except it will also create a replacement order automatically.
- Return to customer – This option will automatically create a positive line on a return order that represents the shipment back to the customer.
Now that we have dispositioned the product, we need to enter the quantity we have received back from the customer.
Next, since this is a batch tracked product, I will scan the batch number associated with the product. The batch number will need to exist in D365 before you scan it or you will receive and error.
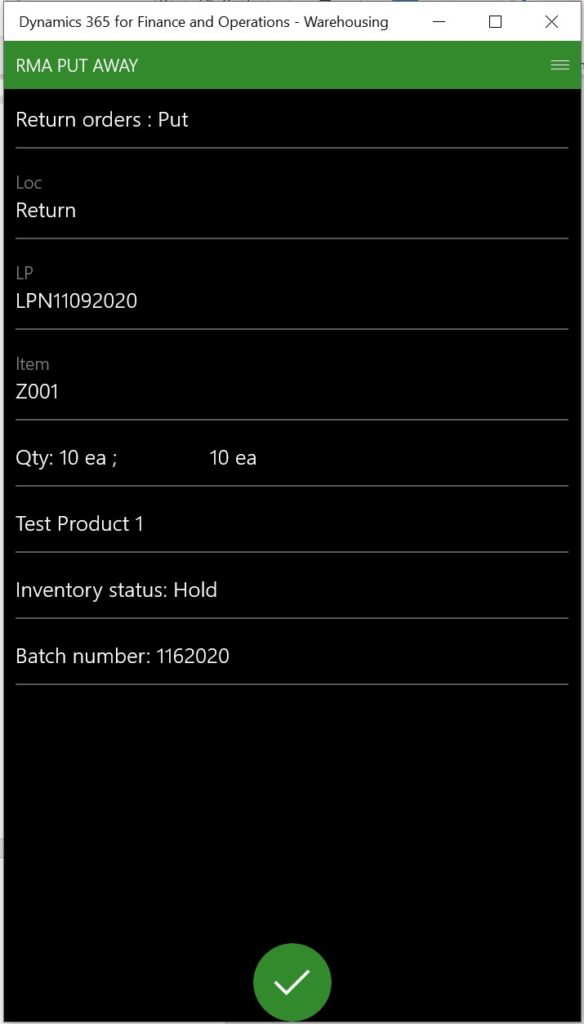
After you confirm the batch number this will complete the registration process. In the background there has been work created for a user to go and put this product away to a return location. This process is highly configurable using the location directives and work templates.
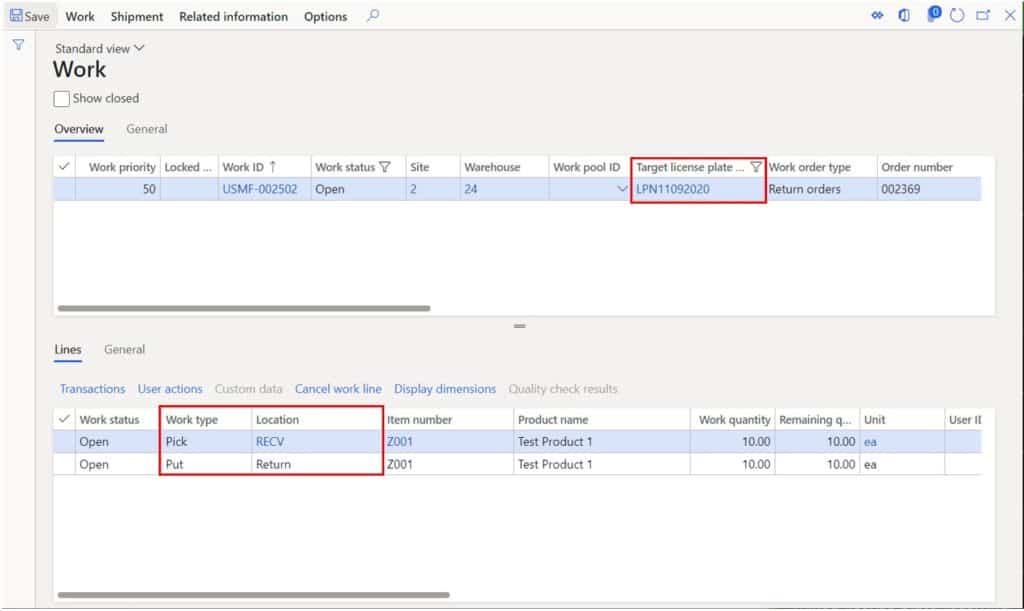
To process the put away work the user walks up to the product sitting on the receiving dock and scans the license plate assigned to that product.
Now the warehouse mobile application will direct the user to pick the product from the receiving dock (RECV). Additionally, you can configure the mobile device to require scan confirmations for the location, product, and quantity in these pick and put steps.
Now the warehouse mobile application directs the user to put the product in the “Return” location.
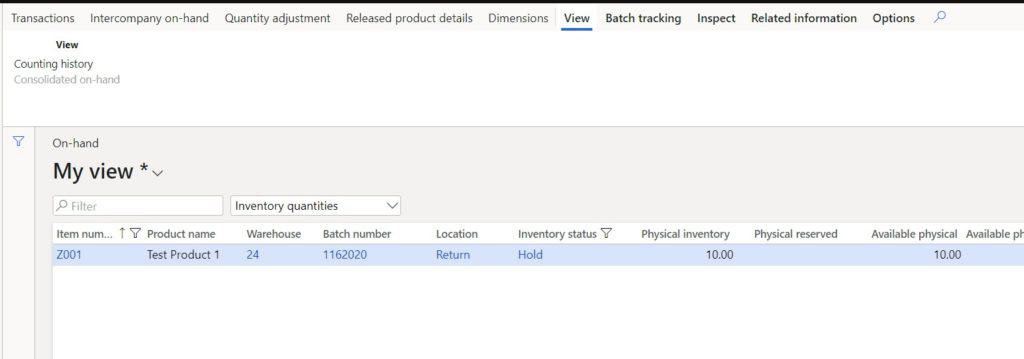
Now if we check on-hand inventory for this product we can see that we have the 10 quantity in the return location and the inventory status has been automatically set to “Hold” because that was the inventory status associated with the disposition code I chose during receipt.
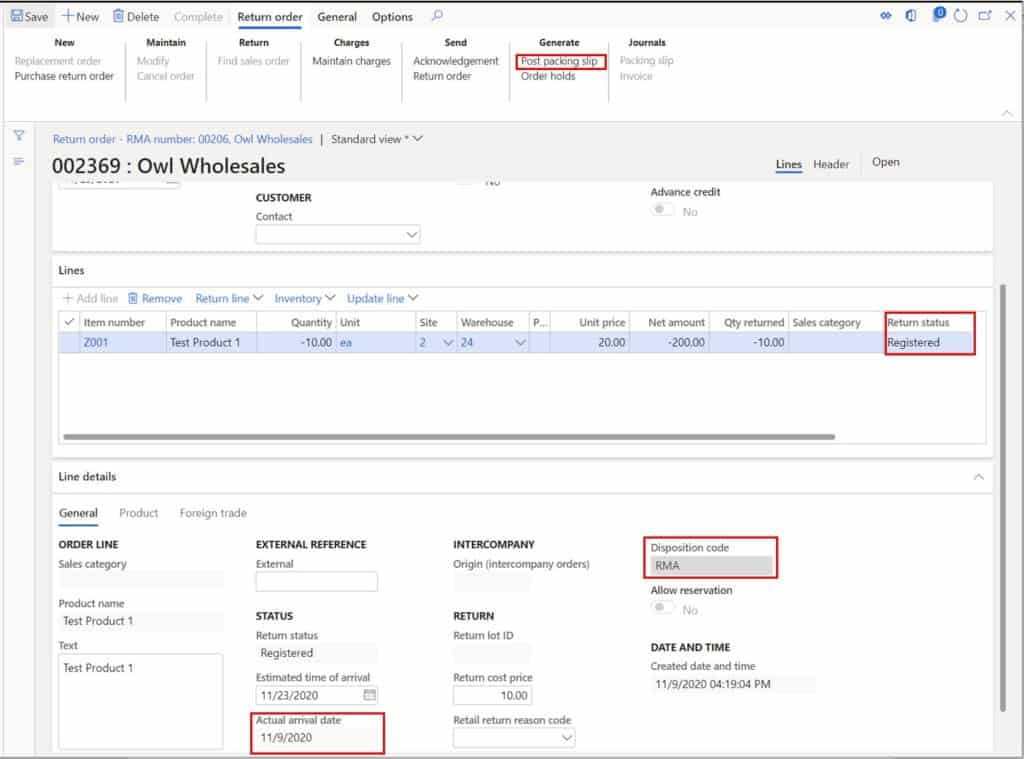
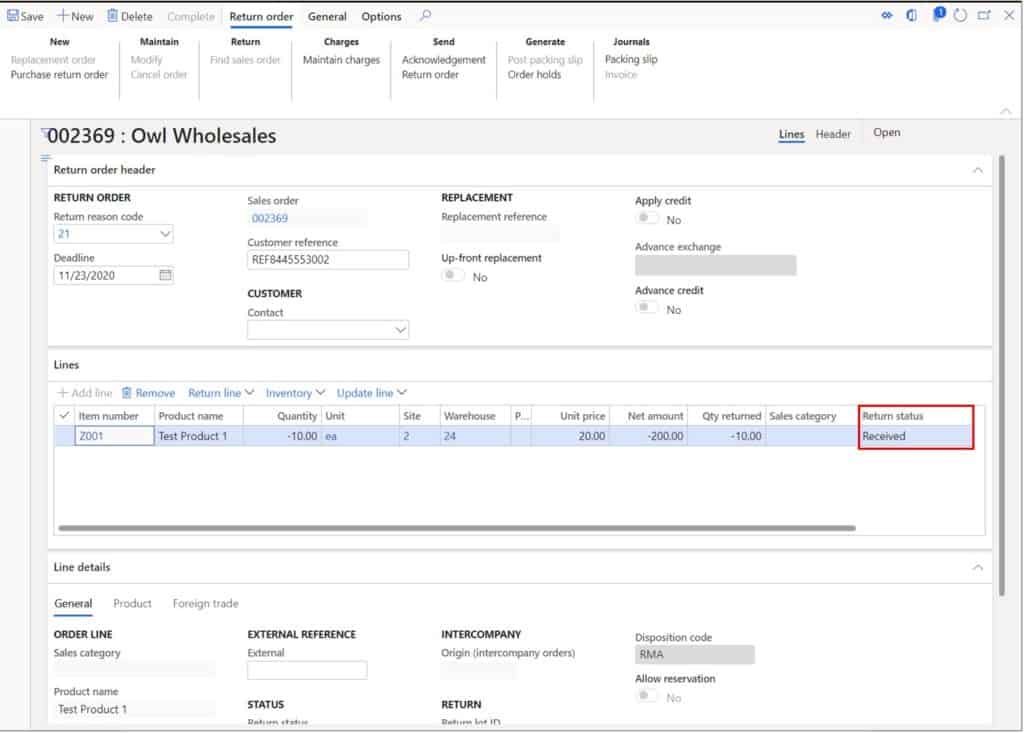
If you go back to the return order you will see a few things have updated. The “Return status” is now set to “Registered”, the “Disposition code” field is set to “RMA” and the “Actual arrival date” is set to the date that we received the product into the warehouse.
The next step is the finalize the receipt by clicking “Post packing slip”. Although the terminology is a bit confusing this is actually more of a product receipt similar to a purchase order product receipt.
If you would like to print the packing slip (product receipt) select the “Print packing slip” option and click “Ok”.
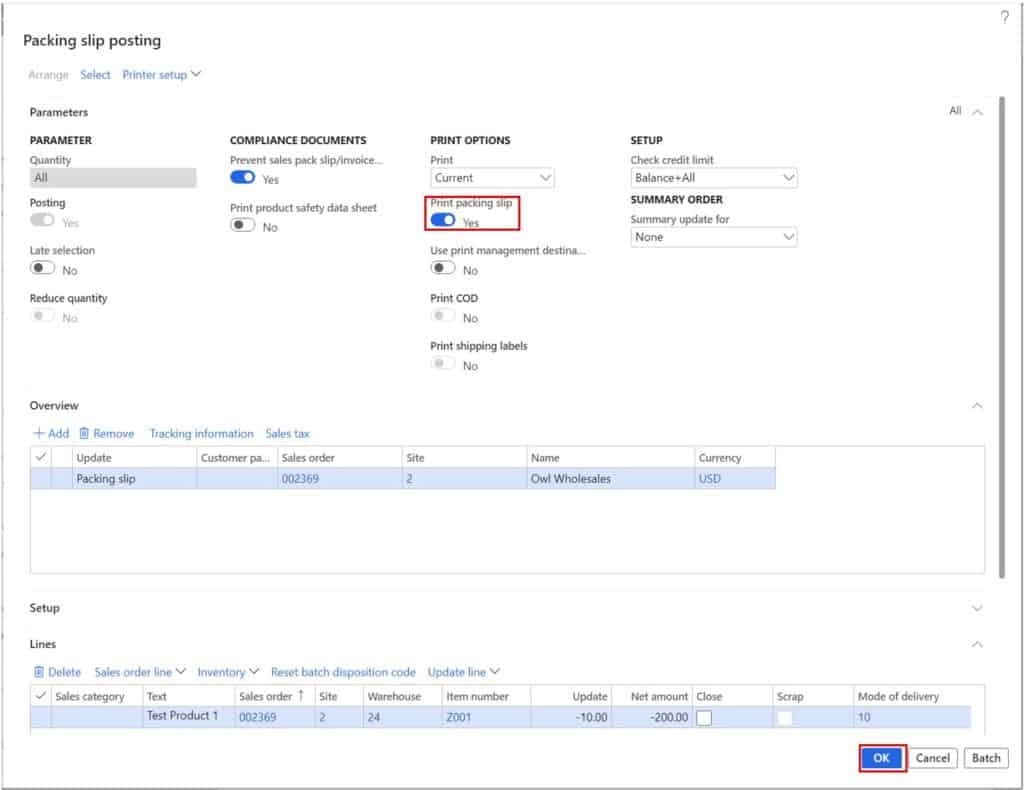
This will update the order to received status.
Post Customer Credit
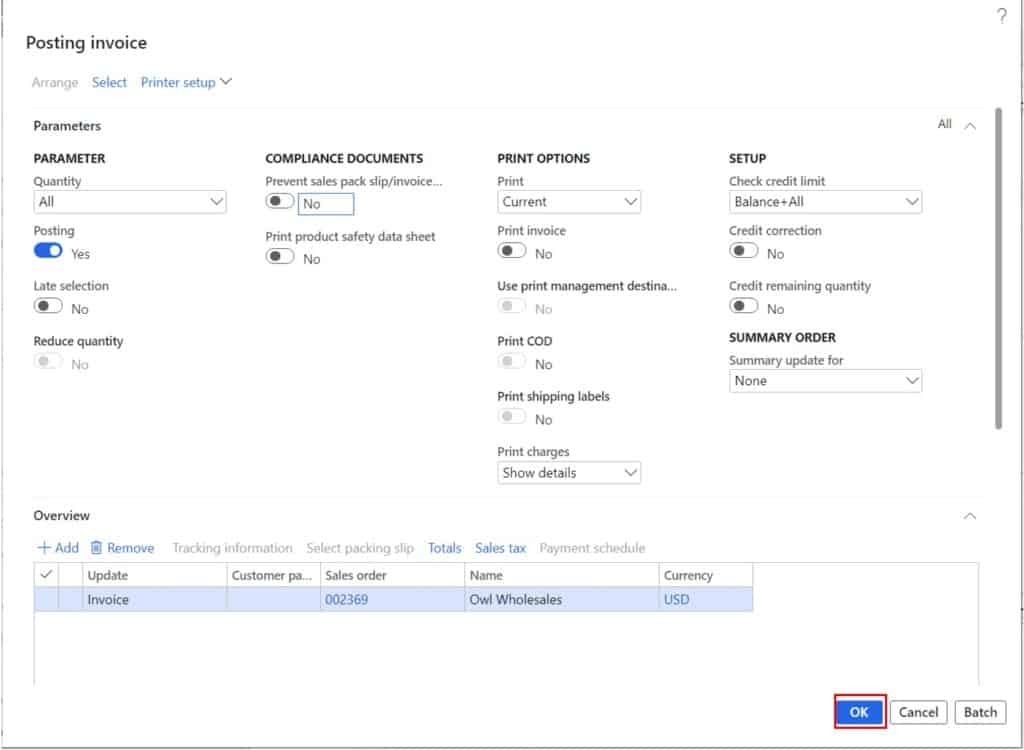
The next step is to invoice the return order which is the same process as invoicing any other normal sales order. This is because a return order is really just a sales order of type “Returned order” from the system perspective.
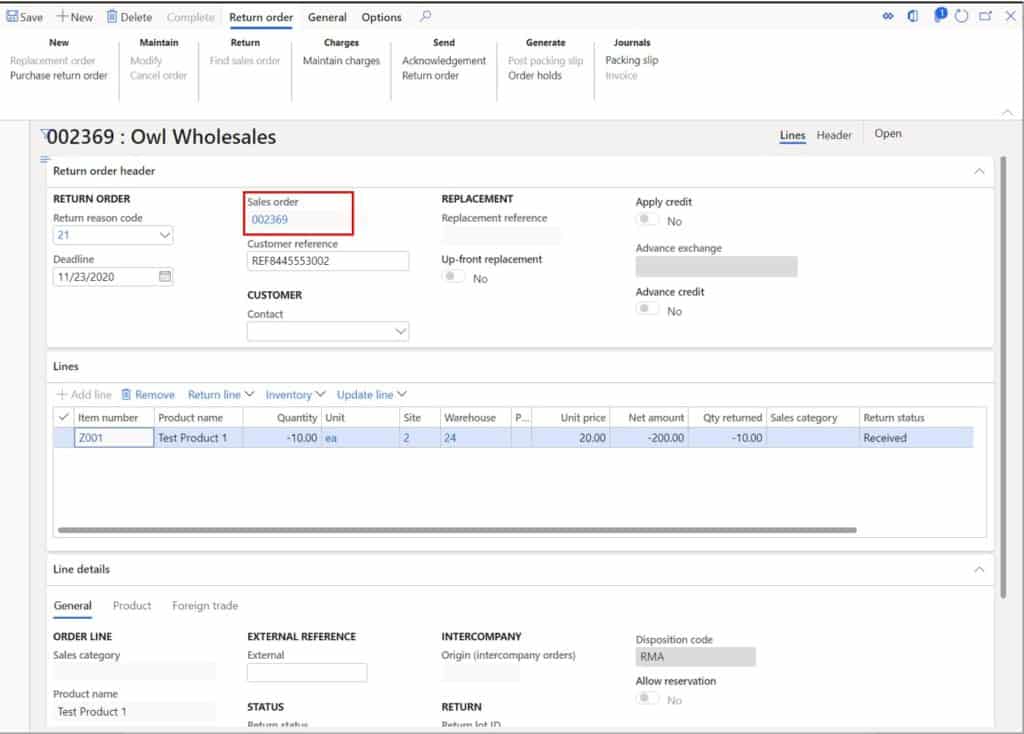
The user interface is a bit different from a normal sales order but the same tables in the database are used. To invoice the return order you can navigate to the sales order by clicking the “Sales order” hyperlink.
From the “Invoice” tab in the ribbon click the “Invoice” button.
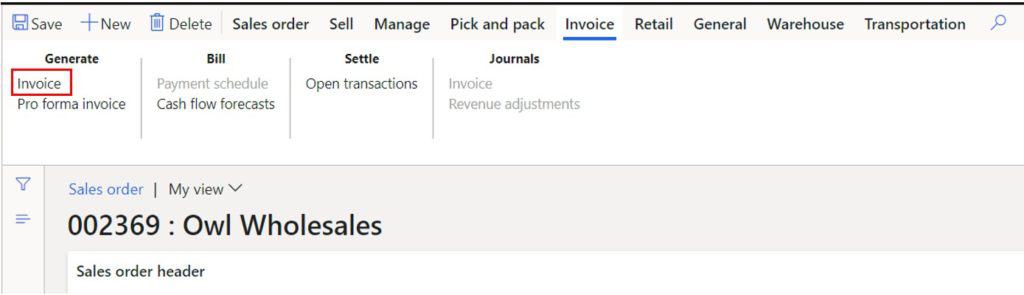
Next, click the “Ok” button to post the invoice which will credit the customer account.
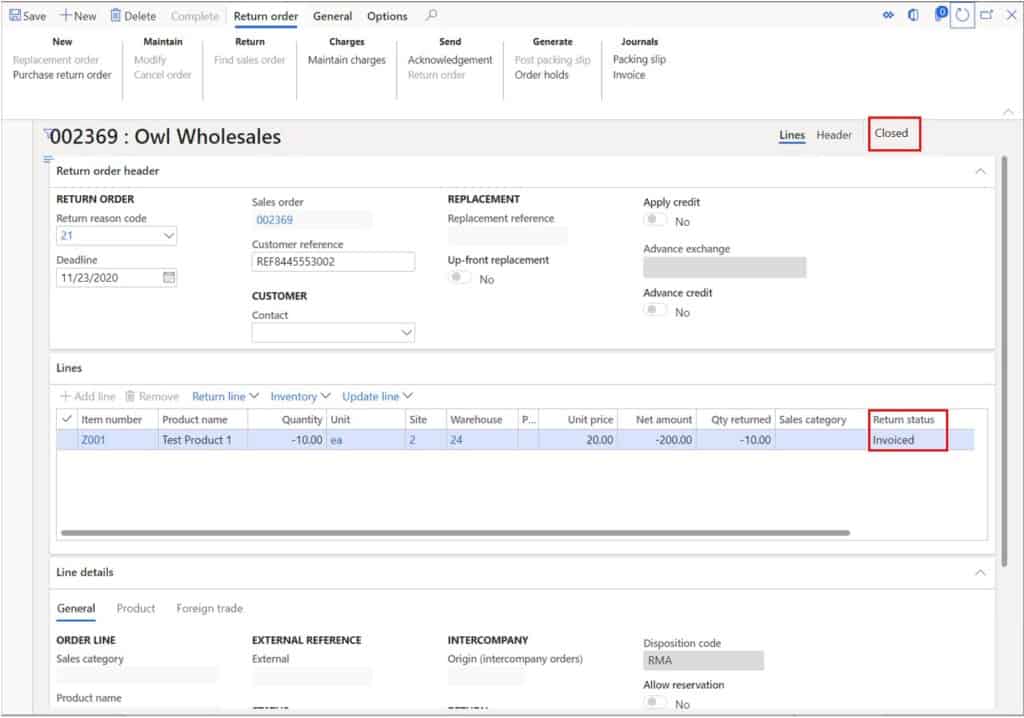
If we go back to the return order you will see that the status of the return order is set to “Closed” and the “Return status” is set to “Invoiced”.
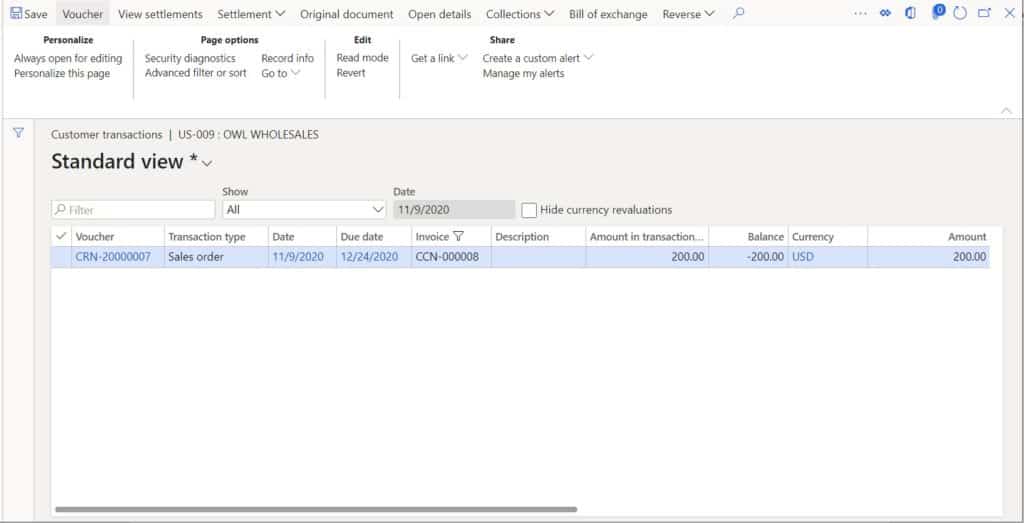
If we go back to the customer account, we can see that there is a credit transaction against the customer account for the amount of the return.
Takeaways
The return process is a core process in the order to cash cycle and in D365 there are plenty of ways to configure the return process to meet your business requirements. I hope this guide was a helpful way to see the full Dynamics 365 Finance and Operations return order process in action.