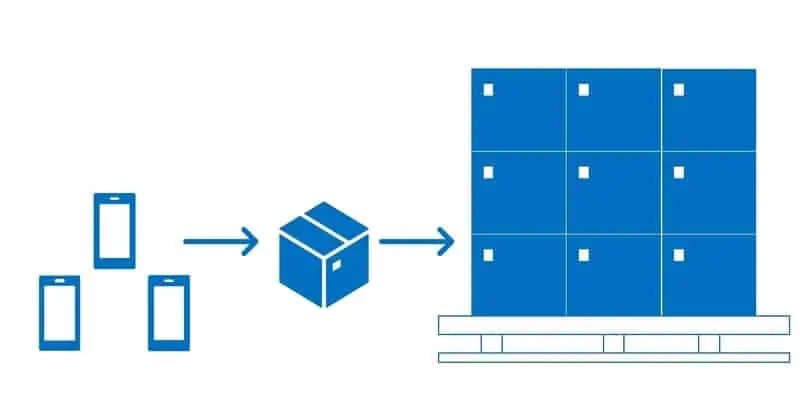
Unit sequence groups define the physical handing units of the product and in what order units are converted to these physical handing units of measure when warehouse work is created. Unit sequence groups are a required setup if you are using the advanced warehousing functionality in Dynamics 365 Finance and Operations.
In this article we will go through the setup of the unit sequence groups and you will see how the unit sequence group setups affect various warehouse management features and functionality.
Setup A Unit Sequence Group
To set up a unit sequence group navigate to Warehouse management > Setup > Warehouse > Unit sequence groups.
Next click the “New” button and enter a unique ID that identifies the handling structure of the product from lowest unit to highest unit. For example, a product that comes in each, cases, and pallets would be “ECP”. Then in the “Name” field, enter a description of the unit sequence group.
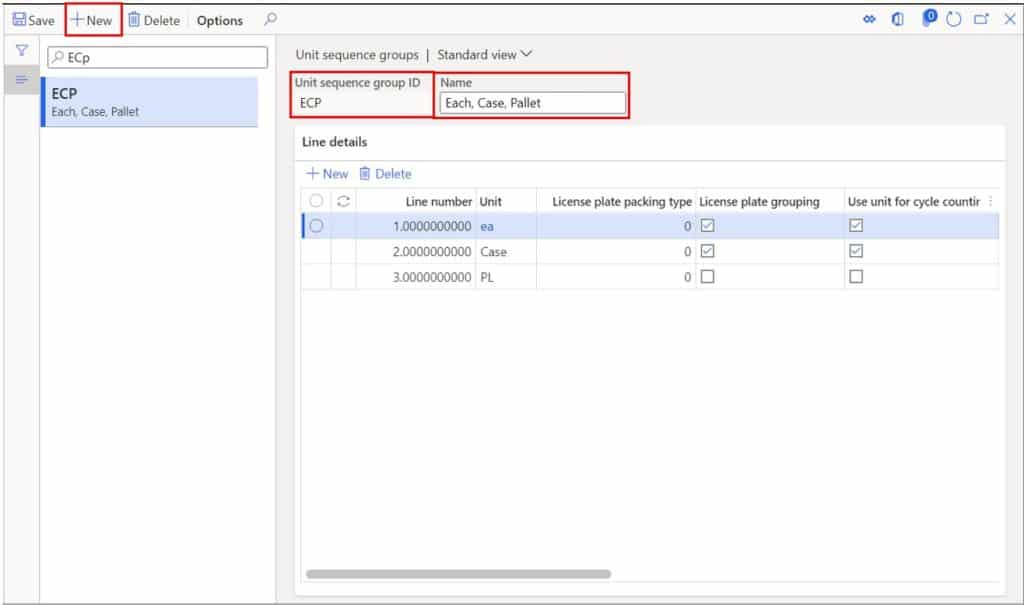
Next in the “Line details” section of the form, click the “New” button. In the “Unit” field select the lowest unit of measure. This will be the inventory unit of measure. Click the “New” button again and enter the next unit of measure in the sequence. Continue this until you have listed each unit of measure in order from smallest unit to largest unit. In my example, my product can be handled in each, cases, and pallets.
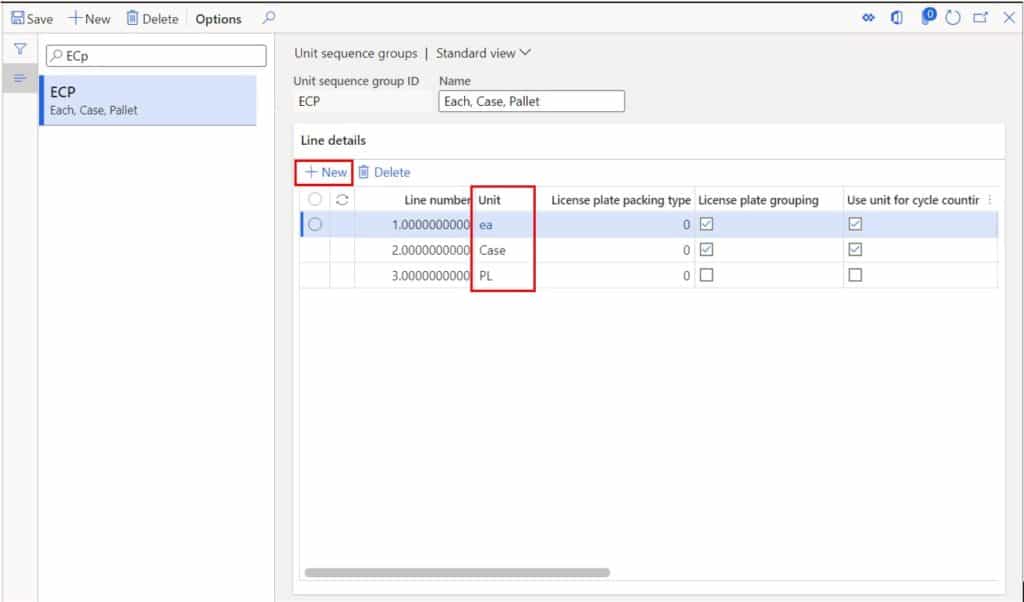
Default unit for purchase and transfer – This selection indicates the default unit of measure that should be used on purchase order receipts and transfer order receipts. Only one unit of measure can be selected.
Default unit for production – This selection indicates the default unit of measure for product receipts when reporting production orders as finished.
Default unit for material consumption – This defines the default unit to be used for material consumption from the warehouse mobile application against a production order.
We will cover the rest of the setup in later sections. Next, I want to move into how the unit sequence group relates to the unit conversions setup on the released product.
Unit Conversions and Unit Sequence Groups
Now that we have defined the units of measure in our unit sequence group, we need to tell Dynamics 365 Finance and Operations what the conversions are between these units so when warehouse work is created it can convert the quantities into the correct handling unit.
To set up unit conversions for a product navigate to Product information management > Products > Released products.
In the warehouse tab of the released product form is where you set the unit sequence group for the item. For a complete user guide on how to setup a product from start to finish see product information management user guide. In the “Product” tab in the ribbon click the “Unit conversions” button.
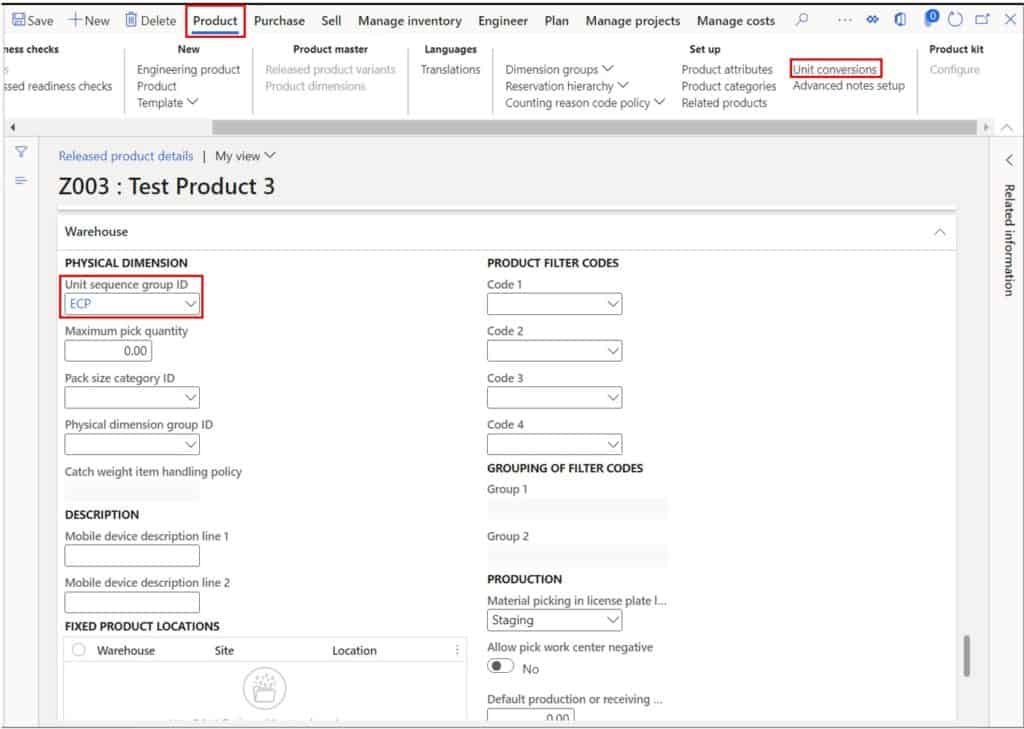
In the unit conversions form click the “Intra-class conversions” tab if your units are all in the same unit class and click the “Inter-class conversions” if you have a conversion from a weight like LBS to each or case. Click the “New” button and in the “From unit” select the unit you are converting from and in the “To unit” select the unit you are converting to.
Then in the field after the “=” enter the factor for the conversion and click “Ok”. For example, if 1 case contains 10 units, the “From unit” would be “Case”, the “To unit” would be “ea” and the factor would be 10. Continue this until you have added a conversion among each unit configured in the unit sequence group.
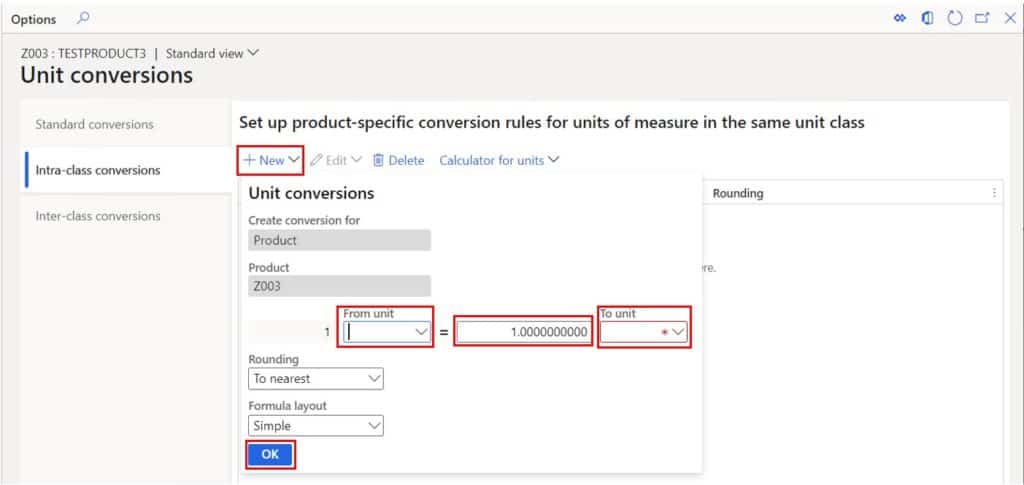
In the example below there are 10 units in a case and 30 cases on a pallet which means that there are 300 units on a pallet.

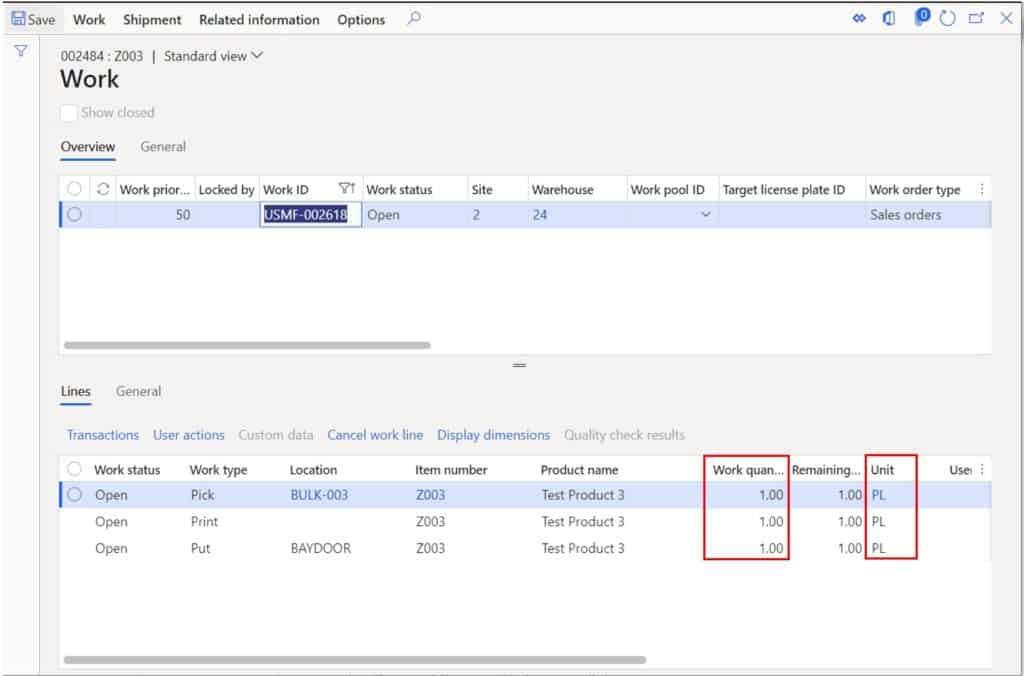
Now when we create an order for this product for a quantity of 300 and release to the warehouse, D365 will convert the quantity to one pallet.
License Plate Grouping
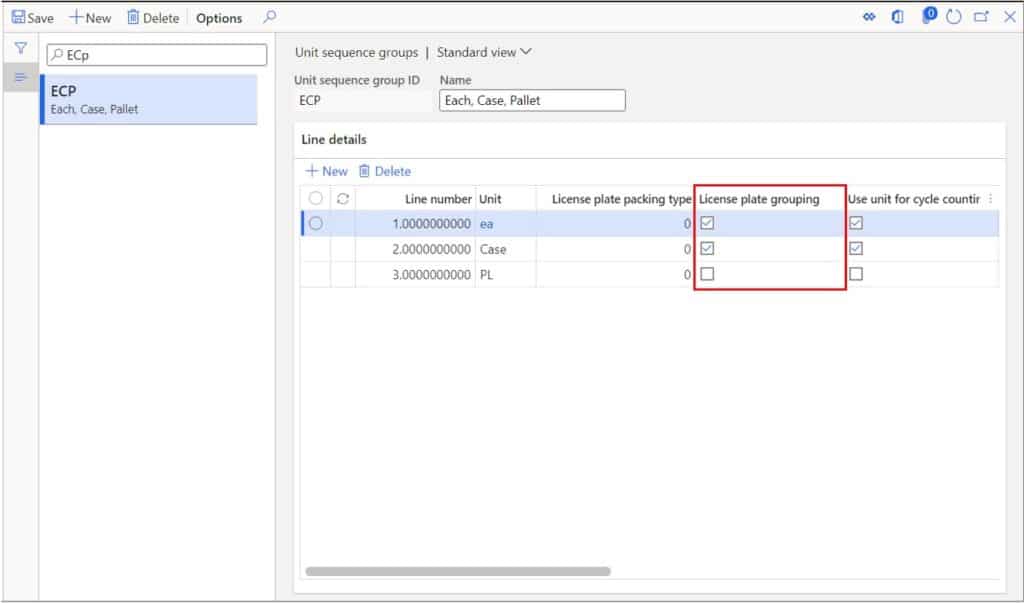
The next setup on the unit sequence group is the license plate grouping checkboxes. These checkboxes define the unit at which license plates are grouped. So, in my example if I check all but the last unit, the system will only generate a new license plate at each new pallet during a receipt. This is also dependent on the “License plate grouping policy” set on the mobile device menu item. If the “License plate grouping policy” is set to “License plate grouping” the system will automatically create the license plates based on the unit sequence group setup.
You really want to make sure you get this setup right because if you accidentally receive 6,000 units and the system is generating 6,000 license plates D365 is going to hang and probably time out. It may look like there is a bug when really it is just a setup issue. Let’s take a look at the behavior.
In this example I have a purchase order with quantity of 600 units which converts to 2 pallets. So, based on the “License plate grouping” setup I would expect the system to generate two license plates.
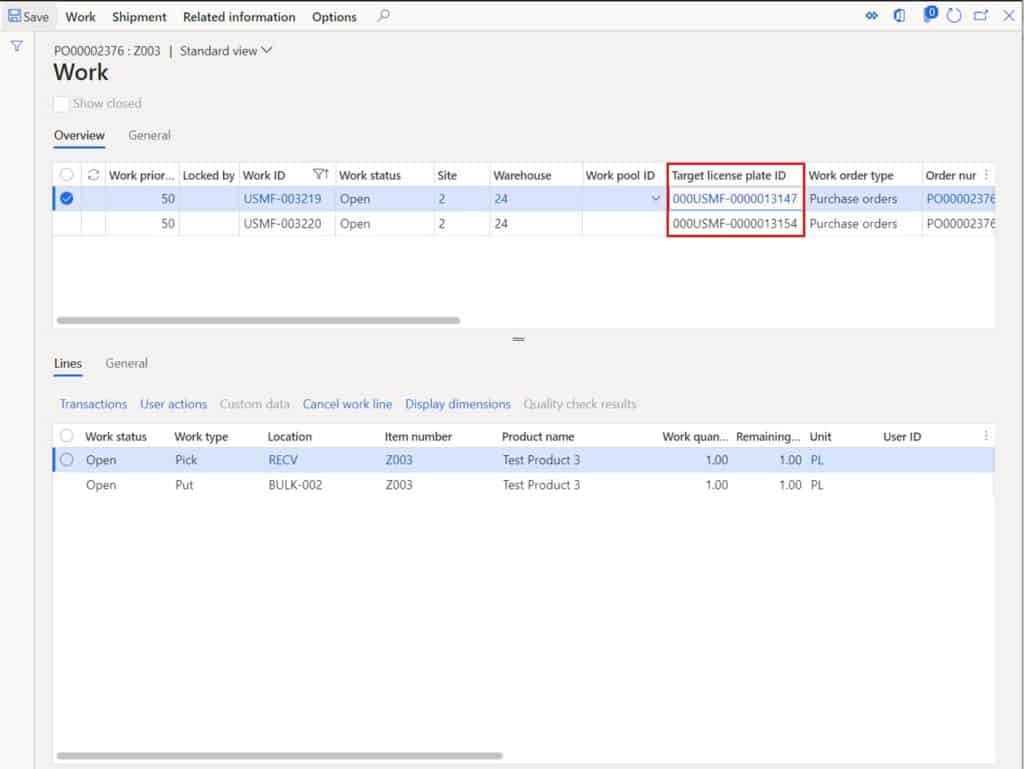
If I change the quantity to 599 on the purchase order line which means there is not an even conversion, the system will still create two license plates. One license plate will be for 1 pallet and the other will be for 299 units.
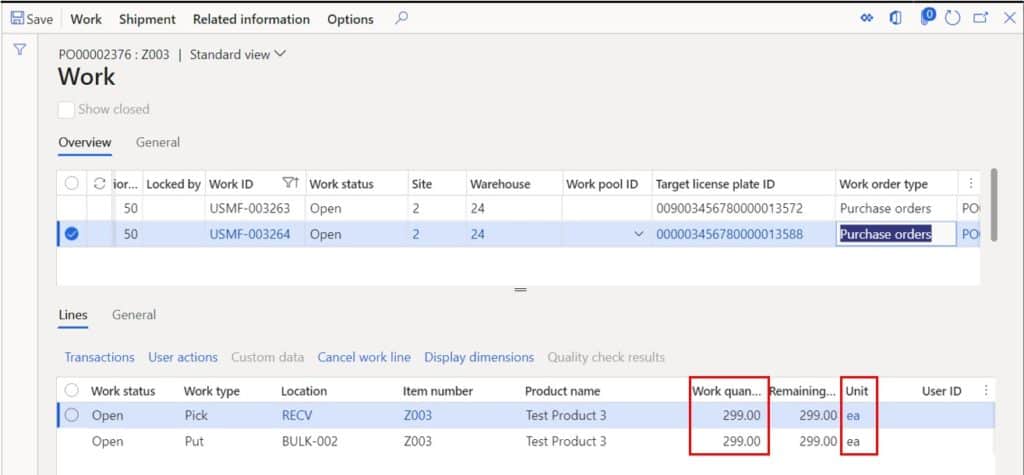
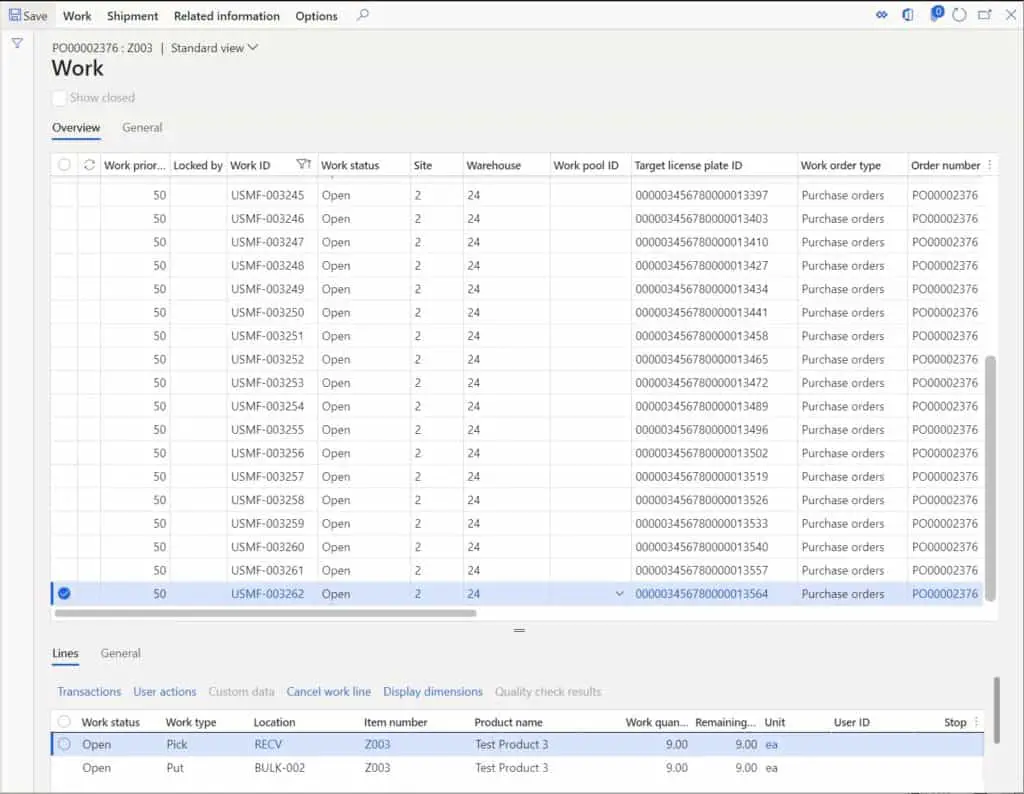
Now If I only check license plate grouping only on my “ea” unit of measure if I have the same quantity (600) I will still get two license plates for 1 pallet each. But If I change the quantity back to 599 (where there is not an even conversion and the system needs to convert down to cases) I would expect to get 1 license plate for a pallet (30 cases) and then 30 additional license plates. 1 license plate for each of the 29 cases and 1 license plate for 9 units totaling to 599 units.

When I process the receipt, this is exactly what I get.
License Plate Packing Type
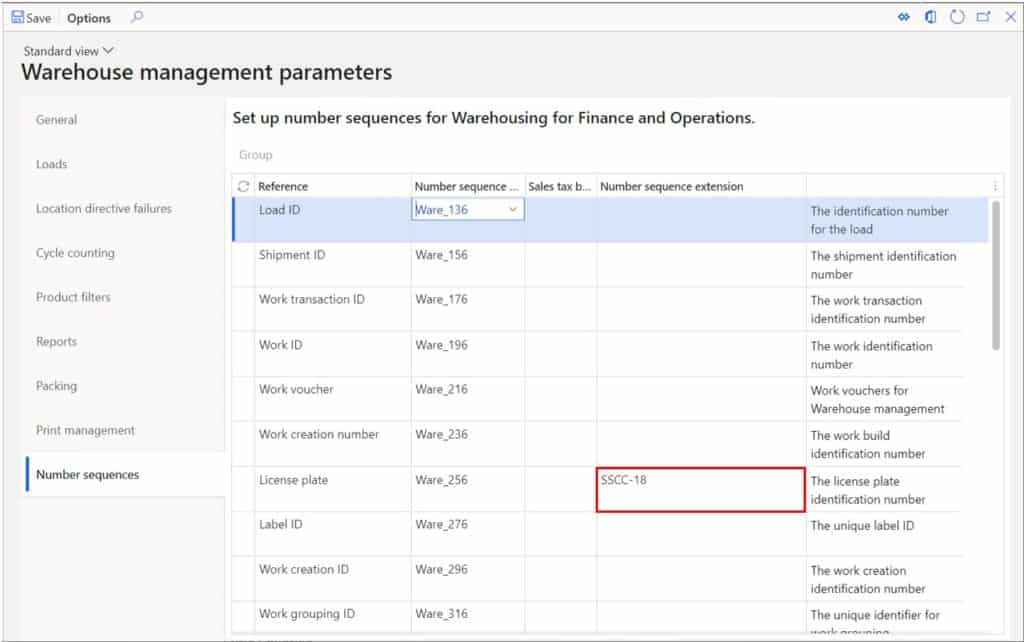
The license plate packing type is used to generate GS1 compliant labeling. For example if I want to be able to produce a GS1 compliant SSCC code I can set a value in the “License plate packing type” field and it will be placed in the appropriate place in the license plate based on my setup for the number sequence extension.
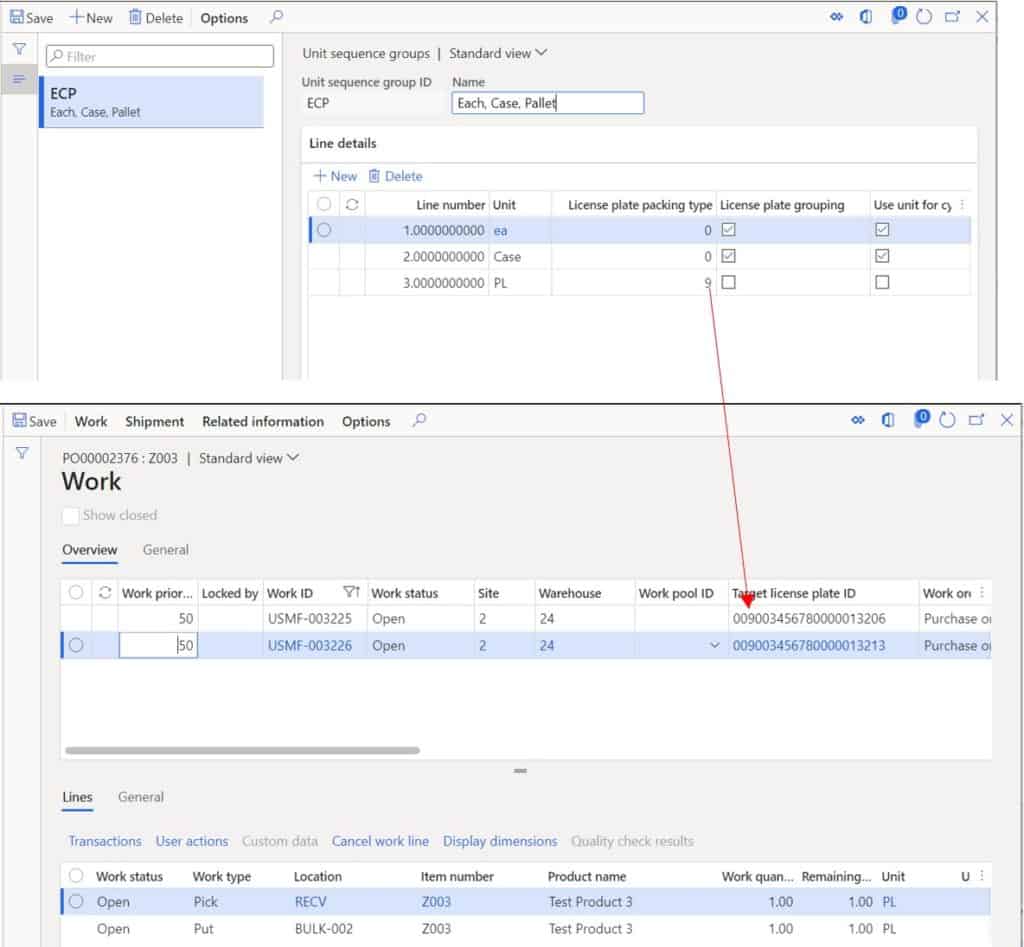
As you can see in my number sequence extension, I have set the license plate packing type to be in the second position after the application identifier field.
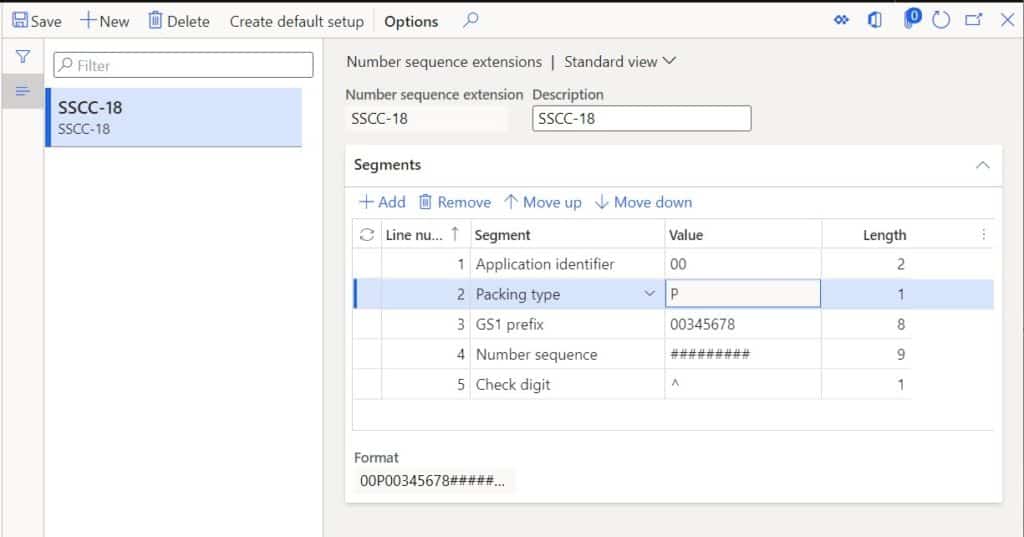
Then I can associate that number sequence extension to the license plate number sequence so that it uses this extension instead of the standard number sequence.
Cycle Counting
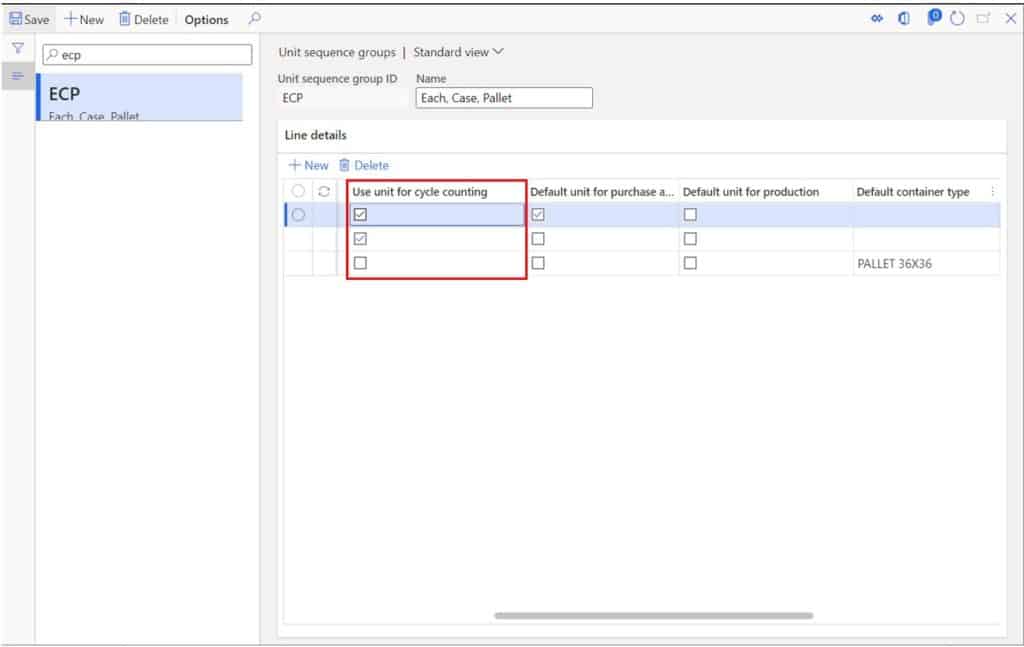
The “Use unit for cycle counting” checkboxes enable me to select which units of measure I will allow cycle counting by. It is important to note that if you select more than one option the WMS mobile application will prompt you for counts in both whatever unit you select.
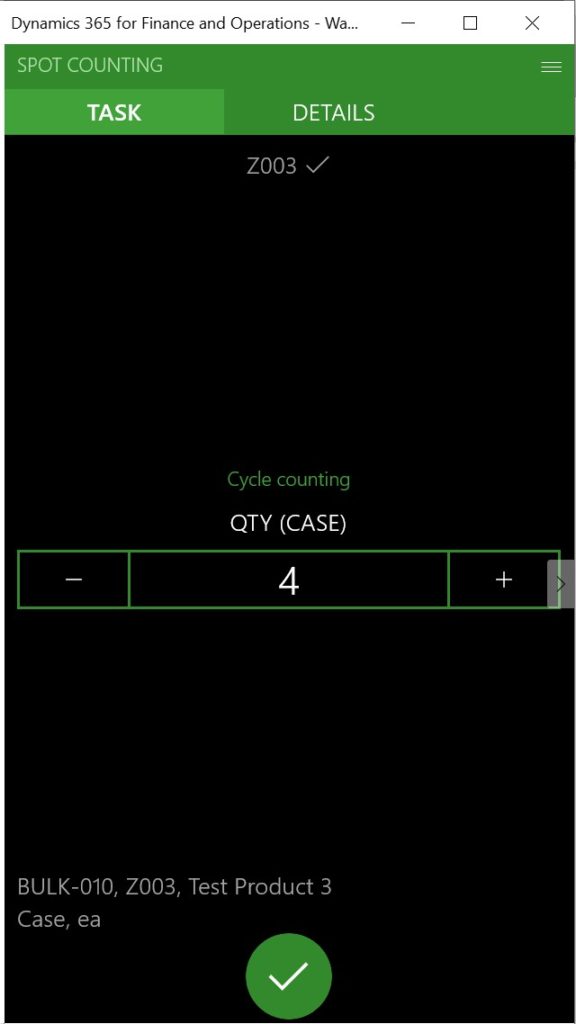
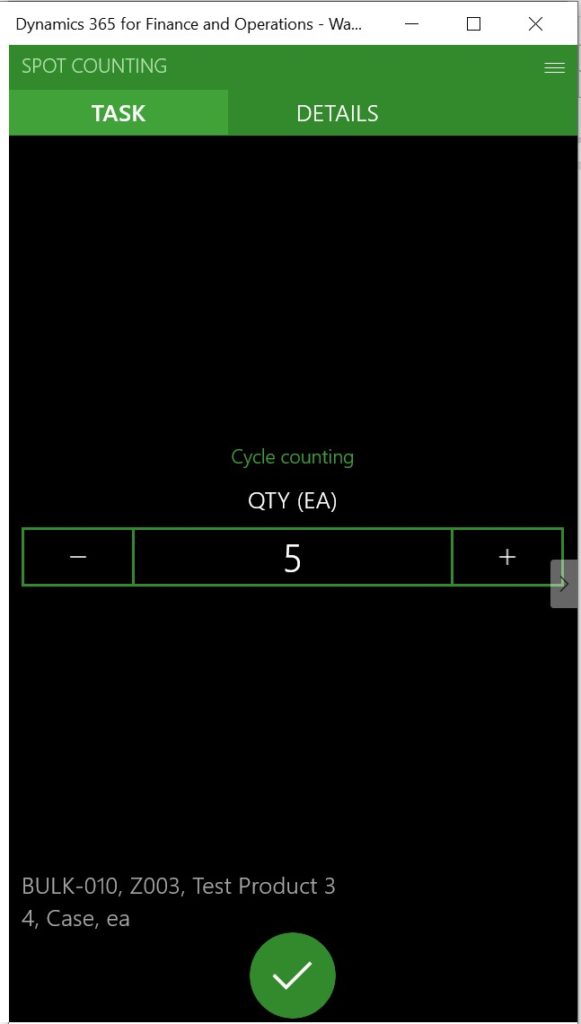
So for example if we use the same unit conversions from the example earlier in the post where 1 case has 10 units and we are counting a location with 4 cases and 5 loose units, the mobile application will ask me to count first in cases where I would enter 4 and then it would ask me to enter an each count. However, this does not mean I need to convert it to each and enter a count of 40 because it is adding the two counts together. Let’s take a look at an example.
I have quantity of 45 on hand and I am doing a spot count at a location. So, I will enter 4 cases (40 units).
Then it asks me for the remainder in the each unit of measure. So, I will enter 5 for a total count of 45 units (4 * 10) + 5 = 45.
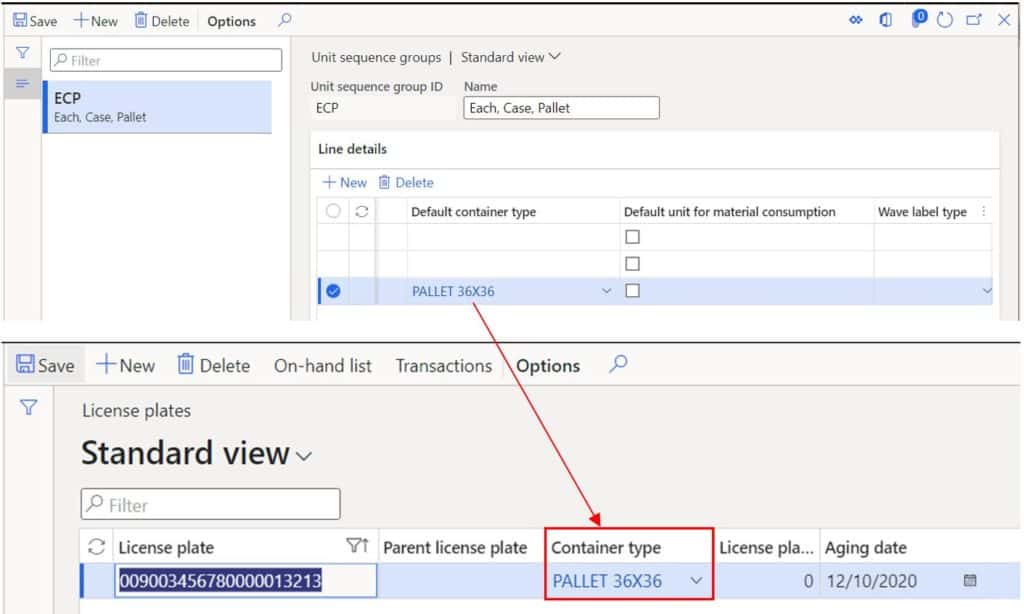
Default Container Type
The license plate packing type allows you to designate a default container type to a system generated license plate for that unit in unit sequence group. Note that for the default container type to be assigned automatically you need to enable the default container type on the mobile device menu item.
Takeaways
The unit sequence group setup is an essential setup if you are using advanced warehousing and can cause some headaches if you don’t get it right the first time. I hope this walkthrough with examples has given you a better understanding of what some of the configuration options do and how they integrate to other parts of the system.

