

Creating a vendor is one of the most basic processes in Dynamics 365 Finance and Operations but because this master record has so much associated functionality throughout the system it has quite a few fields on the form and can be intimidating if you don’t have an understanding of what they mean. This article is intended to show you how to create a new vendor as a complete guide.
Create The Vendor Record
The first step in creating a vendor is navigating to Procurement and sourcing (Or Accounts Payable) > Vendors > All vendors.
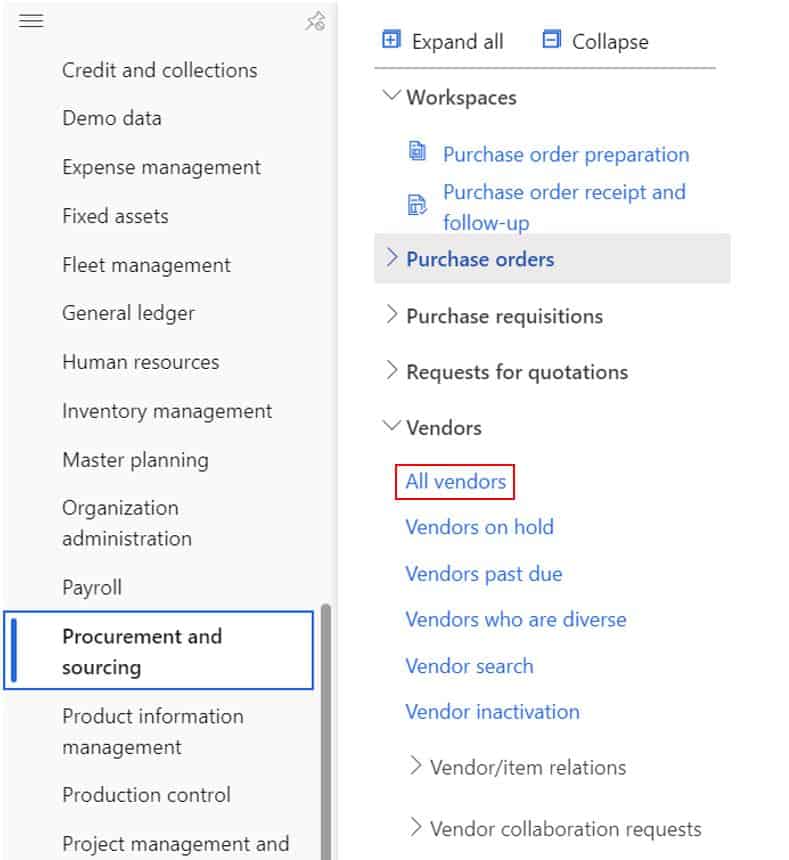
- Click the “New” button
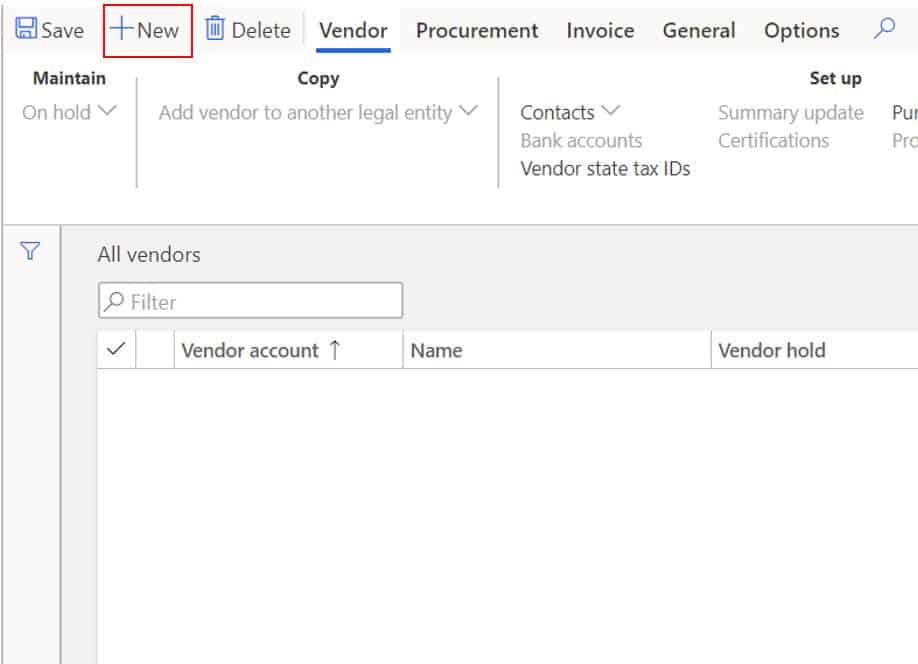
This will open the vendor master form where we will begin to fill in the necessary details. Some fields we may or may not fill in given you specific business requirements. Some fields are self explanatory and some require a more detailed description.
General Fast Tab
The first section is the general section. This section contains, you guessed it, general details about the vendor.
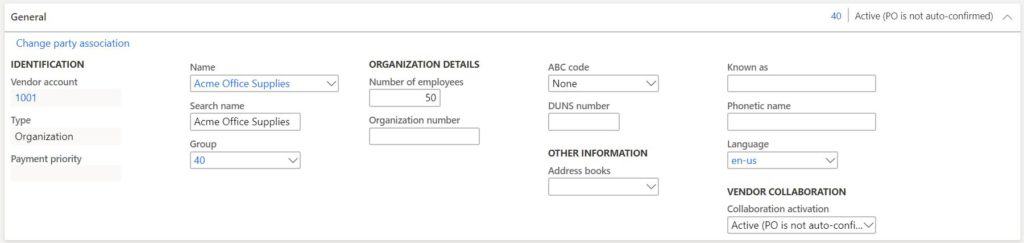
- Vendor account – The vendor account is the unique ID that is given to the vendor and will be referenced throughout the system where vendors are used. This field can be manually entered or generated though number sequence. To have the system generate it navigate to the Accounts payable parameters > Number sequences > View details on the number sequence associated to the vendor account > Set the “Manual” flag on the number sequence record to “No”. You can also customize the sequence by changing components in the “Segments” section.
- Type – The type refers to the type of global address record that will be created after the vendor record is saved. “Organization” is used if the vendor is a company that you buy goods and services from and “Person” is used if the vendor is an employee that we are paying out to (e.g. payroll).
- Name – This is the name of the vendor.
- Search Name – The search name is automatically generated based on the “Name” field. This field can be change to help facilitate searches for this vendor.
- Group – This is the vendor group. The vendor group field has many uses. The first use is for logically group vendors for reporting purposes. There are several places in the system where vendor group appears as an available field for sorting and grouping vendors in reports, lists, and so on. The second use is to drive posting to the correct ledger account. The vendor posting profile uses vendor groups to determine which summary account to post transactions to.
- Number of employees – This field is a self-explanatory field that is used for reporting purposes.
- Organization number – The organization number is a number that is assigned to a company or association by the authority that registered the entity. An organization number is an optional field that is only visible on vendors of type “Organization”
- ABC code – The ABC code is a way to classify your vendors in terms of importance. A vendors being the most important, B vendors second, and C vendors least important. The means by which the classification is implemented will on the preferences of the procurement department.
- DUNS number – is a unique identifier for an organization or entity provided by Dun & Bradstreet.
- Address book – The global address book is a unified repository for party data. Party data represents different master data types like persons, organizations, contacts etc. The address book is a way to group party records associated with vendors together. The address book can also be used to keep certain address data private. On the global address book parameters you can select specific roles that have access to private address data.
- Known as – can be used to identify a secondary name or the name the company is better known by.
- Phonetic name – displays the phonetic pronunciation of the vendor name.
- Language – The default language for business documents and transactions.
- Collaboration active – Controls whether the vendor is enabled for the vendor collaboration portal and whether the purchase order can be auto-confirmed if the vendor confirms it through the vendor collaboration portal or if it needs to be manually confirmed internally.
Address Fast Tab
The Addresses fast tab contains the address records associated to the vendor. The addresses are used for various purposes and functions throughout the system.
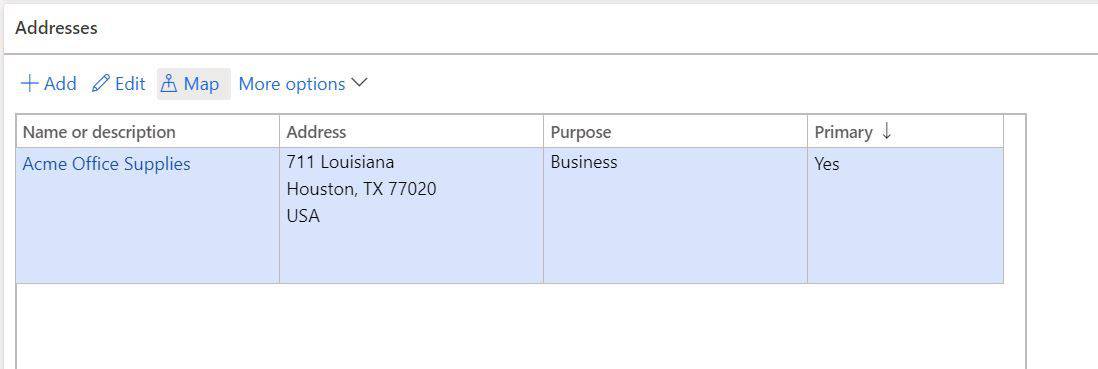
- To create an address, click the “Add” button. Depending on the version of Dynamics 365 Finance and Operations you are using, you may need to click the ellipses (…) and click “Add”. This will open up the address creation form.
- Name or description – Typically this should be the vendor name. If this is the remit-to address, this should be the remit-to name.
- Purpose – This defines the purpose for the address. In the context of vendors we there are typically only three used.
- Business – This is a generic purpose that is used when the address applied for all purposes.
- Remit-to – The address to which you send the payment when a check is issued to a vendor.
- Payments – The address to which you send payments.
- Country/region – This is the country the address is for.
- Zip/postal – This is the zip or postal code associated with the address. Once this is populated the City, State and Country will also be defaulted.
- Primary – This indicates the primary address. There can only be one primary address record.
- Private – This indicates that the address is private. Once this is selected you can specify which security roles have access to view private address records. This works in conjunction with the global address book assigned to the vendor.
- Primary for country/region – This indicates that the address is the primary address for the country/region.
Contact Information Fast Tab
Contact information is often times confused with contact records. Contact information contains phone, email, URL, Fax number data related to the vendor organization. Contact records are specific individuals/contact within the vendor organization.

- To create a new contact information record click the “Add” button.
- Description – The description describes the type of contact record. For example if you are entering a phone number for the vendor the description might be something like “Main line” or “Customer service”.
- Type – identifies the type of contact record.
- Contact number/address – Depending on the “Type” you select this is the actual contact detail. So if the type is “Phone” you would enter the phone number. If the “Type” is “URL” you would enter the URL here.
- Extension – if there is a specific extension associated with the phone number that can be entered here.
- Primary – Indicates the primary contact record for the type of contact record.
Miscellaneous Details Fast Tab
The Miscellaneous Details fast tab contains credit information, intercompany details and vendor rebate details.

- Credit rating – This is where you can give the vendor a credit rating. Some business will run a credit check on vendors before deciding to do business with them.
- Credit limit – The credit limit is used to define a the credit limit that a vendor has extended to our organization. The credit limit can be used to stop the processing of a purchase order if the credit limit is exceeded.
- Buyer group – Is an identifier field that indicates that a vendor is associated with a particular buyer. This is typically used as a way for buyers to filter purchase orders by their respective buyer groups.
- Vendor hold – This indicates the hold status of the vendor. The vendor can be placed on hold by clicking the “On hold” button in the top left of the form. The hold types definitions are the following:
- No – Not on hold.
- Invoice – No invoices can be posted against the vendor.
- All – The vendor is on hold for all transactions.
- Payment – The vendor cannot be paid.
- Requisition – Purchase requisitions cannot be raised for this vendor.
- Never – The vendor inactivation batch job that puts vendors on hold that do not have recent activity will ignore vendors that have hold code set to “Never”.
- Reason code – is the reason the vendor was put on hold.
- Vendor hold release date – This date is the date the hold will be lifted from the vendor.
- Active – This indicates that this is an intercompany vendor.
- Company – This is the legal entity this intercompany relationship exists for.
- Customer account – This is the customer account that represents the intercompany customer related to this intercompany vendor.
- Vendor rebate group – Vendor rebates can apply for specific vendors, groups of vendors, or all vendors. The vendor rebate group is how you can group certain vendors to apply certain rebates.
Vendor Profile Fast Tab
The Vendor profile fast tab has several descriptor fields that help build the profile of the vendor. The fields are used in diversity and regulatory reporting.

- Bid only – Should the vendor be quoted before purchasing?
- One-time supplier – Is the vendor a one-time vendor? This field is automatically selected when a one-time vendor is used during purchase order creation.
- Locally owned – Is the vendor locally owned?
- Small business – Does the vendor qualify as a small business?
- Woman owner – Is the vendor organization owned by a woman?
- Minority owned – Is the vendor organization owned by a minority?
- Ethnic origin – If the answer to “Minority owned” is yes you can specify the ethnicity.
- Owner is a service veteran – Is the owner a service veteran?
- Owner is disabled – Is the owner disabled?
- HUBZone – Is the vendor in a historically underutilized business zone?
Purchasing Demographics Fast Tab
The purchasing demographics fast tab is where there are several reporting fields that can be used for various reporting and categorization purposes.

- Currency – This is the default currency that will be used for transactions against the system. For example, if we purchase from the vendor in USD the USD currency code will default to the purchase order if this vendor is selected.
- Primary contact – If you have created multiple contacts associated with this vendor you can select a primary contact for the vendor.
- Line of business – This is a reporting field that can be used to categorize vendors into lines of business.
- Employee responsible – This field can be used to assign a specific employee that is responsible for the vendor.
- Segments – Segments are another reporting field that can help you segment your vendors however you and your supply chain team see fit.
- Subsegments – Subsegment is a way to get down to a second level of granularity. So under a segment you could have more detailed subsegments used for reporting.
- Chain – This field is used to link/tag related vendors together for reporting. So let’s say you had General Supply Co. and they have several subsidiary companies that are separate vendor accounts General Supply Co. A and General Supply Co. B. When you go to report on total spend you want to know how much we have spent with General Supply Co. and all of their subsidiaries.
- Notes – These are purchasing notes related to the vendors.
Invoice and Delivery Fast Tab
The invoice and delivery fast tab is where several defaults related to invoicing and delivery details can be set to default to purchase orders.
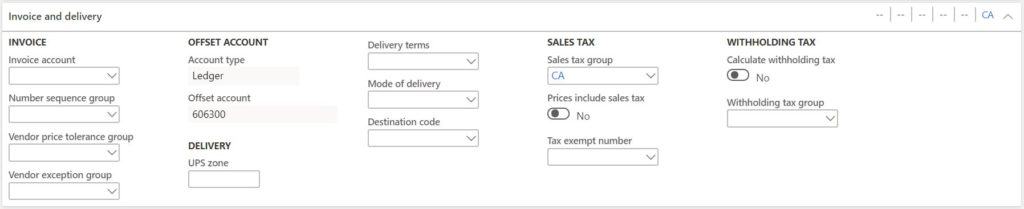
- Invoice account – Is used when you need to invoice a different account other than the current vendor account. If this is left blank the vendor account will be the invoice account.
- Number sequence group – This enables you to generate an invoice number based on a specific number sequence.
- Vendor price tolerance group – Unit price tolerances can be set up at a global level for all vendors, a group of vendors and specific vendors. This field is a way to create a unit price tolerance for a group of vendors. Associated setup can be found in Accounts payable > Invoice matching setup > Price tolerances
- Vendor exception group – This group is used to filter out certain vendors for invoice policy violations.
- Account type – This displays the selected account type under the default account setup in the invoice tab in the ribbon. When a vendor is added to a transactional journal like a vendor invoice journal the selected default account type is selected as the offset account type.
- Offset account – This displays the selected account under the default account setup in the invoice tab in the ribbon. When a vendor is added to a transactional journal like a vendor invoice journal the selected default account is selected as the offset account.
- UPS Zone – Typically shipping contracts are divided into zone pricing. The UPS Zone identifies the zone associated to the vendor and will default on the purchase order.
- Delivery terms – Delivery terms identify codes for predefined commercial shipping terms. Terms can specify carrier, routing, freight charges, place of delivery, liability, and title to goods is transfer. Delivery terms will default from the vendor to the purchase order.
- Mode of delivery – This specifies default mode of delivery related to the vendor. This will default to the purchase order from the vendor but can be overridden on each purchase order.
- Sales tax group – The sales tax group is used in conjunction with the item sales tax group to calculate the sales tax amount to apply to the purchase order.
- Prices include sales tax – Do products from this vendor have tax included in the price. An example of this is value added tax (VAT).
- Tax exempt number – Identifies a tax exempt number associated to the vendor. These are common in the case of a charitable organization or re-seller.
- Calculate withholding tax – Enable this to activate the withholding tax calculation.
- Withholding tax group – The withholding tax group is used to activate the calculation when a payment is entered in a vendor payment journal. The withholding tax group is associated with a withholding tax code which contains the withholding rate.
Purchase Order Defaults Fast Tab
This one is pretty self-explanatory. There are several fields in this fast tab that can be defaulted to the purchase order to expedite the purchase order creation process, drive pricing, and control the behavior of the purchase order.
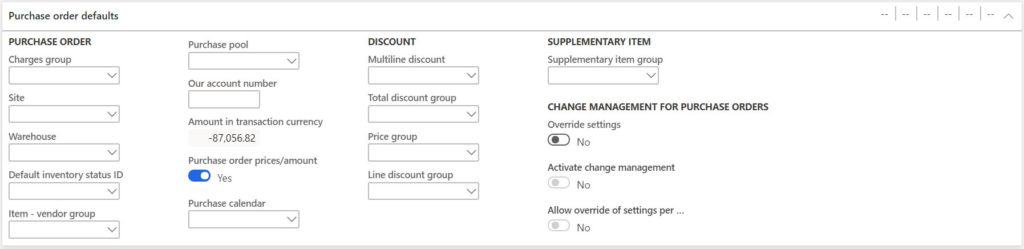
- Charges group – Charges can be automatically created for purchase orders based on an item vendor combination. It can also be based on groupings of items or vendors. The charges group is how you identify a vendor as part of a charge group.
- Site – If there is a site that should automatically default on the purchase order it can be defined on the vendor.
- Warehouse – If there is a warehouse that should automatically default on the purchase order it can be defined on the vendor.
- Default inventory status Id – If the items added to a purchase order to this vendor should default to a specific inventory status that can be specified here.
- Item vendor group – This is used with the external item description functionality. If an external part number is shared by a group of vendors, you can group them together using this code.
- Purchase pool – Purchase pool is used to group purchase orders together. This can be for reporting, filtering, or sorting purposes. If a purchase pool is assigned to a vendor it will default to the purchase order.
- Our account number – This is our customer account number in the vendor’s system.
- Amount in transaction currency – This is the current balance associated with the vendor.
- Purchase order prices/amount – If this is set to yes, the purchase prices will be displayed on the purchase order confirmation document.
- Purchase calendar – The purchase calendar can be used to identify closed and open working days associated with the vendor that might affect lead time. For example, vendors in other countries with long lead times may have long holiday business closures that need to be accounted for in planning.
- Multiline discount – This is used to enable multiline discounts for a set of vendors. This group will be defaulted to the purchase order. This is used in trade agreement journals.
- Total discount group – This is used to identify groups of vendors eligible for total discounts. This is used in trade agreement journals.
- Price group – This is used to identify groups of vendors eligible for specific pricing. This is used in trade agreement journals.
- Line discount group – This is used to identify groups of vendors eligible for line discounts. This is used in trade agreement journals.
- Supplementary item group – Supplementary items can be used on the purchase order lines by clicking the “Purchase order lines” button and clicking the “Supplementary items” button in the “Calculate” section. If there is a supplementary item associated to the vendor and item it can be added to the PO line by clicking “OK”. Items can have supplementary items associated to them against specific vendors or for a group of vendors. This is how you assign a group of vendors to a supplementary item.
- Override settings – Change management refers to the purchase order approval workflow. If the “Allow override settings per vendor” flag is enabled on the “Procurement and sourcing” parameters. If this flag is selected the change management flags below will be enabled.
- Activate change management – This flag enables the purchase order approval workflow for this specific vendor.
- Allow override of settings per purchase order – If this flag is enabled, the purchase order approval workflow can be bypassed for this vendor.
Payment Fast Tab
The payment fast tab contains several fields that also default to the purchase order that will drive payment due dates and payment functionality.

- Terms of payment – is used to calculate the due date on the purchase order invoice.
- Method of payment – is used to identify the default method of payment used to pay this vendor.
- Payment type – is a display field that shows the payment type associated with the selected method of payment. There are “Other”, “Check”, “Electronic payment”, and “Promissory note”.
- Payment specification – is tied to an export format of an electronic payment file like an ACH. The selected payment specification is defining the specific variation of the selected format.
- Payment schedule – enables you to create a payment schedule for invoice payments. For example, if you have negotiated a payment schedule where you pay 20% in 30 days and the remaining 80% after 60 days you can set up this arrangement so that the due dates of the invoice are split accordingly.
- Cash discount – is used if the vendor offers cash discount for early payment.
- Bank account – is used to specify the bank account record used to transfer money into via electronic file. It contains data like routing number and account number.
- Payment ID – In some jurisdictions bank issue unique numbers to their customers which must be given to the bank during payment to ensure the transaction is a legitimate business transaction (i.e. to prevent money laundering or fraud). The payment ID is entered during vendor invoice entry and pull through when paying the invoice.
- Payment day – is used when payment must be made on a certain day. For a detailed explanations with examples on how the payment days functionality works please see my article called Payment Days Functionality.
- Bank account number – displays the bank account number of the selected vendor bank account.
- Use cash discount – Indicates the behavior of the cash discount. “Normal” is what you would expect. The cash discount is taken if the payment is made in the cash discount window. “Never” means that no cash discount is ever applied regardless of the payment date. “Always” means that a cash discount is always taken even if it is after the cash discount eligibility date.
- Central bank purpose code – European reporting requirements may dictate that a purpose code is associated with payments over a certain amount.
- Purpose text – is a display field that displays the text associated with the purpose code.
Tax 1099 Fast Tab
The tax 1099 fast tab contains all the relevant 1099 details for United States 1099 taxation.

- Report 1099 – indicates this vendor is a 1099 vendor.
- W-9 received – indicates that the vendor has confirmed received of the W-9 form.
- Check for W-9 – if this is enabled and the W-9 form is not selected you will get a warning message when you create a vendor invoice.
- FATCA filing requirement – does the vendor have a Foreign Account Tax Compliance Act filing requirement. This will be printed on the respective 1099 form.
- Federal tax ID – is the federal tax identification number given out to the vendor by the taxing authority.
- Tax ID type – specifies the ID type. Options are “Unknown”, “Employer Identification Number”, “Social Security Number”, “Individual Taxpayer Identification Number”, “Adopted Tax Payer Identification Number”.
- 1099 Box – a 1009 box is a record that an employer or entity gave money to someone or a legal entity. There different types of 1099 boxes that can be used in different circumstances. 1099 box indicates the default 1099 box to be used for this vendor. This box will default on the vendor invoice and eventually be used to calculate 1099 data for the respective 1099 form.
- Foreign entity indicator – what you might expect. Indicates a foreign entity.
- Second TIN – does the vendor have a second tax identification number?
- Name to use on the 1099 – when the 1099 form is printed on the 1099 stock this field determine which name to be used. If “Vendor name” is selected the system will take the vendor name if the “Doing business as” field is selected, the “DBA” field will be used.
- DBA – is the doing business as field. If the vendor has a doing business as it can be entered here.
- Name control – is the alphanumeric name control ID that the IRS requires to be printed on the mailing label to help validate the vendors EIN in the Name control.
- CUSIP – A CUSIP is a nine-digit numeric or nine-character alphanumeric code that identifies a North American financial security for the purposes of facilitating clearing and settlement of trades. If this is enabled the CUSIP ID becomes enabled.
- CUSIP ID – nine-character alphanumeric CUSIP number to identify the debt instrument.
- CUSIP details – is the abbreviation of the stock exchange and issuer, coupon rate, and year of maturity.
- Nominee details – is the purchaser or acquiring entity of the instrument.
- Investor type – “Owner” indicates the owner of the debt instrument or “Nominee/broker” indicates a broker who represents the owner of the debt instrument.
Retail Fast Tab
The Retail fast tab contains retail related setups related concerning vendor catalogs, barcode generation, and rounding.
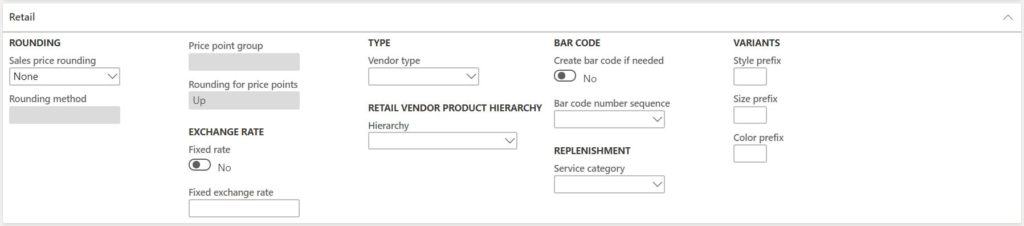
- Sales price rounding – determine the method to be used when calculating the vendor sales price during catalog import.
- Rounding method – defines how the price should be rounded. This is only enabled if the “Sales price rounding” field is set to “Rounding”.
- Price point group – specifies the price point at which rounding should occur. This is only enabled if the “Sales price rounding” field is set to “Price points”.
- Rounding for price points – is used when price point group is selected. It determines the rounding method to use.
- Vendor type – indicates if the vendor is 3rd party or our own vendor.
- Hierarchy – the vendor hierarchy is used to build out a category hierarchy that matches the vendors product hierarchy when products are imported from a vendor catalog.
- Create bar code if needed – this flag enables the vendor barcode functionality. In conjunction with the bar code number sequence a vendor bar code can be generated for products in the bar code form.
- Bar code number sequence – defines the bar code sequence to be used when automatically generating the bar code string.
- Service category – Service categories are used to define replenishment rules and the availability calculation that will be used for cross docking to distribute products from a planned purchase order. The service category also supports automatic and manual cross docking.
- Style prefix – if a style code needs to be generated automatically for a vendor this prefix will be used.
- Color prefix – if a color code needs to be generated automatically for a vendor this prefix will be used.
- Size prefix – if a size code needs to be generated automatically for a vendor this prefix will be used.
Financial Dimensions Fast Tab
The financial dimension fast tab is used if there are certain financial dimensions that need to be defaulted to transactions that the vendor is used in. The list of financial dimensions will depend on which financial dimensions are active for your legal entity.

Takeaways
Not all these fields will be used or needed depending on your own specific business requirements but after you have filled in the fields that apply to your business needs you can click the “Close” button to close and save the record. I hope this complete guide on how to create a vendor was helpful.