

Free text invoices in Dynamics 365 Finance and Operations are used as a mechanism to invoice a customer for various miscellaneous services, fees, or charges, that need to be itemized and posted to specific offset general ledger accounts.
Free text invoices are very versatile documents and can be used not only for invoicing customers but also posting credits to customers accounts. Free text invoices are most commonly used where the customer needs an itemized invoice of services, fees, or charges assessed and where we do not have a service item or sales category already set up. Free text invoices also allow us to manually specify the exact offset account that should be hit when the invoice is posted.
In this post I will take you through how to create, post, print, implement a template, and automate the posting of free text invoices. I have never been on a Dynamics 365 project implementation that did not use free text invoices so learning how to fully utilize free text invoices is an essential skill if you are implementing as a consultant or currently using D365 as an end user.
Create a Free Text Invoice
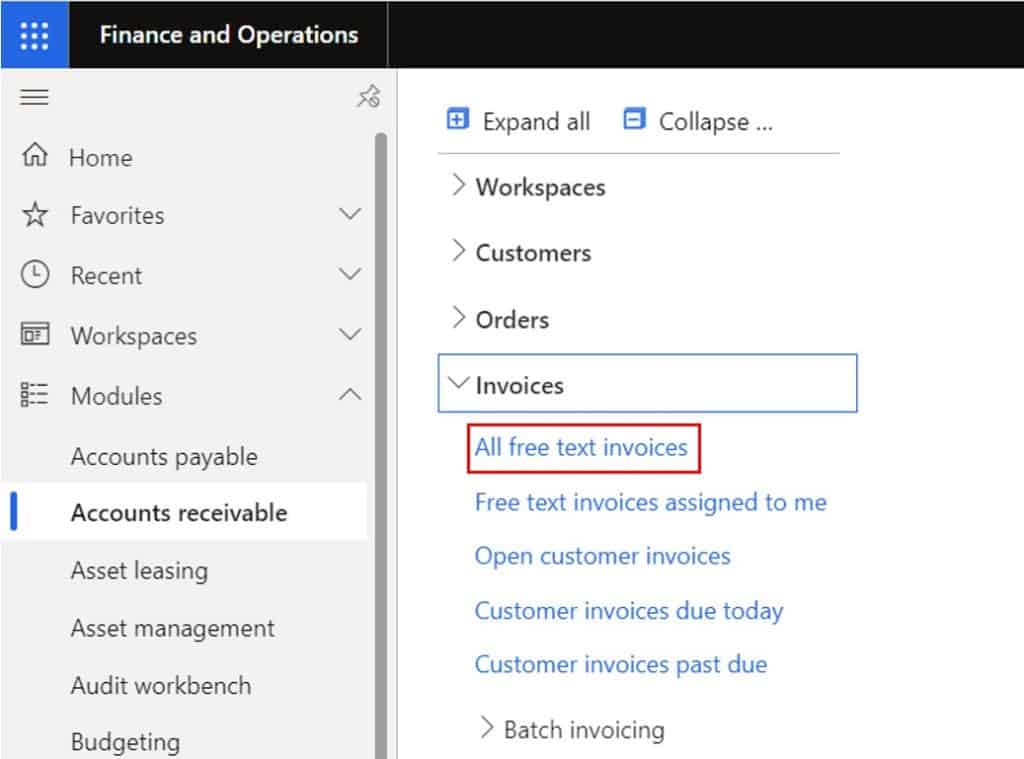
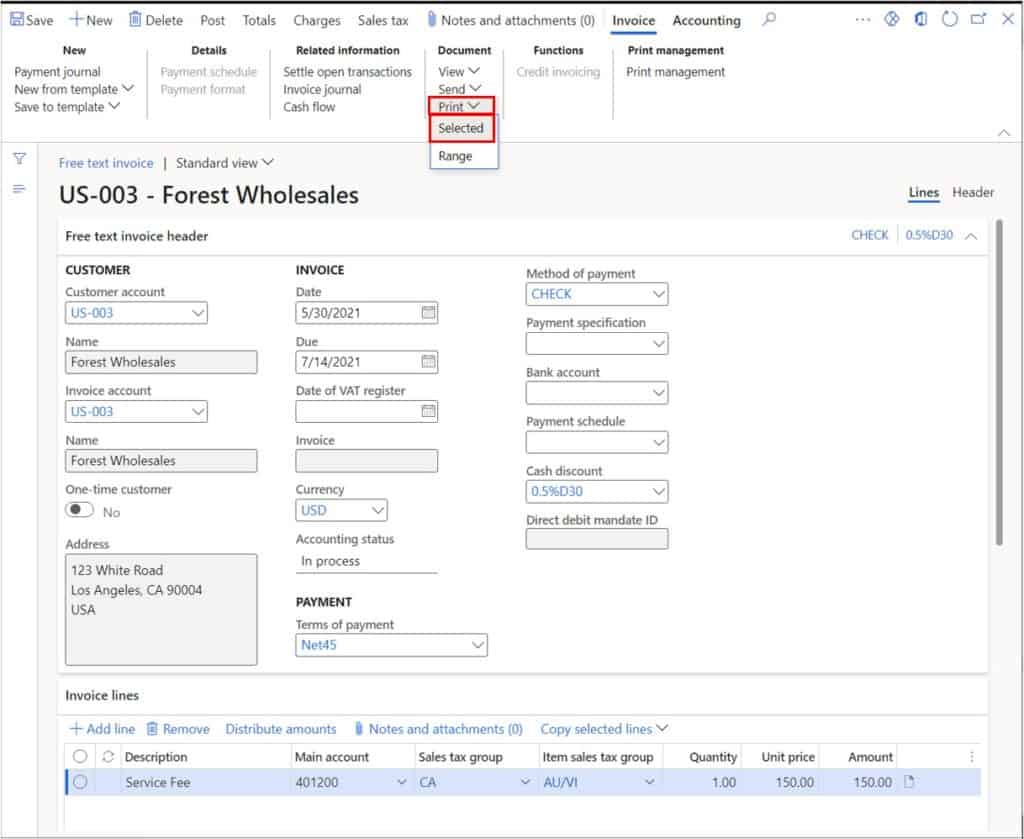
To create a free text invoice, navigate to Accounts receivable > Invoices > All free text invoices.
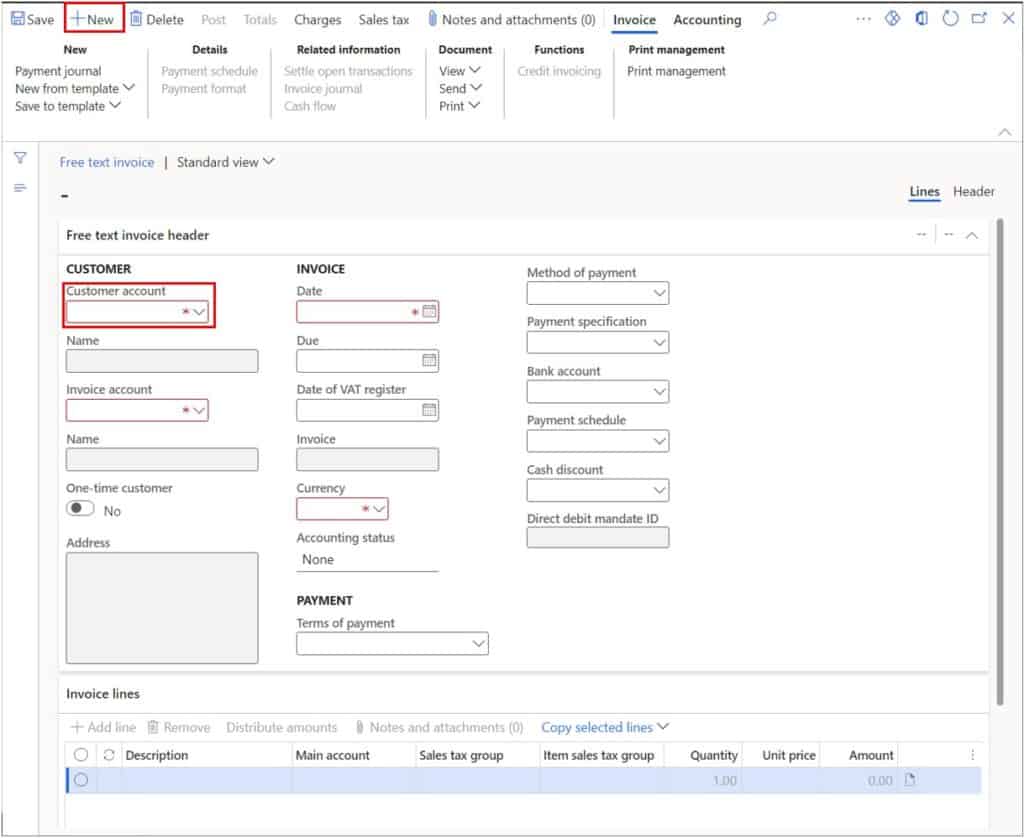
Click the “New” button and select the customer account you want to create the invoice for.
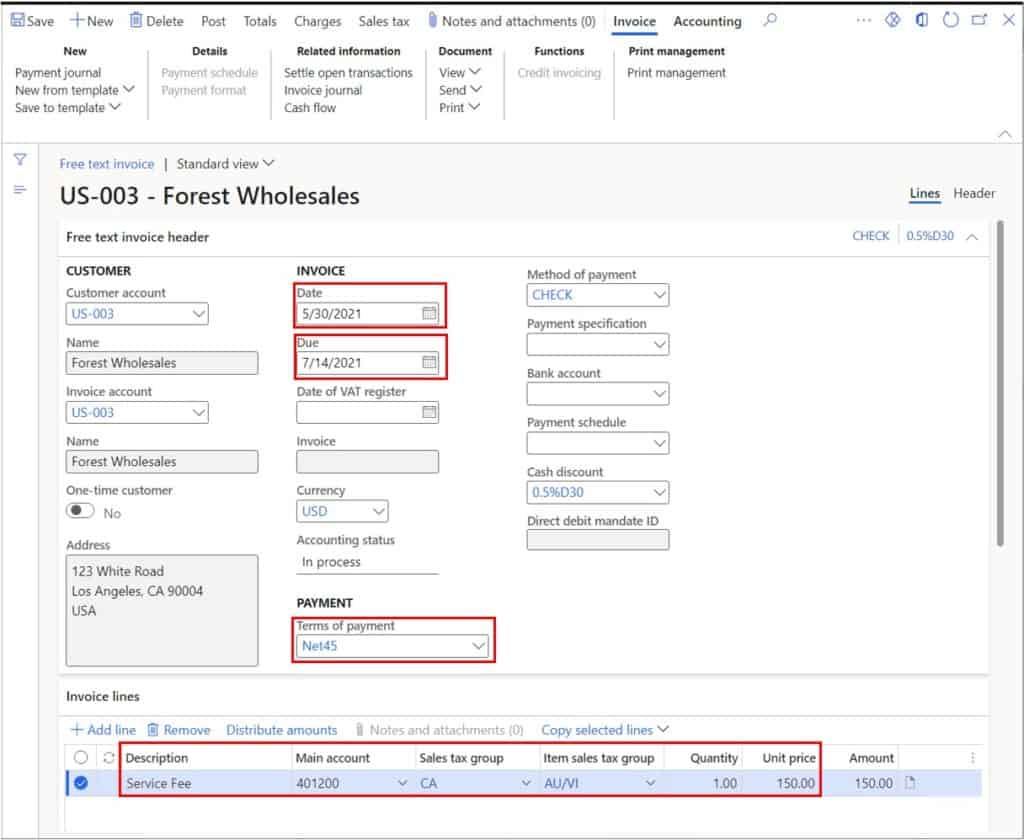
Based on the customer selection you may have things that default in like the payment terms, cash discount, and method of payment but if they do not, go ahead and select values for those fields. In the “Date” field select the invoice date for the free text invoice. The default value will be today’s date. The due date will be calculated based on the payment terms selected.
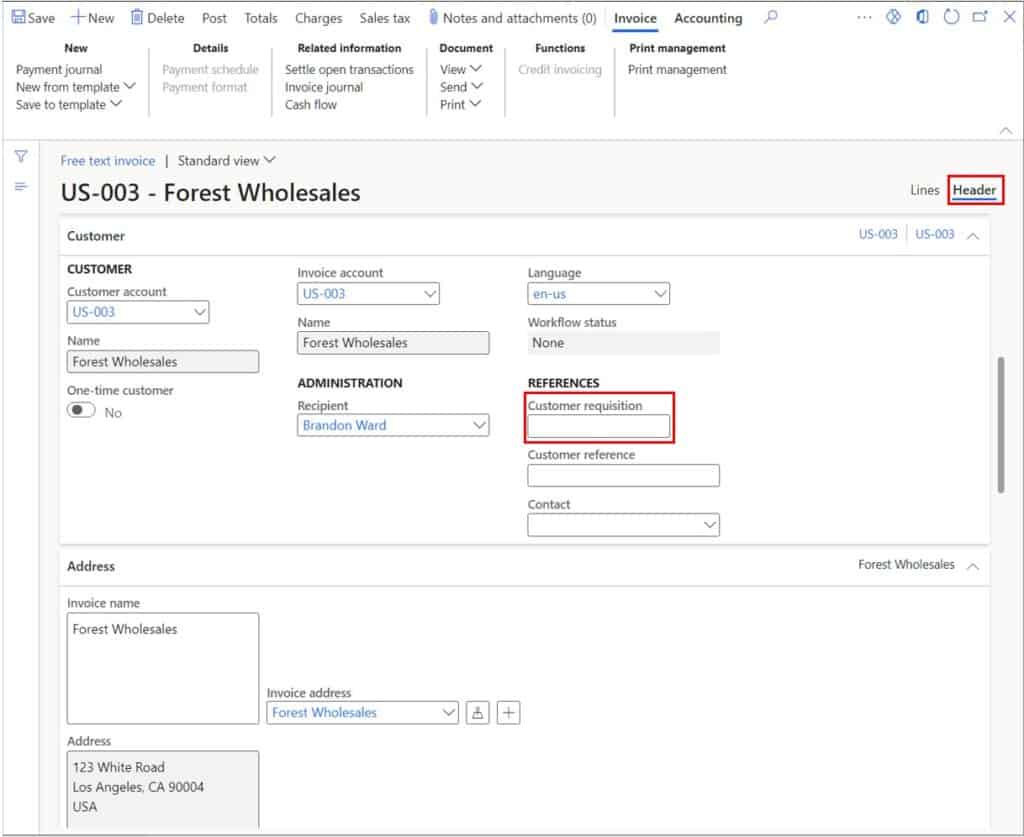
There are additional fields that are on the free text invoice header. To open the header, click the “Header” button. The most common field I would enter here is the customer’s purchase order number in the “Customer requisition” field. Most customers require some reference to a purchase order before their accounts payable department will pay the invoice.
After you have entered any other applicable header fields navigate back to the line view by clicking the “Lines” button.
In the “Invoice lines” section we can enter the free text invoice lines. The advantage of a free text invoice is that it allows you to enter a free text description of each line item you are invoicing. So, in the “Description” field enter the description of the line item you are charging the customer. This will be printed on the invoice so make sure the description provides enough information for the customer.
In the “Main account” field select the main account that should be hit as the offset account in the transaction. The debit will hit the summary account associated to the applicable customer posting profile (typically an AR summary account) and the credit will hit the account you select in the “Main account” field. If there are any applicable taxes make sure you select both the “sales tax group” value and applicable “item sales tax group” value. The tax can only be calculated if both are selected. Next select the applicable quantity and unit price for the line item which will automatically calculate the “Amount” field. Repeat this until you have entered all of your lines.
To make sure the total invoice amount is what you expected click the “Totals” button. Here you can see a breakout of all the applicable amounts including calculated tax and additional miscellaneous charges.

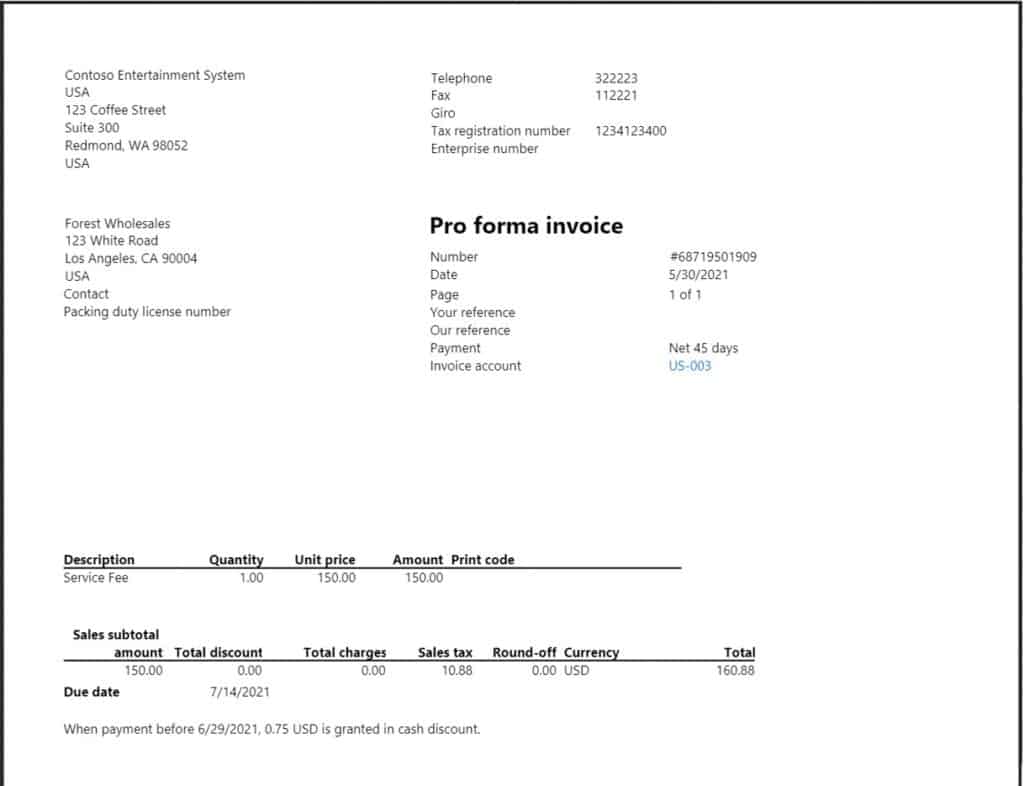
Print a Pro Forma Free Text Invoice
The last thing I usually do before I post my free text invoice is print a pro forma free text invoice. This gives me the chance to take a look at the customer facing print out and make sure everything looks ok. To print a pro forma free text invoice, click the “Print” button and then click “Selected”.
Post a Free Text Invoice
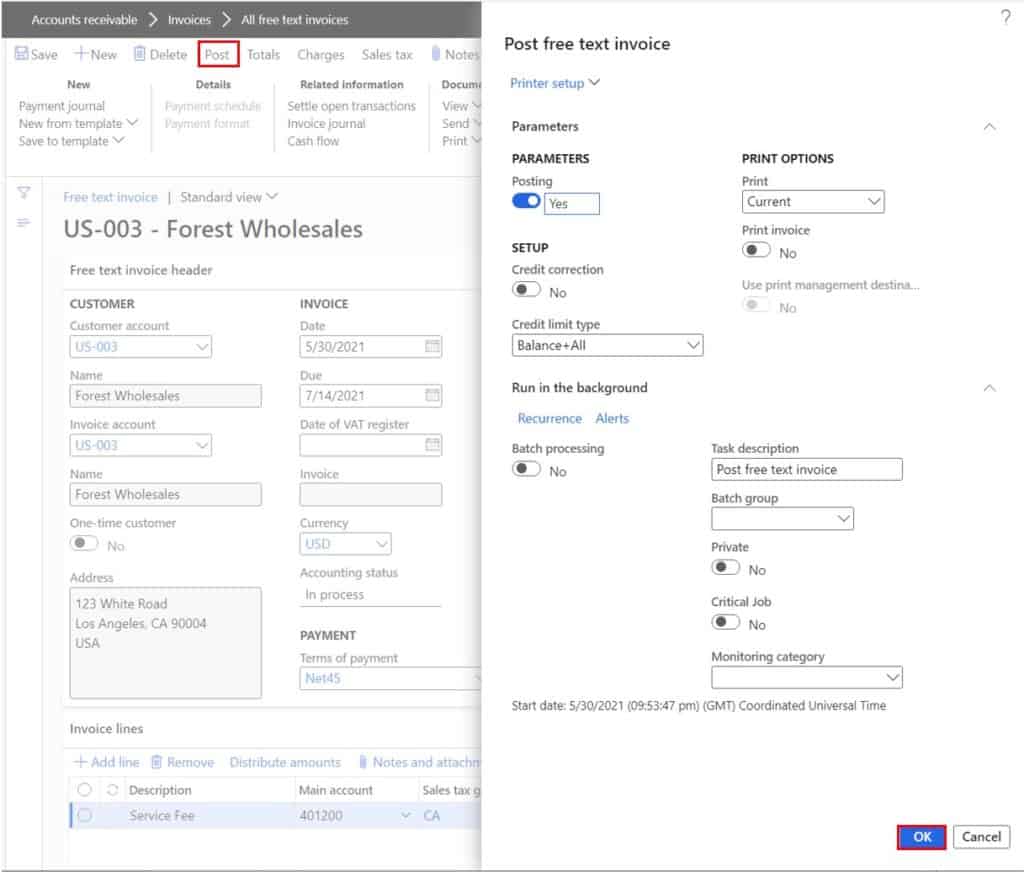
Once we are happy with the free text invoice, we need to post the invoice. This will post the invoice balance the customer account selected in the “Invoice account” on the free text invoice. To post the free text invoice click the “Post” button at the top of the free text invoice form. Then on the flyout form click the “Ok” button to post the free text invoice.
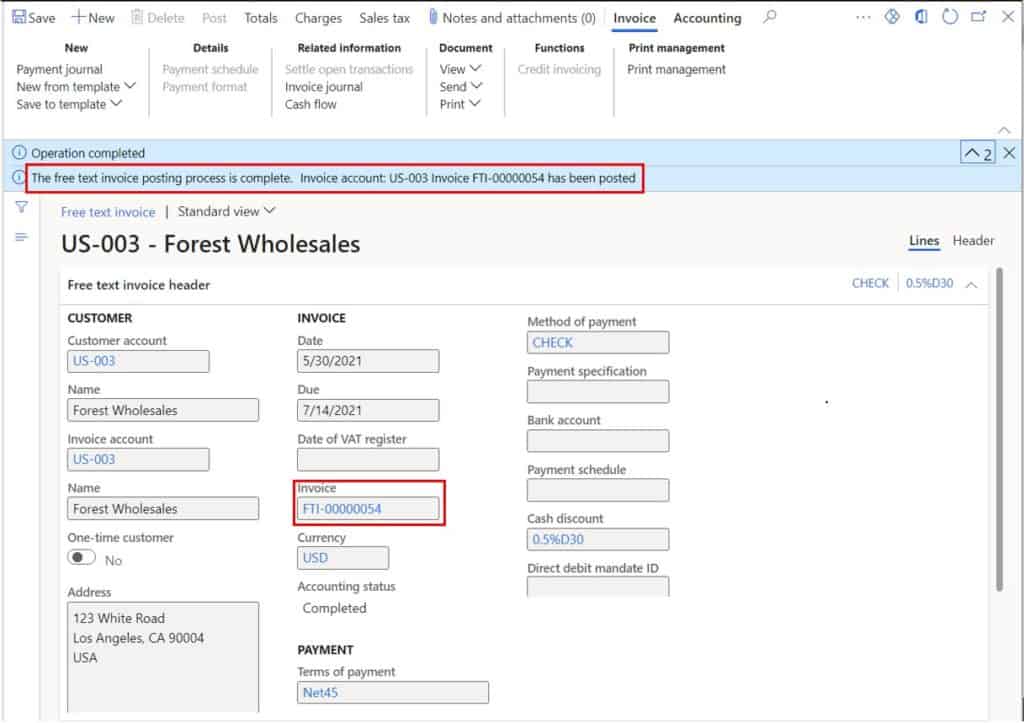
Once the posting is complete you will see an information log message saying that the free text invoice posted successfully, and it will also display the free text invoice number. This invoice number will also be set on the free text invoice in the “Invoice” field.
Free Text Invoice Template
There may be some cases where you either need to create a large number of very similar free text invoices for different customers or maybe just the same free text invoice every month. Instead of starting from scratch you can use a free text invoice template to default in a majority of the fields in the free text invoice including the free text invoice lines.
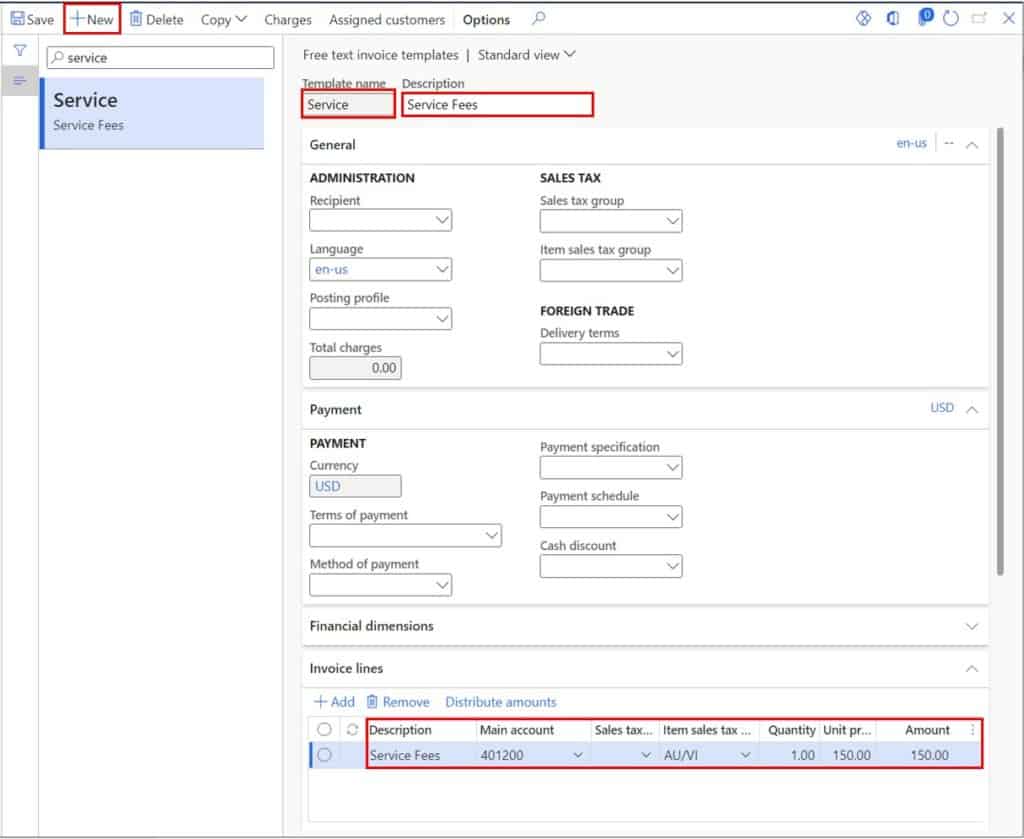
The first step is to create the free text invoice template. To do this navigate to Accounts receivable > Invoices > Recurring invoices > Free text invoice templates. Click the “New” button to create a new free text invoice template and give the template a template name and a detailed description. Next, expand each tab in the form and fill in the applicable fields you want to be defaulted when the template is selected. In the “Invoice lines” section you can also enter the free text invoice lines that should be defaulted. For example, if the only thing that will change each month is the quantity to be invoiced you could just enter all the lines that need to be invoiced and then just fill in the applicable quantity at the end of the month at the time the invoice is created.
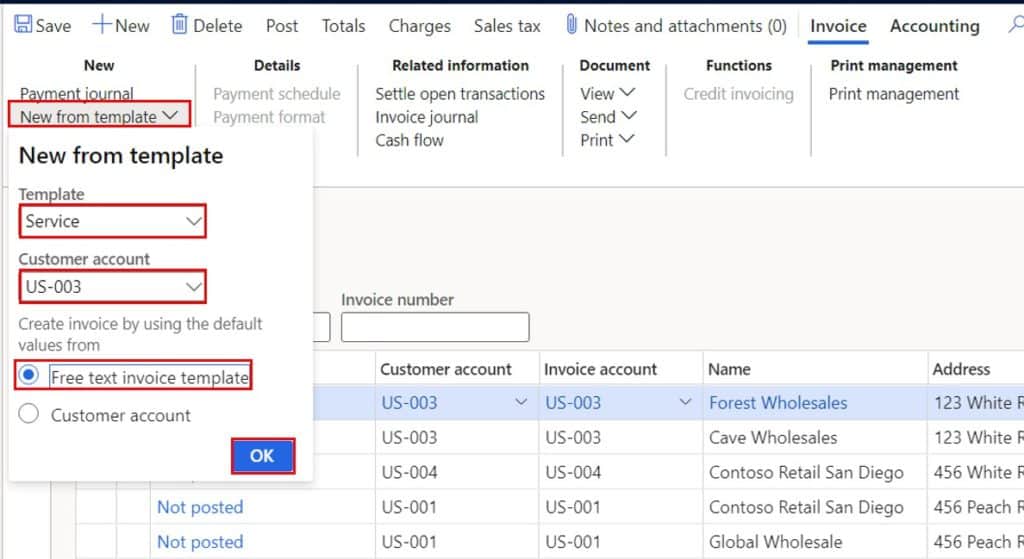
Now that we have the template created, we can use it in a free text invoice. When you create a free text invoice instead of clicking the “New” button simply click the “New from template” button instead. Then select the template you want to use, select the customer the free text invoice is for, select the “Free text invoice template” option, and click the “Ok” button.
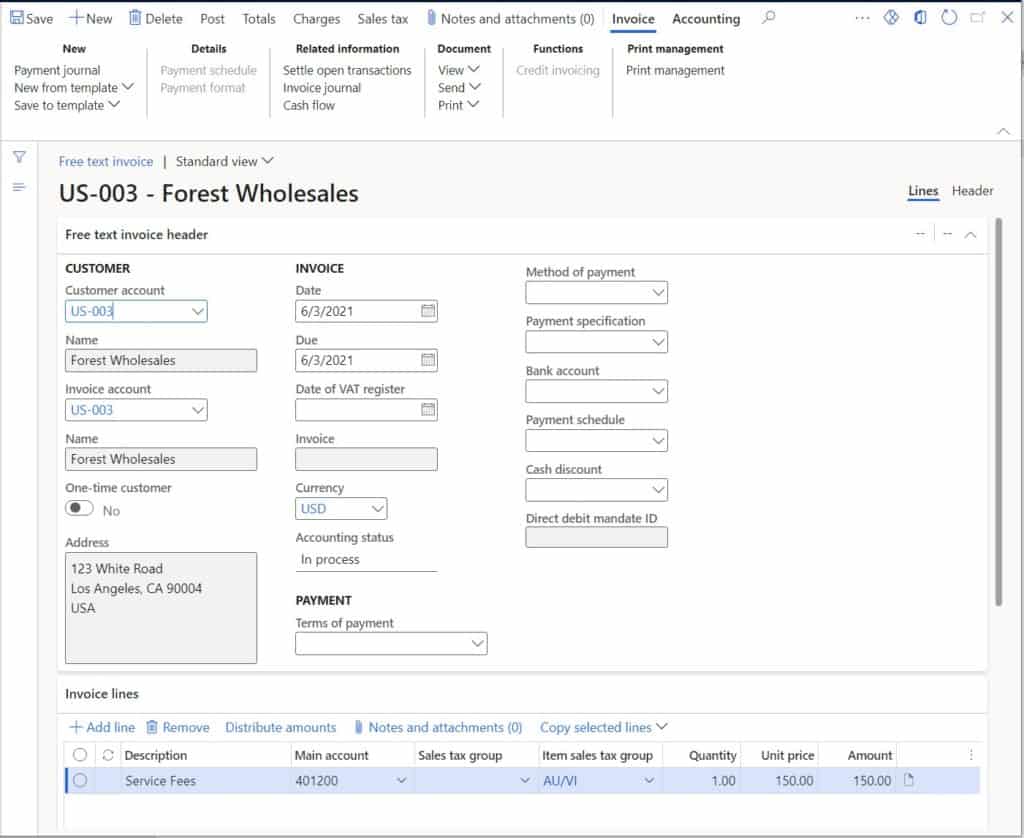
This will create a free text invoice with all the default values you populated on the free text invoice template.
Automate Free Text Invoice Posting
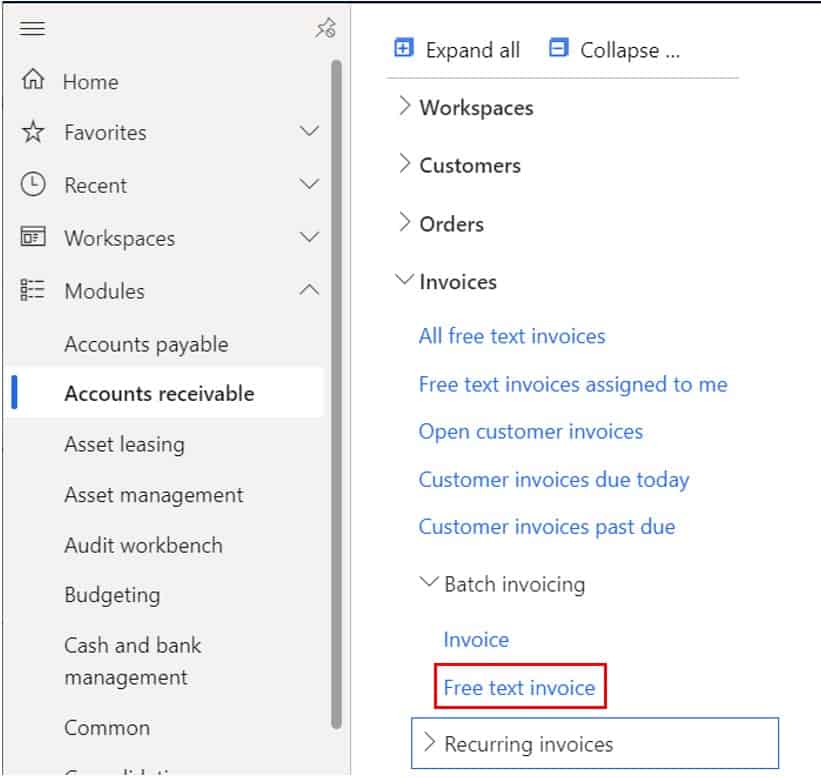
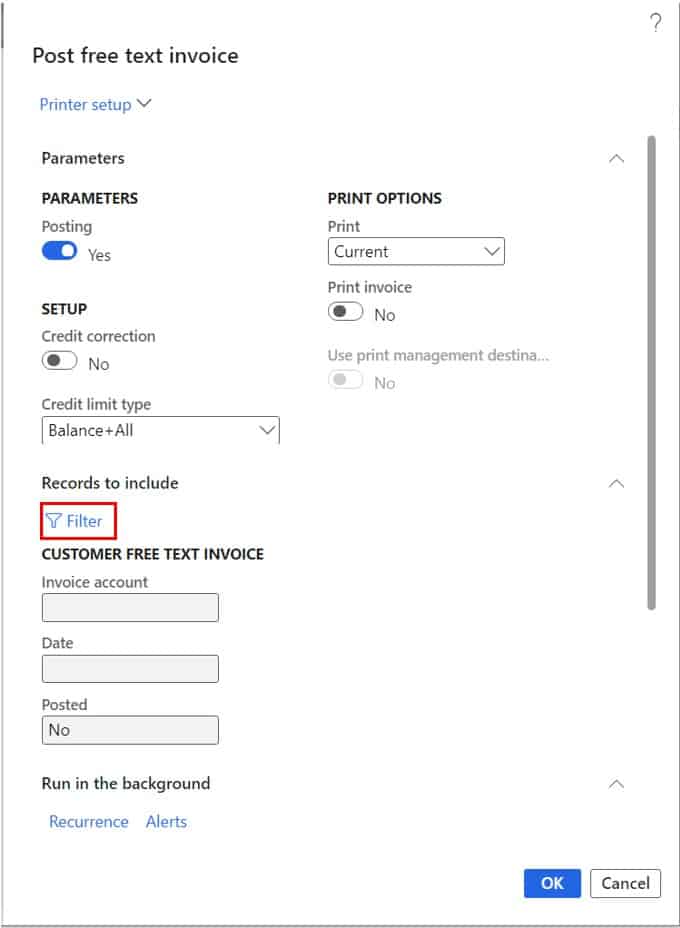
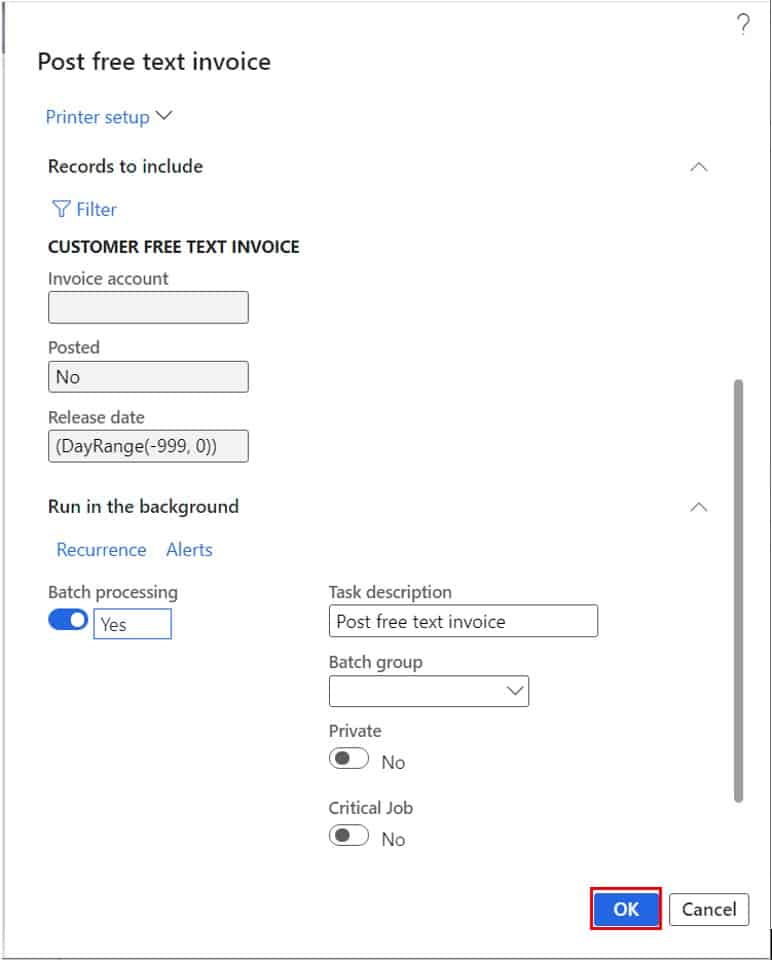
There may be cases where you would want to automatically post invoices under certain criteria or just at a certain time of month or week. You can set up a recurring batch job to automatically post free text invoices that meet a given criteria. To do this navigate to Accounts receivable > Invoices > Batch invoicing > Free text invoice.
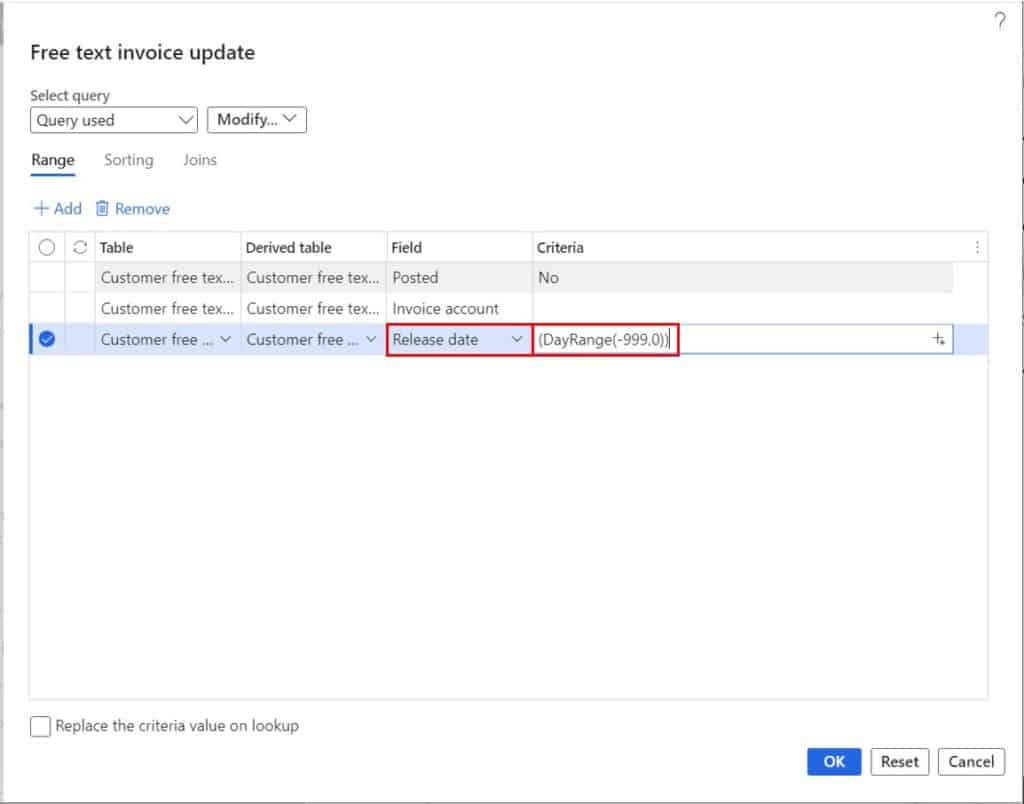
When the free text invoice batch job form opens click the “Filter” button in the “Records to include” section. This will open up an advanced filter form where you can set an advanced filter for the batch job to use as criteria for posting a free text invoice. If you are not familiar with how to use the advanced filter functionality check out this post on how to use the advanced filter functionality.
In the advanced filter form I want only free text invoices that have a release date of today order older to post every day. So, I will put a dynamic query range in the criteria for release date field so that each time the batch job runs it will evaluate the criteria and only try to post free text invoices where the release date is today’s date or order.
Note: The release date is typically used to define when the free text invoice should be released for posting which is why I used the field for this example. Once you have your criteria set, click the “Ok” button.
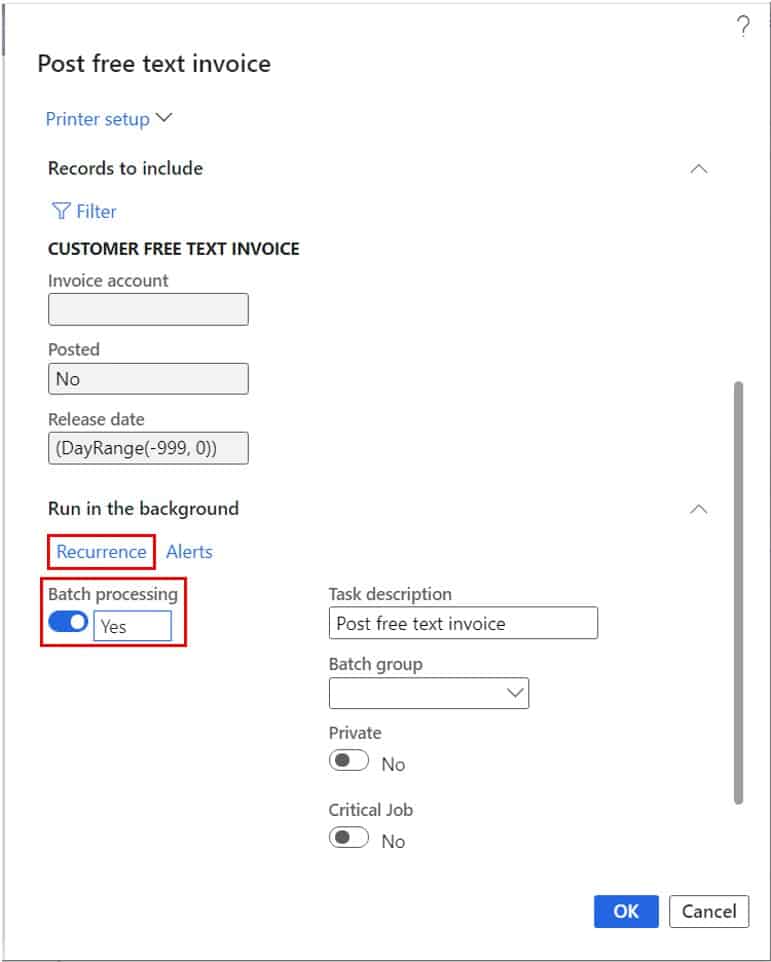
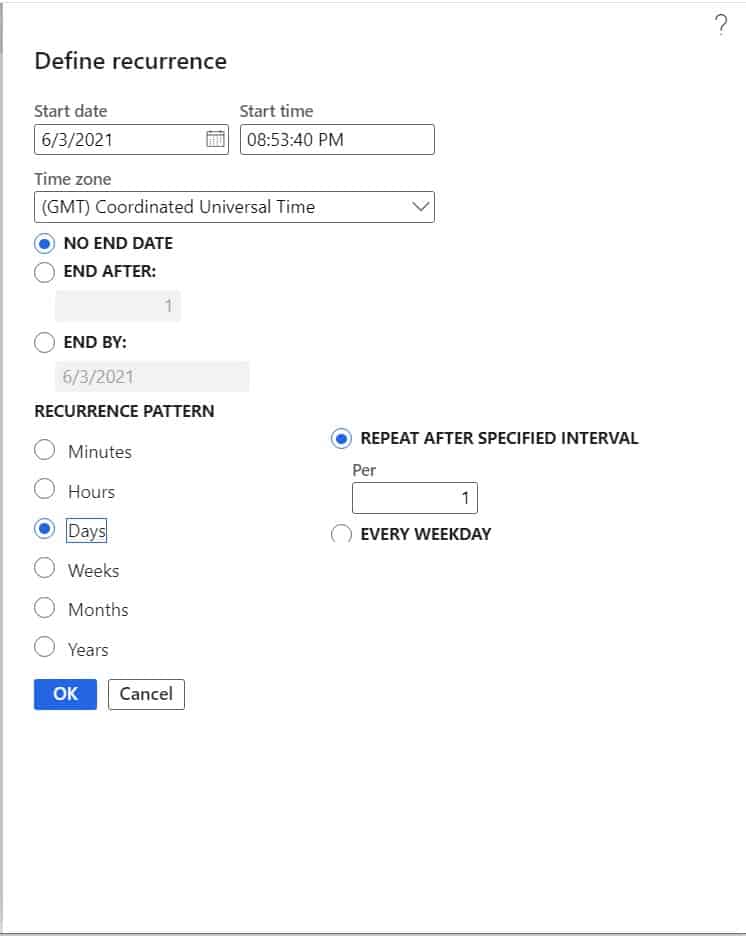
Next set the “Batch processing” flag to “Yes” and click the “Recurrence” button to specify how often you want the bath job to run.
I have set this batch job to run daily.
Next click the “Ok” button on the recurrence form to set the recurrence and click the “Ok” button on the batch job form to put the job into the batch queue.
Takeaways
Free text invoices are extremely versatile documents in Dynamics 365 Finance and Operations that can be used for a variety of things. If you have understood and mastered the topics in this post, you have mastered the majority of the skills needed to use free text invoices in your implementation or in your daily business processes.