

The Dynamics 365 Finance and Operations request for quotation (RFQ) feature is commonly used in implementations but often intimidating for new users that are used to requesting quotes through email. Processing requests for quotations in Dynamics 365 Finance and Operations enables visibility to the quoting process, traceability, and better collaboration among buyers and suppliers.
This post can be used as a training guide and will show you how to process an RFQ without using the vendor collaboration portal. I will write something on processing an RFQ using the collaboration portal in another post.
Basic Flow
- The basic flow of an RFQ is we select our items we want to get bids for, the vendors we want to receive bids from and send the RFQ to the vendors.
- Then once we start to receive the replies from the vendors, we will enter those replies until we have all or most of the vendors responses.
- Once we have the responses, we can compare the bids and select the winning bid.
- Once we accept the bid, D365 will create a purchase order based on the winning bid and we will send an RFQ acceptance letter or purchase order confirmation to the vendor informing them of the acceptance.
Create The Request For Quotation
Navigate to Procurement and sourcing > Request for quotations > All requests for quotations.
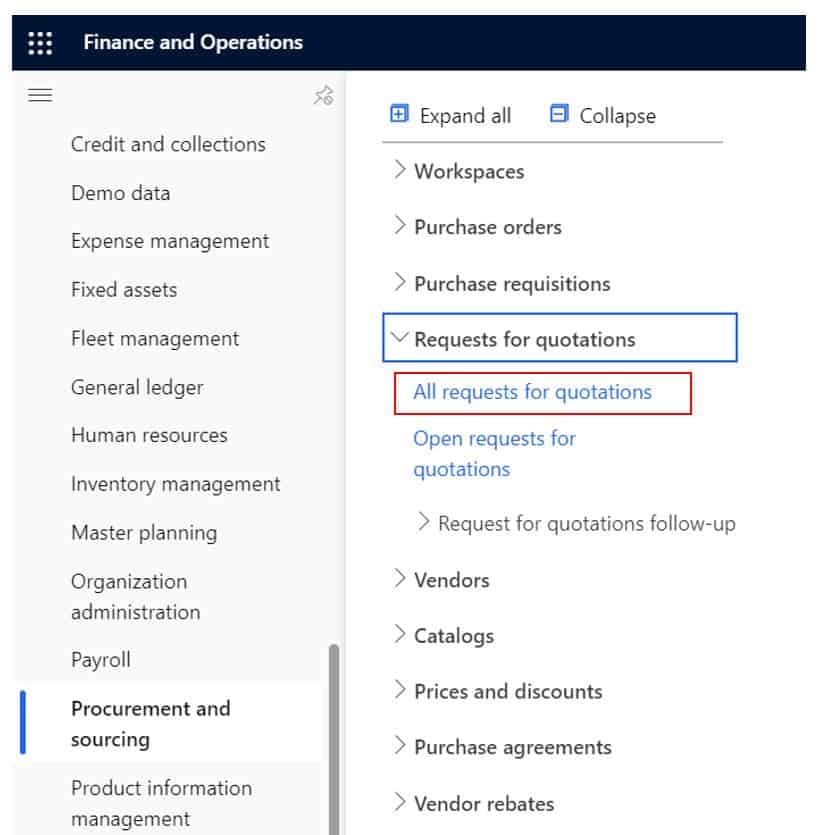
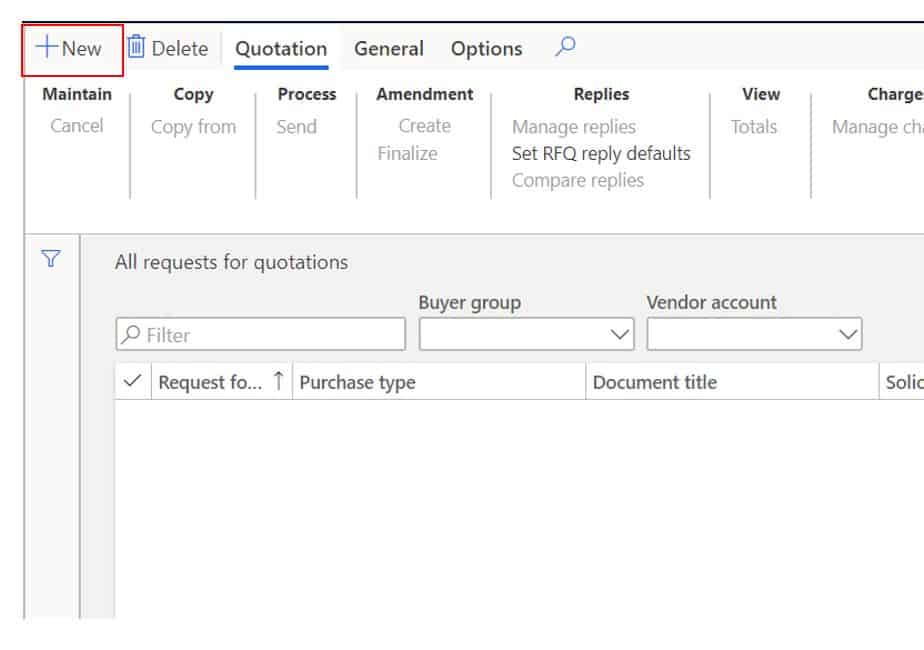
Click the “New” button to create a new RFQ.
This will open a creation panel to the right side of the screen with several fields.
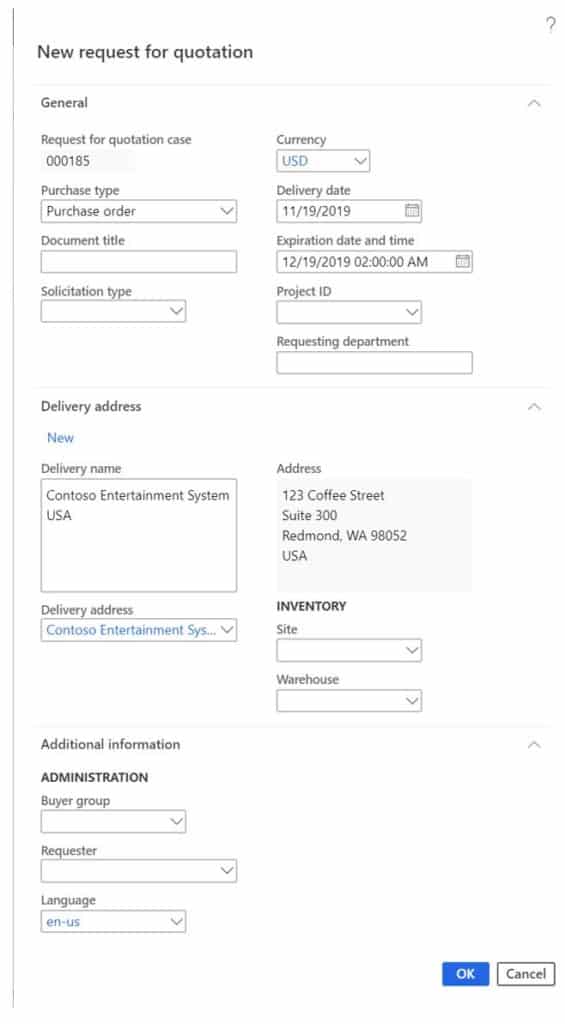
- Request for quotation case – This is the unique RFQ ID. Depending on the number sequence setup this can be auto-generated by the system or manually entered although the former is typically best practice.
- Currency – The currency will default based on the system transaction currency and can be overridden if necessary.
- Purchase type – There are three purchase types. For this example, select “Purchase order”
- Purchase order – This is the one you will probably use if you are wanting an accepted RFQ to turn into a purchase order this is the most common selection for an RFQ.
- Purchase agreement – With this setting the accepted RFQ will generate a purchase agreement.
- Purchase requisition – The purchase requisition cannot be manually set. This type is only for request for quotations generated through a purchase requisition flow.
- Document title – This is a free text field where you can title the request for quotation.
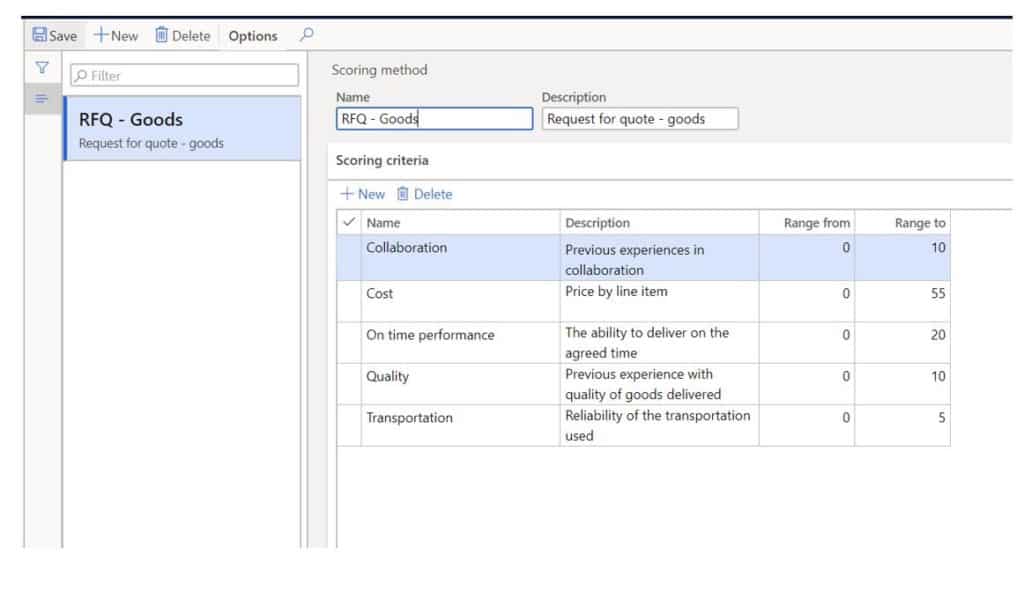
- Solicitation type – is a descriptor field that describes what the type of RFQ. The solicitation type also tied to the scoring method that will be used on the RFQ and bidding guidelines that can be configured. If you right click on the down arrow in the “Solicitation type” field and click view details you can see the solicitation type setup form.
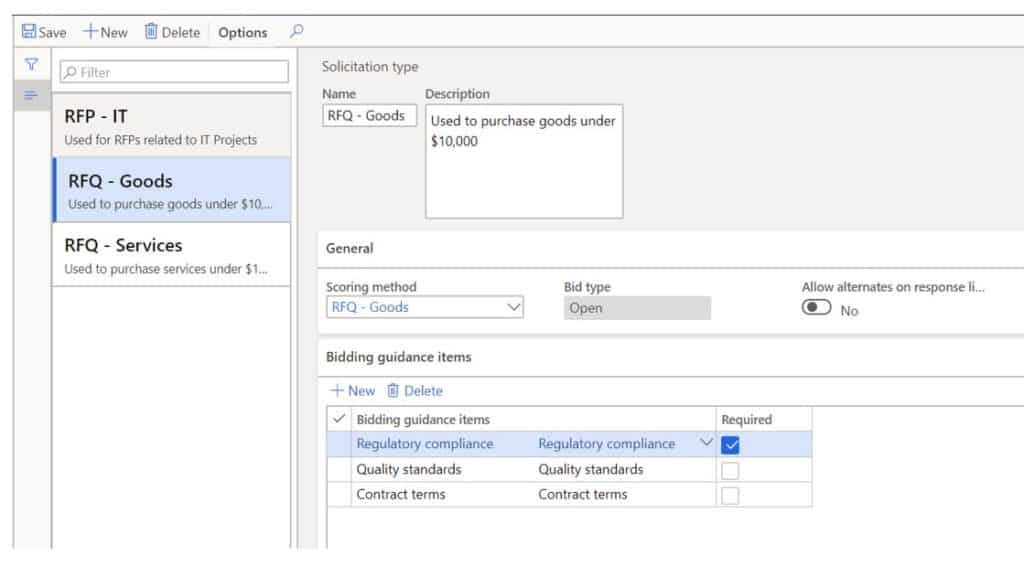
The scoring method associated with the RFQ can be configured to however your company rates and scores bids coming from vendors. You can set the “Range from” and “Range to” fields to weight certain factors higher than others. Then when the buyer receives the bids back from the suppliers he or she can not only enter the bids but also score the vendors on these criteria.
- Delivery date – This is the delivery date set at the RFQ header, but the delivery date specified by the winning bid will be defaulted to the purchase order.
- Expiration date and time – You can specify when the request for bids will expire.
- Project Id – If an RFQ is tied to a project it can be specified here.
- Requesting department – If applicable you can enter a requesting department.
- Delivery address – This address will default to the legal entity address at first and then once you specify the warehouse the address will change to the address of the warehouse.
- Site – The site associated with the warehouse that the purchase order will be delivered to.
- Warehouse – The warehouse associated with the site that the purchase order will be delivered to.
- Buyer group – The buyer group is a way for buyers to filter, sort and, distinguish ownership of purchase orders.
- Requester – Is the person who is requesting the purchase. This may not be applicable in cases where you are buying parts for manufacturing or re-sell.
- Language – will default from the default company language. The language can be overridden if necessary.
- Click “OK” to create the RFQ record.
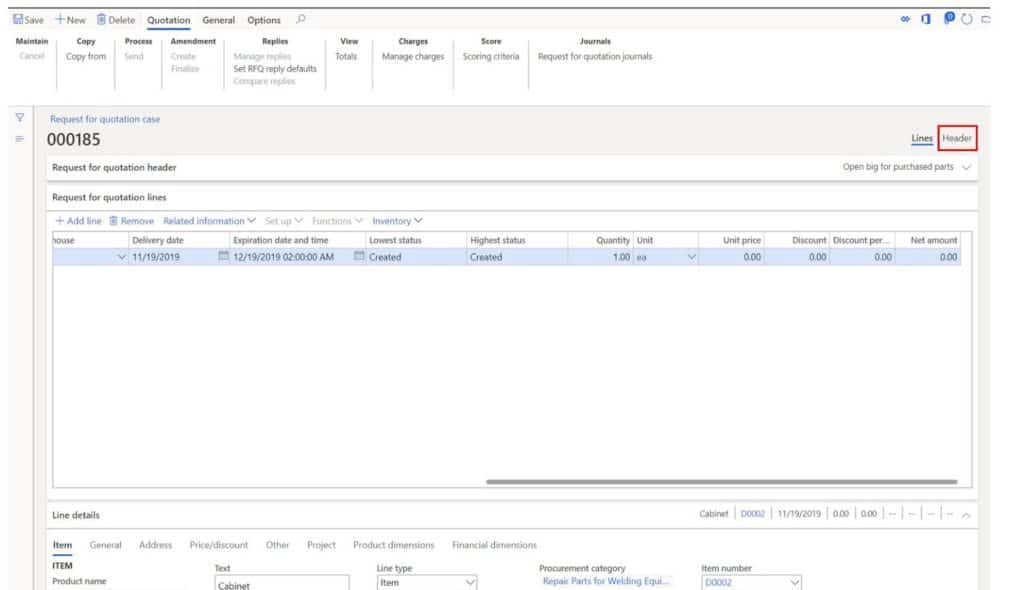
Complete The RFQ Line Details
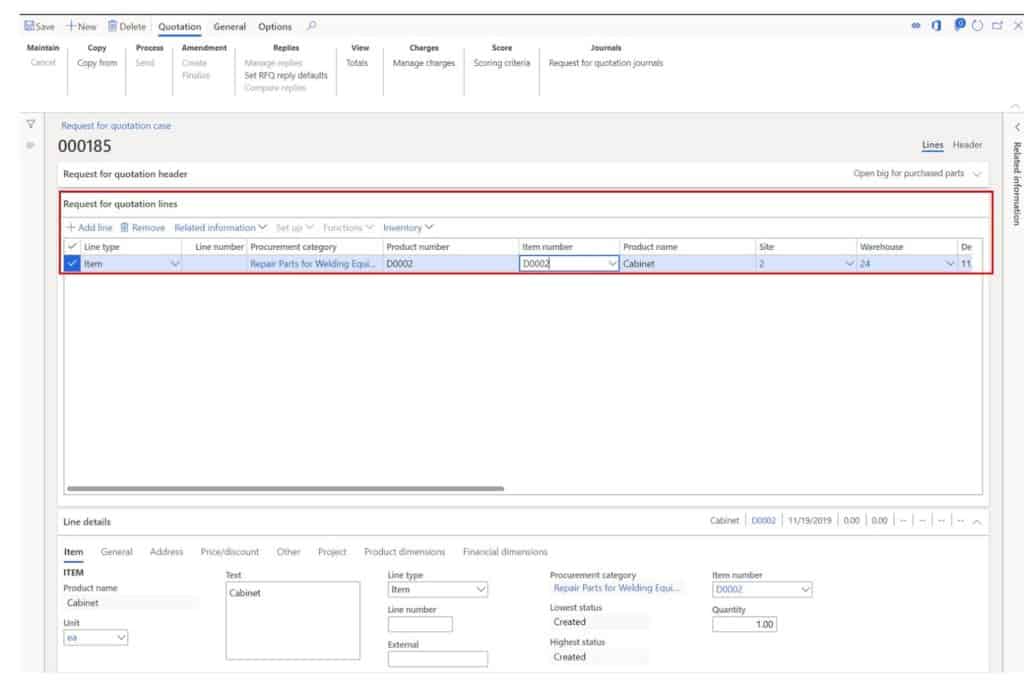
- In the “Request for quotation lines” section we will enter the parts or categories we are sending out for bids.
- Click the “Add line” button to add a line.
- Line type – The line type field is used to select whether the line is an “Item” or a “Category”. In this example we will select “Item”.
- Line number – This will be automatically generated by the system.
- Item number – Select the item number you want to send out for bids
- Site – Select the site that the items will be delivered to.
- Warehouse – Select the warehouse the items will be delivered to.
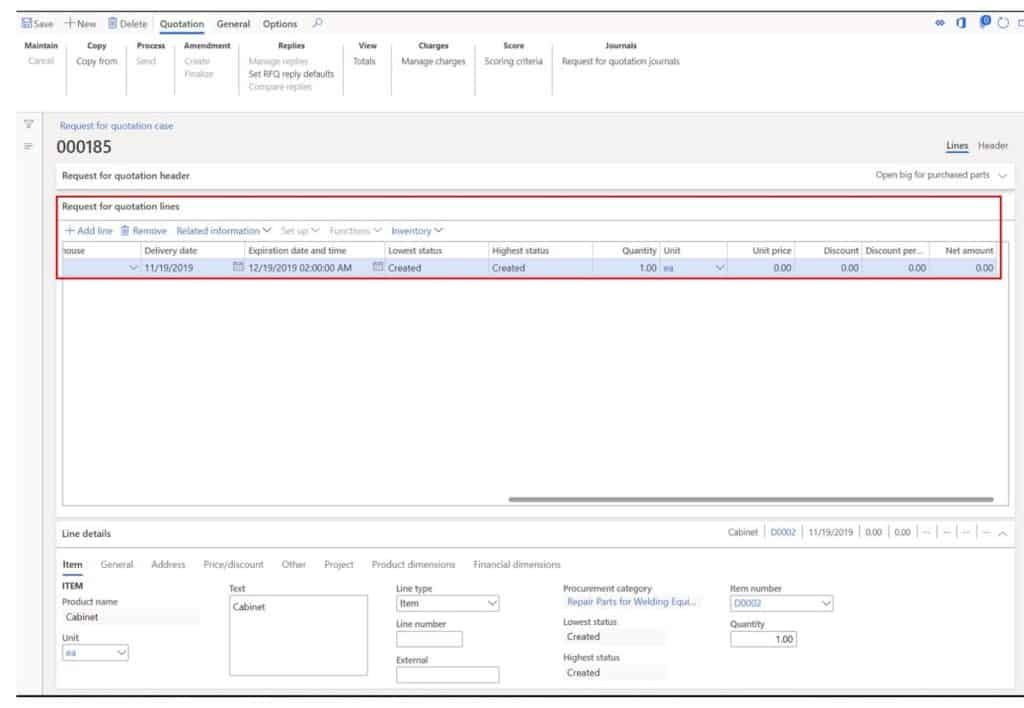
- Scroll to the right and there are additional fields that can be filled in for the RFQ.
- Delivery date – This is the delivery date you need the vendor to meet for this item. The vendor will take this into consideration when replying to the RFQ.
- Expiration date and time – The date and time will default from what you selected on the header but this can be overridden for each item.
- Lowest status – This is the lowest status for the RFQ line. Statuses can have a range of values since the bid is sent to multiple vendors.
- Highest status – The highest status is the highest status for that line. The closer the line gets to “Accepted” which is the highest status will be reflected here.
- Quantity – This is the quantity for the item that is required.
- Unit – This is the purchase unit of measure associated with the item.
- Unit price – Some buyers will fill in the unit price to give vendors a sense of the price point that the buyer is looking for. Others will leave this blank and let the vendors bid and give their most competitive price.
- Discount – This is a flat discount amount. This can be filled in if you are looking for a specific discounted price.
- Discount percentage – This is a discount percentage. This can be filled in if you are looking for a specific discounted percentage.
- Net amount – This is calculated based on the price and quantity fields that were entered previously.
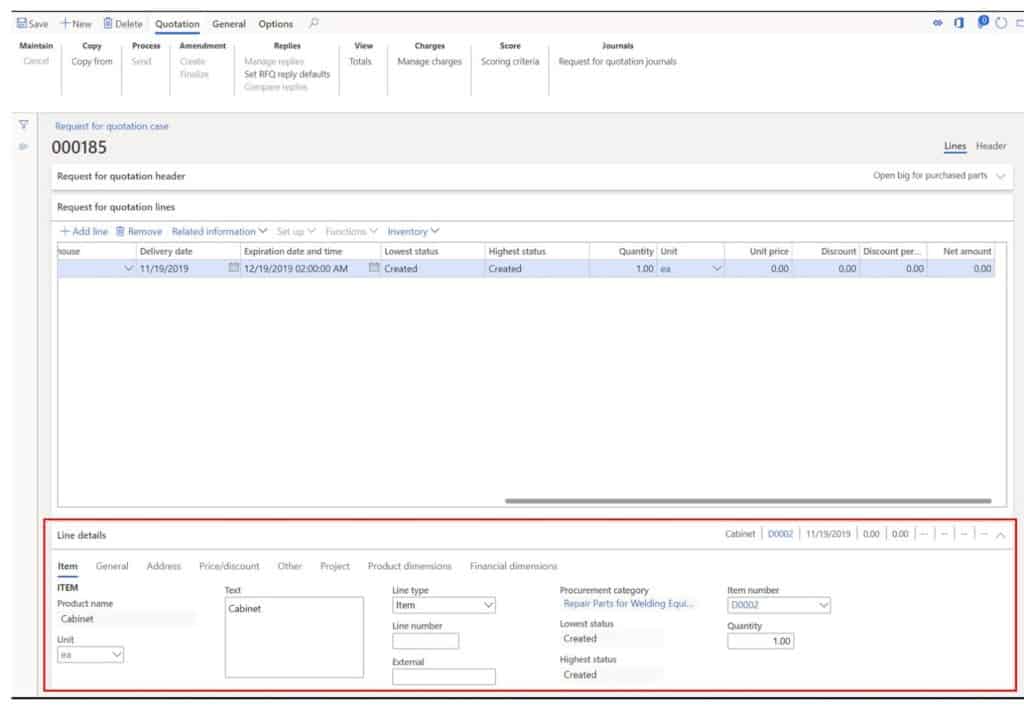
Line Details Tab
- The line details tab below has additional lines fields that you can optionally fill out for a more detailed RFQ. Some of the fields we have already filled out in the “Request for quotation lines” grid above.
- Click the “Item” tab.
- Text – This is a long description text box where you can add a long description to the product text or change the defaulted text.
- External – In some cases vendors require you to reference their part number. The “External” field is how you can reference the vendor external part number. This will be printed on the RFQ depending on configuration.

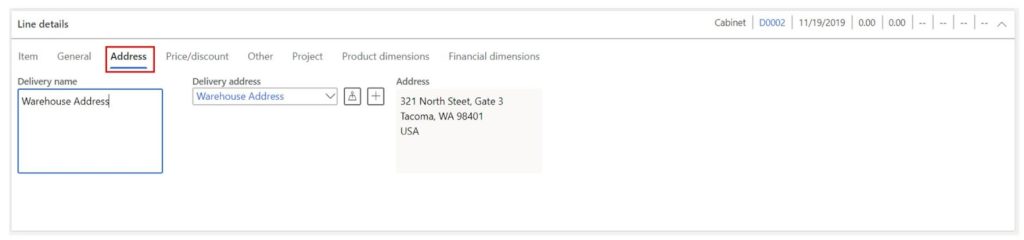
- Click the “Address” tab.
- Address – If the address is different than the defaulted address it can be overridden at the line level.
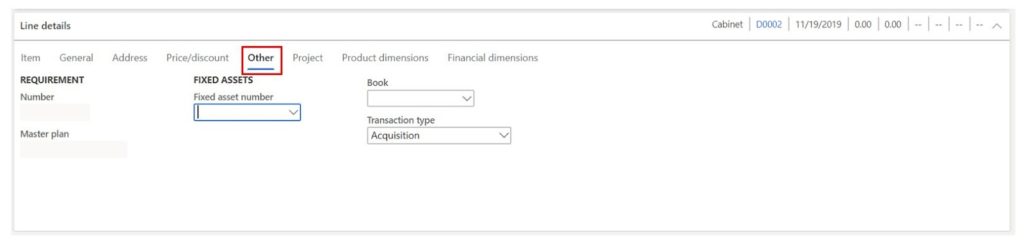
- Click the “Other” tab.
- Fixed asset number – For fixed assets purchases you can select an existing fixed asset that will post an asset acquisition at time of receipt.
- Book – Specifies the book associated with the fixed asset.
- Acquisition type – Specifies the if the transaction is an acquisition or adjustment.
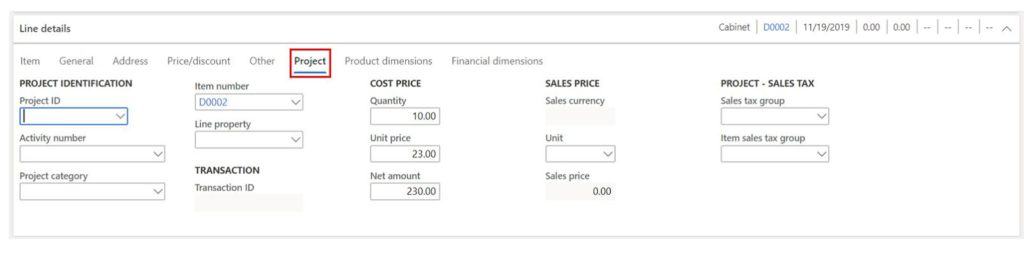
- Click the “Project” tab.
- Project ID – If the RFQ is related to a project you can select the project here.
- Activity number – Activity number associated with the selected project.
- Project category – The project category will determine how the costs are posted to the project when the eventual purchase order is processed.
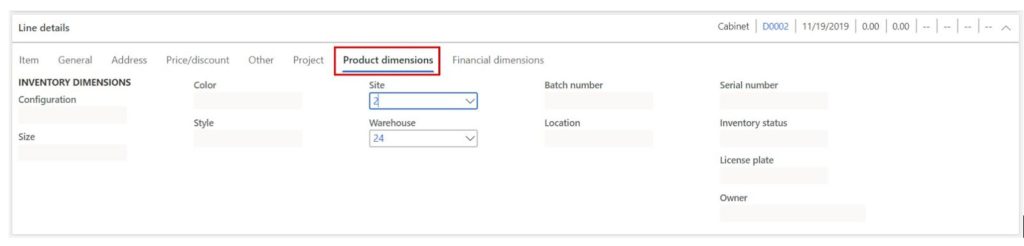
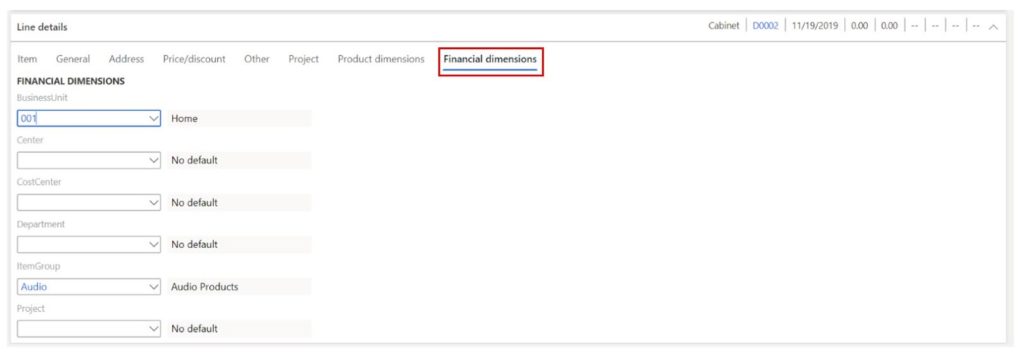
- Click the “Product dimensions” tab.
- If the product you selected is a product master and requires the selection of product dimensions you will need to specify the appropriate product dimensions in this tab.
- Click the “Financial dimensions” tab.
- The financial dimensions will be defaulted to the purchase order from the vendor and item if applicable. They can override on the RFQ is required. The financial dimensions will post to the financial transaction and allow for more granular general ledger reporting.
Complete The Header Details
Now that we have filled in the line details about item, price quantity, etc. we can finish off the header where we will specify the vendors the RFQ should be sent to.
- Click the “Header” button on the right side of the form.
General Tab
Some of the fields in the “General” section will look familiar as we have already filled out the majority of them in the RFQ creation pop-out form.
- Mode of delivery – If we know the mode of delivery that can be selected here and defaulted to the accepted RFQ purchase order.
- Terms of delivery – If we know the terms of delivery, we can specify it here and it will be defaulted to the resulting. Delivery terms identify codes for predefined commercial shipping terms. Terms can specify carrier, routing, freight charges, place of delivery, liability, and title to goods in an exchange.

Bidding Guidance Items Tab
The bidding guidance items section shows the rule associated to the bid. It is defaulted from the “Solicitation type” selected at the beginning. You can add or remove bidding guidance records as required.

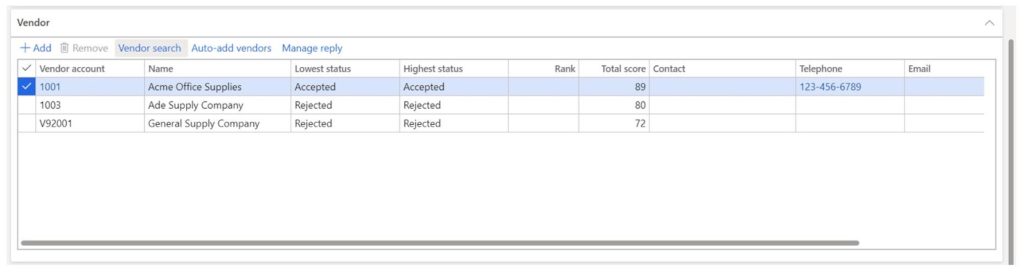
Vendor
The vendor tab is where we select the vendors we are going to invite to bid on our product(s).
- To add a vendor click the “Add” button and click the drop down in the “Vendor account” and select the vendor. Repeat this until you have selected all your vendors.
- After you select all your vendors the other fields on the grid will auto-populate. The “Lowest” and “Highest status” fields will eventually show you which vendor’s bid has been selected.
- The “Rank” and “Score” fields will be populated after we enter replies for our vendors and score and rank them.
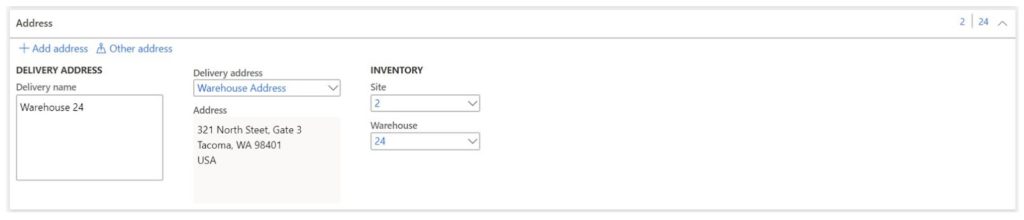
Address Tab
There’s not much to do here because the address should default in from the selected warehouse. So unless the address is wrong you can keep moving along.
Price/Discount Tab
- Terms of payment – Can be selected on the RFQ and defaulted to the resulting purchase order after RFQ acceptance. Terms of payment will determine when payment is due to the vendor.
- Method of payment – Can be selected on the RFQ and defaulted to the resulting purchase order after RFQ acceptance. Method of payment specifies how the vendor will be paid.

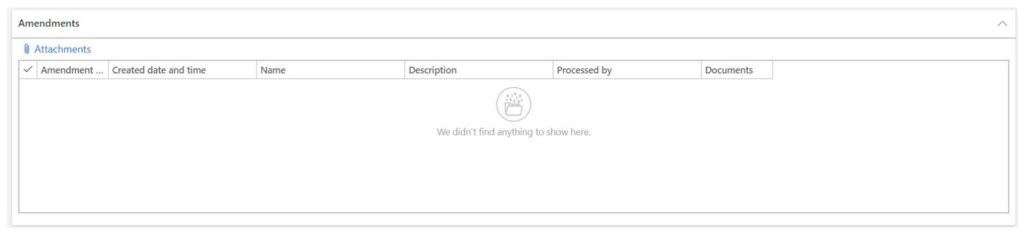
Amendments Tab
Amendments can be captured after the initial RFQ is sent and changes are made. Since we have not yet sent the RFQ we will not be able to create an amendment yet.
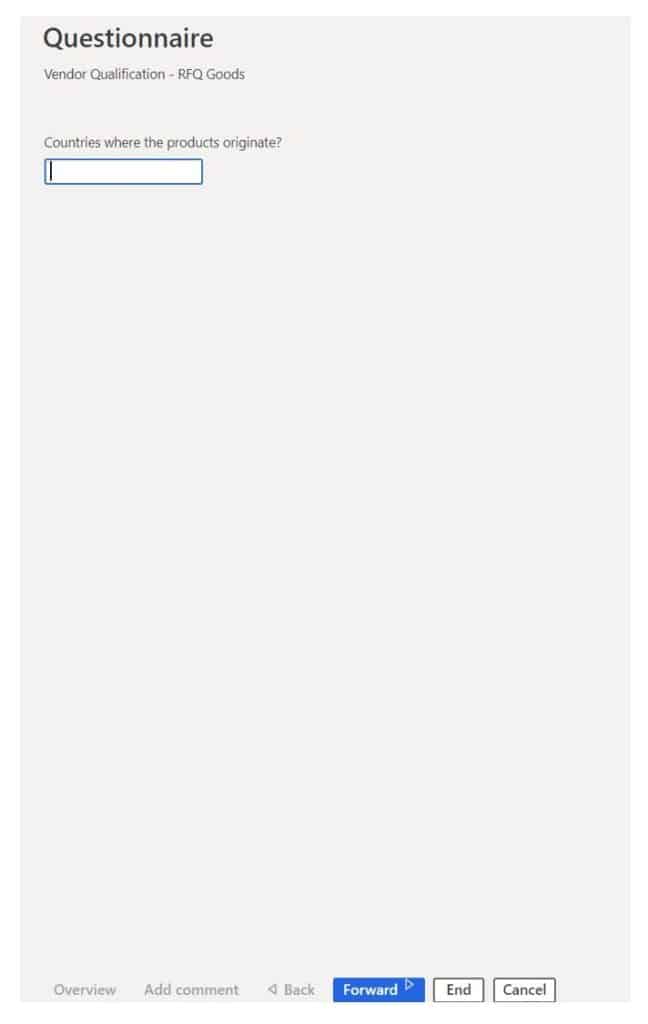
Questionnaires Tab
Questionnaires can be added to the RFQ for the vendor to complete. This is best employed in conjunction with the Vendor collaboration portal so the vendor can fill out the questionnaire in the D365 interface. Otherwise the questions will need to be attached as a note and filled in by the buyer during reply entry.
- Click “Add” to add any amendments to the RFQ.

Below is a sample of what the questionnaire would look to the vendor on the external vendor collaboration portal.
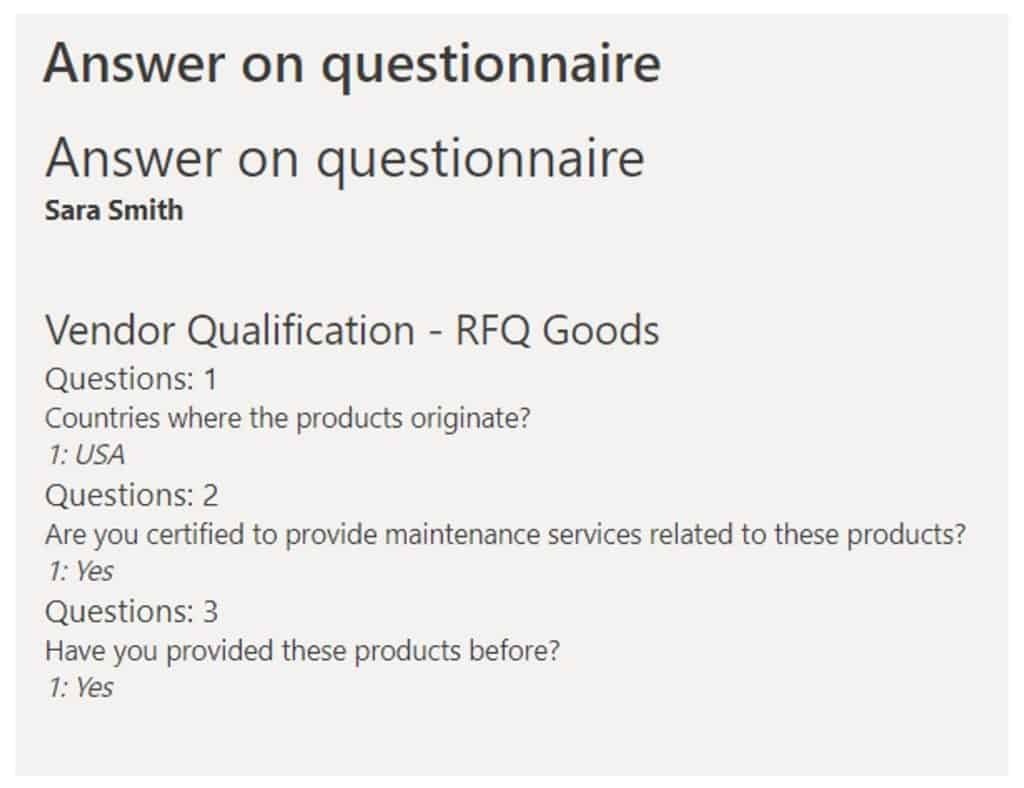
When you go to review the questionnaire answers this is what you would see.
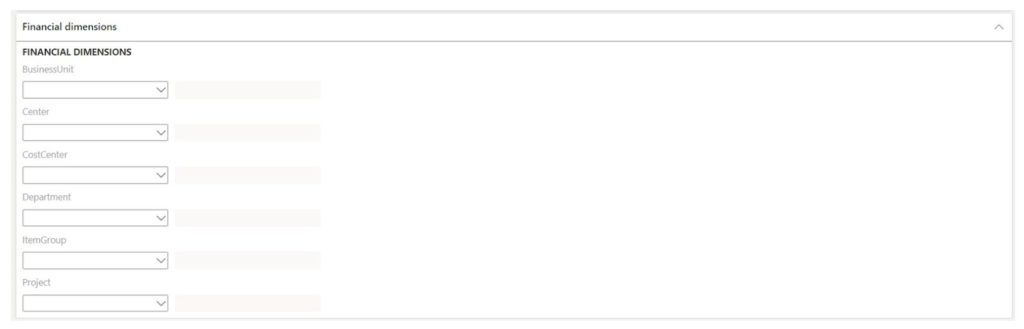
Financial Dimensions Tab
Similar to the “Financial dimension” section on the RFQ lines you can select financial dimensions on the RFQ header that will default to the purchase order header after the RFQ is accepted.
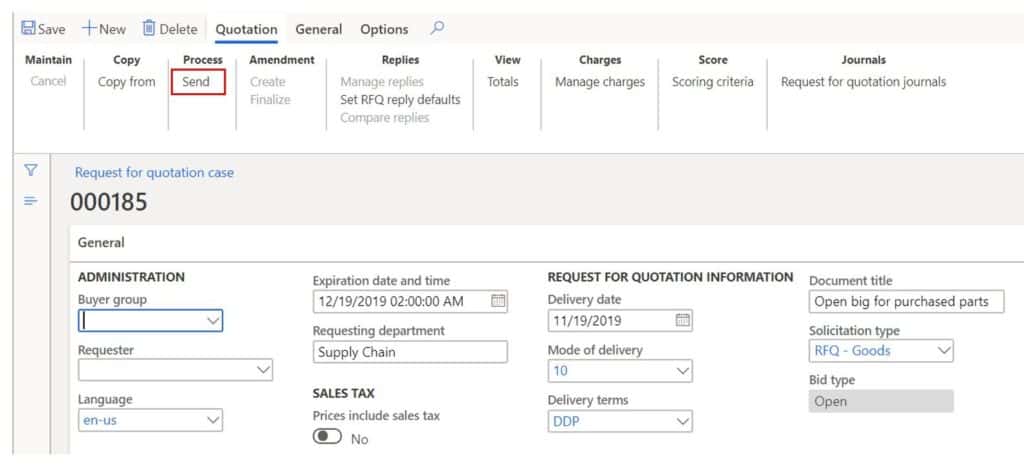
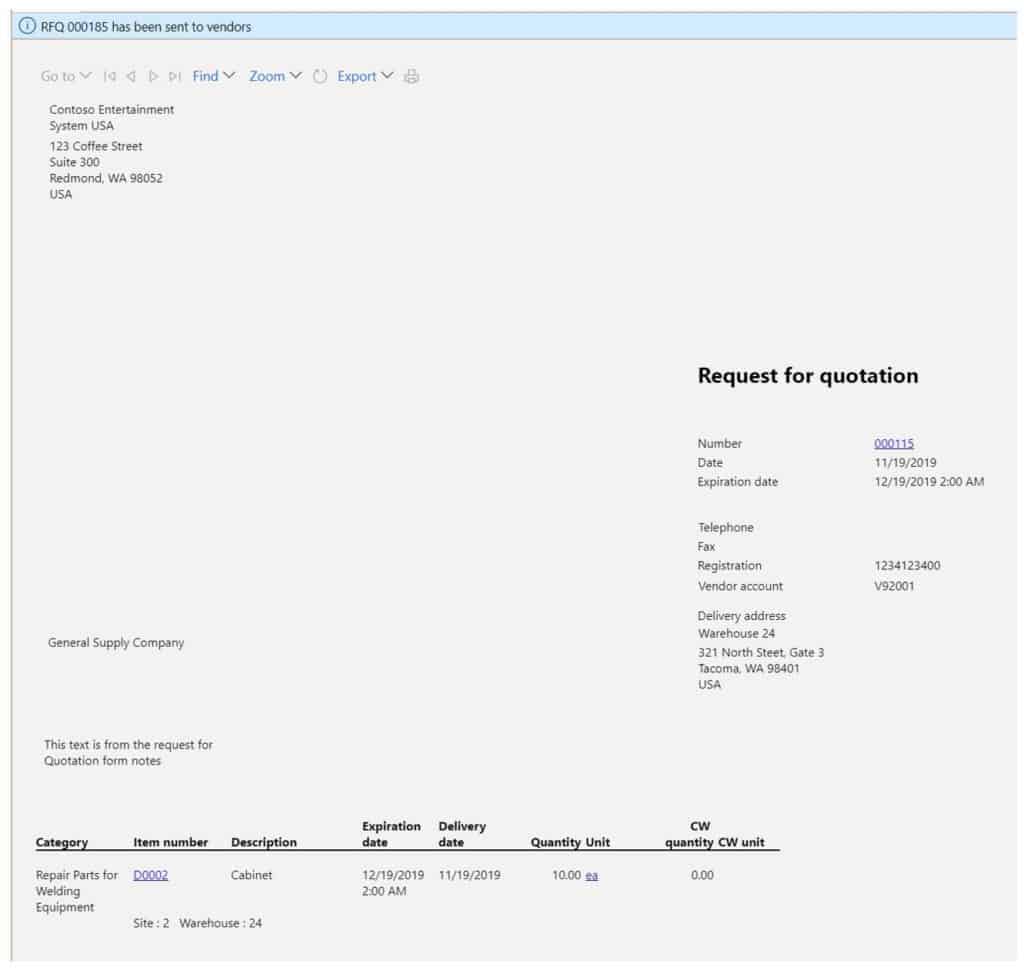
Send RFQ To Vendors
Now that we have the details of the RFQ filled out, we can send the request for quotation out to the vendors.
- To send the RQF click the “Quotation” tab up in the ribbon bar and click “Send”.
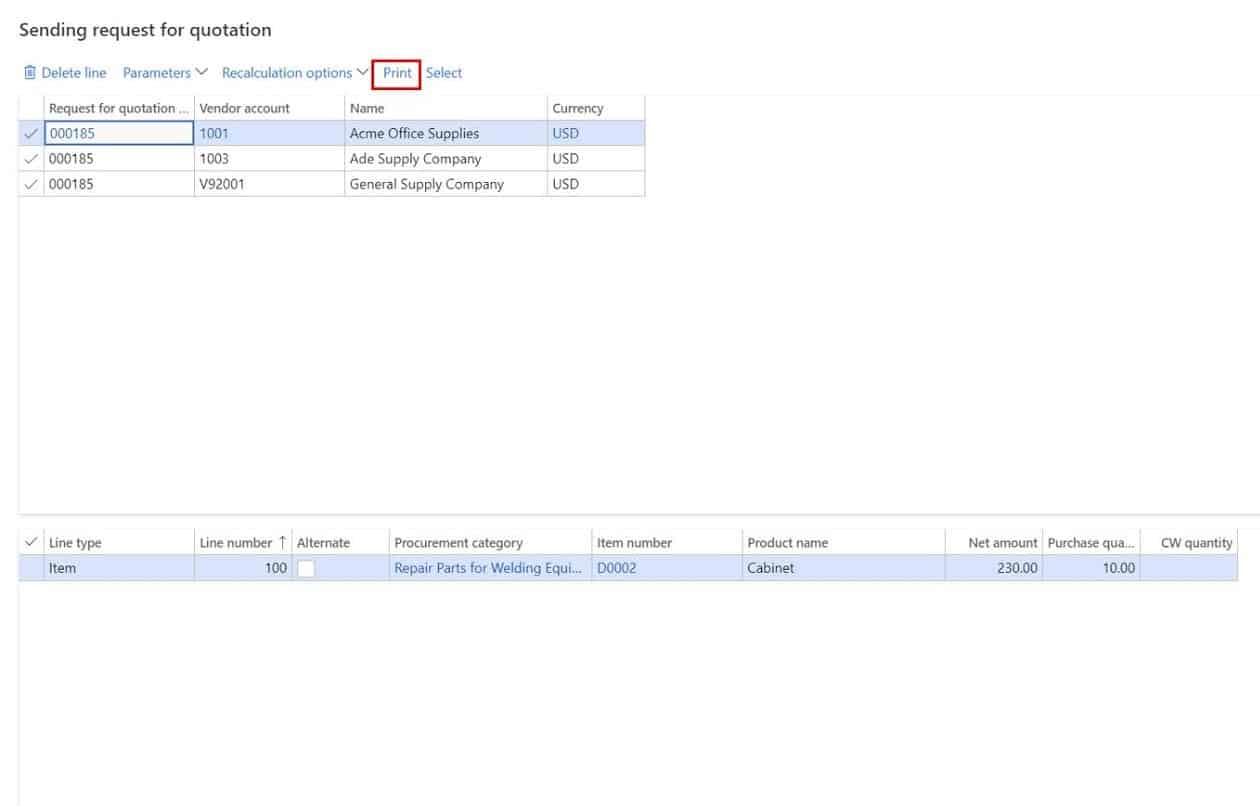
This will open the print screen. If you want to print the RFQs you can click the “Print” button. This will open the printing option screen.
Make sure you select the “Print request for quotation” option. By default the RFQ will print to the screen which you can then preview and export to PDF or your document format of choice. If you want to send the RFQ as an email you can click the “Advanced printing options” and select the email option.
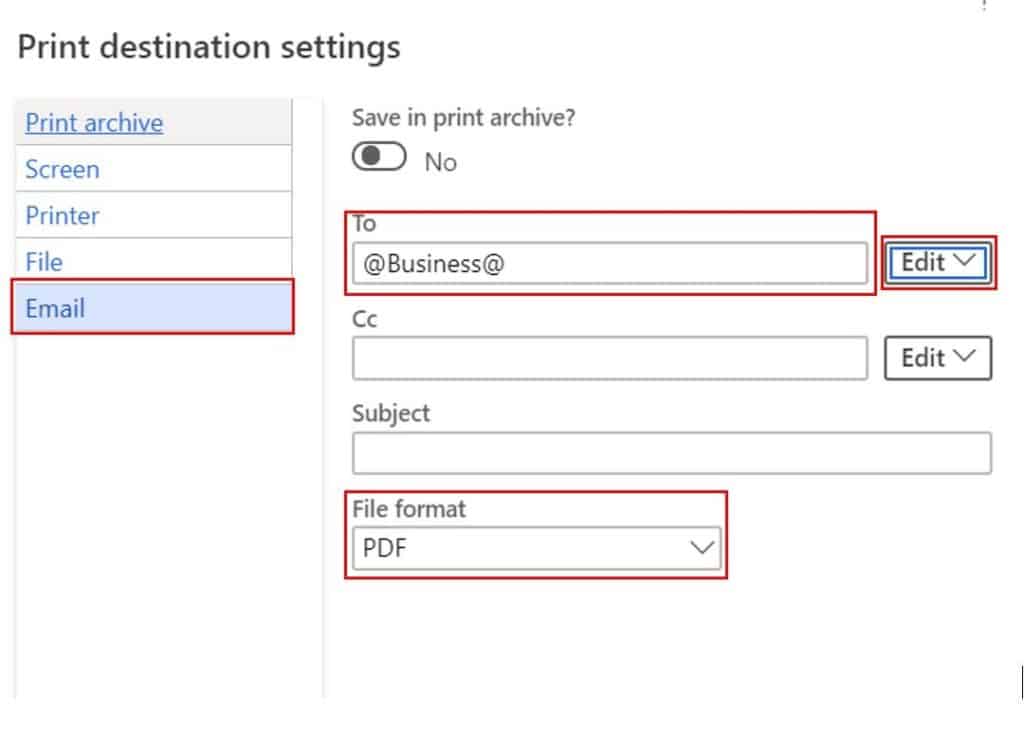
You will need to click the “Edit” button to specify the email purpose you would like to use when sending the RFQ to the vendor. This option assumes you have the vendor’s email on the vendor record. If not you may want to just print the PDF and send that as an attachment yourself.
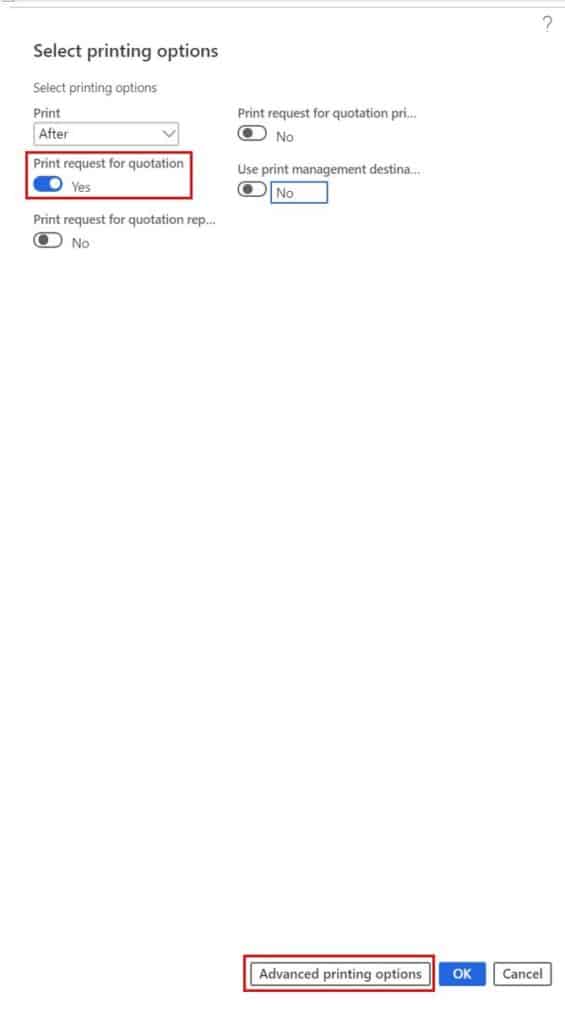
- Once you have selected your printing preferences you can click the “OK” button to send the RFQ.
- This will generate RFQ documents for however many vendors you selected. In this example I have three RFQs that will be generated.
Enter The Replies
After some time you will start to receive bids from the suppliers you sent the RFQ to. When the buyers receive the replies from the vendors, they will enter those on the RFQ to be able to compile and eventually compare all the replies to pick the best offer.
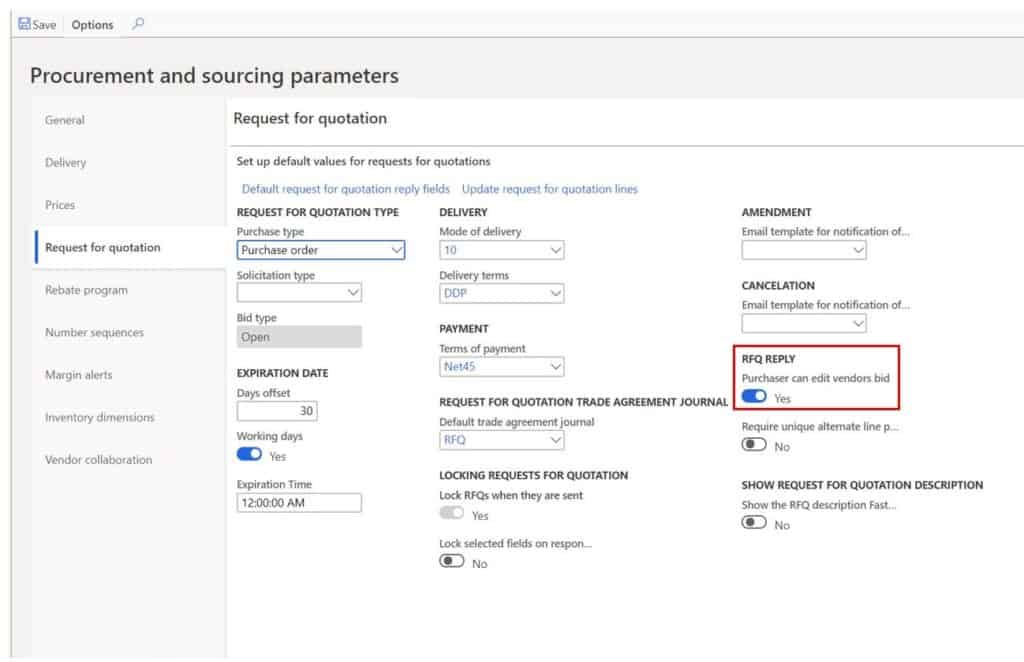
Before you start entering replies make sure the “Purchaser can enter vendor bid” flag is checked on the procurement and sourcing parameters. This option is used when vendor collaboration is not being used and replies will not be entered by external vendors through the vendor collaboration portal but internally by buyers. Navigate to Procurement and sourcing > Setup > Procurement and sourcing parameters > General tab. Enable the “Purchaser can enter vendor bid” flag.
Back on the RFQ you will now be able to enter the vendor reply by clicking the “Manage replies” in the ribbon in the “Quotation” tab.
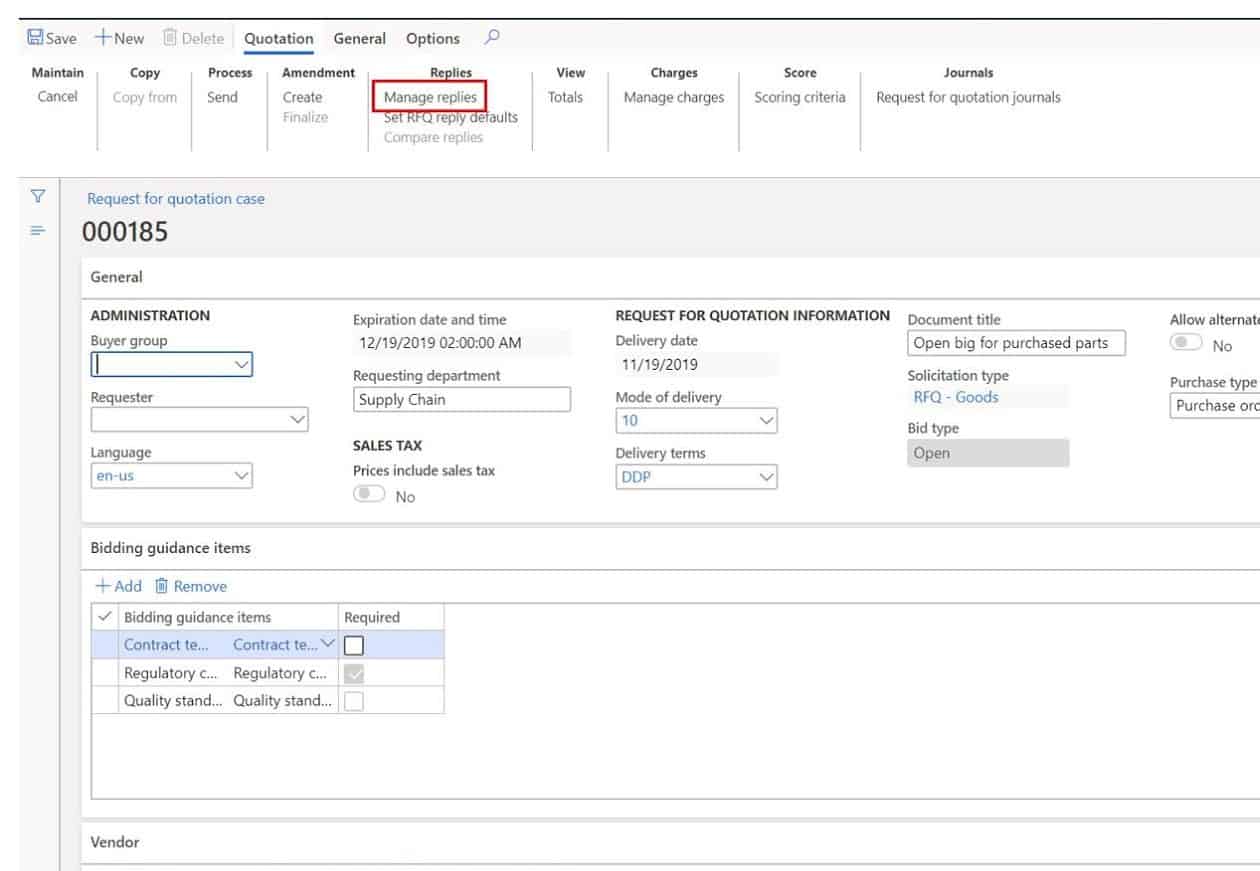
- Here you will see reply records for each vendor you sent the RFQ to.
- To edit the reply record click the “Edit” button and click “Edit RFQ Reply”.
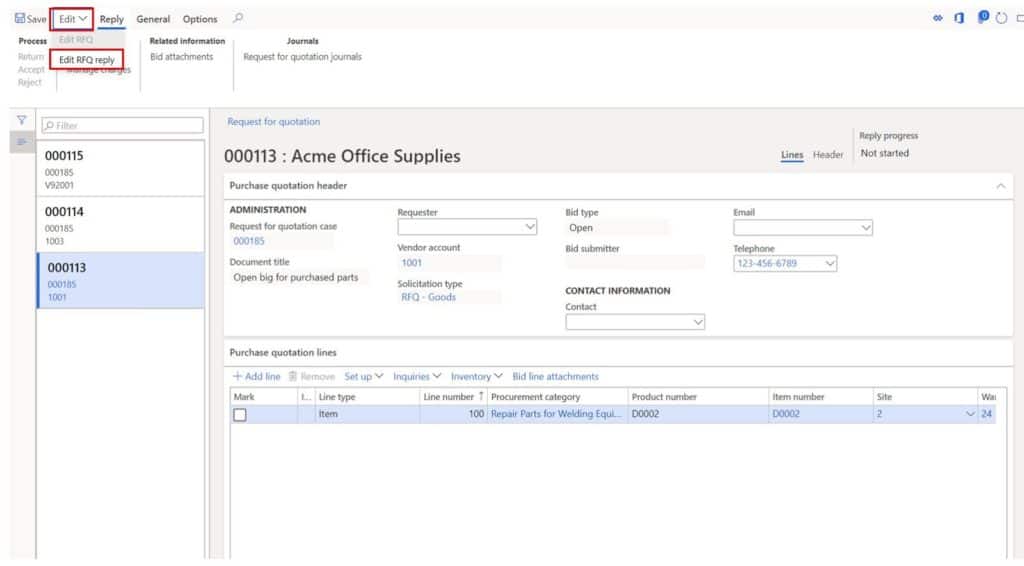
- This will bring you to the RFQ reply details page where you can edit the reply.
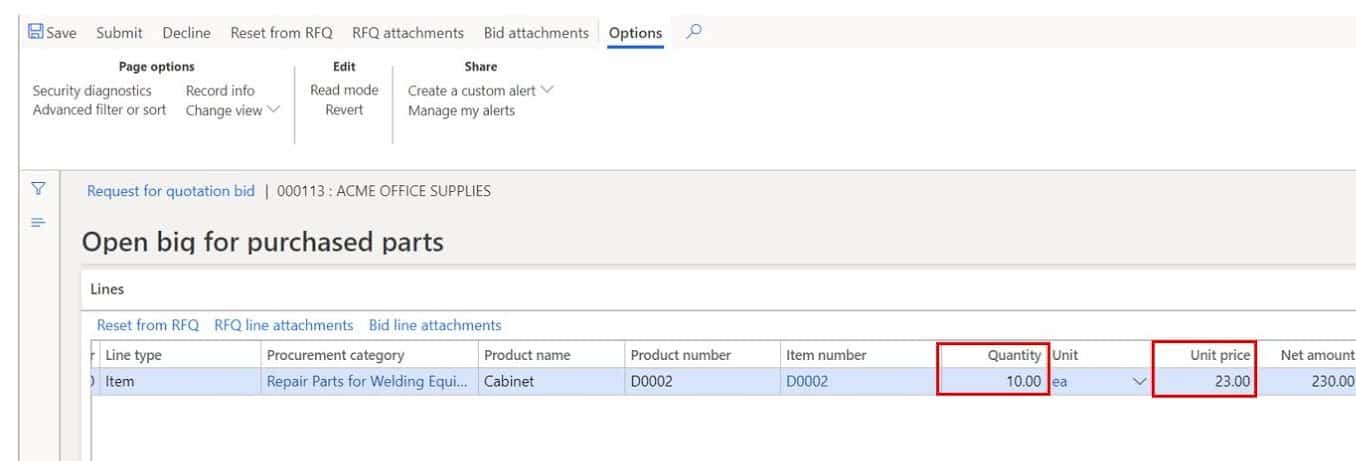
- Scroll down to the “Lines” section and enter the reply details for “Quantity” and “Unit” price. Do this for each item that you received a bid for.
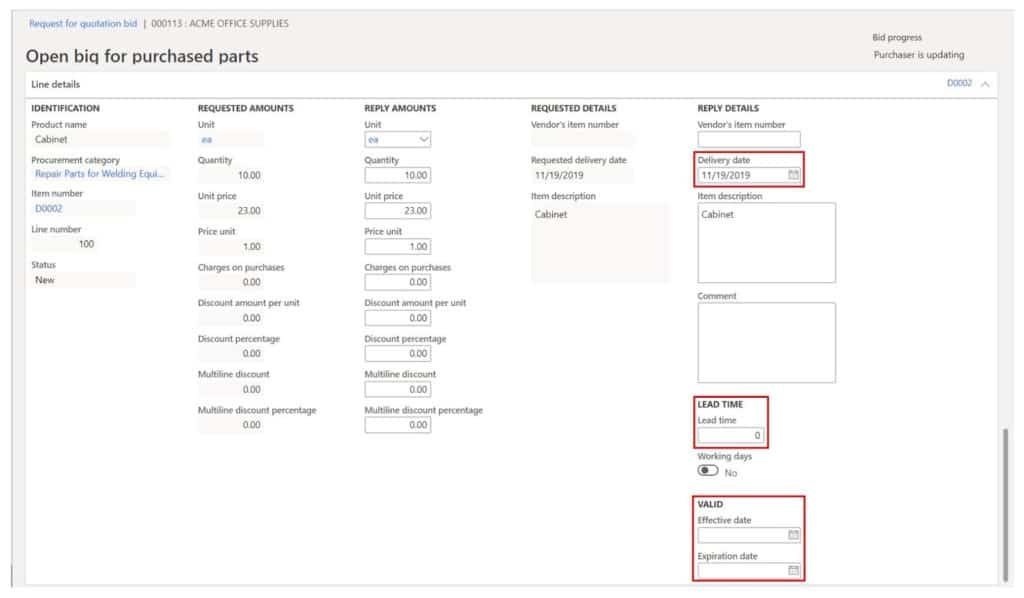
Expand the “Line details” section. Here you can enter things like delivery date, and/or lead time, the validity period for the proposed bid and any other details contained in the vendor reply.
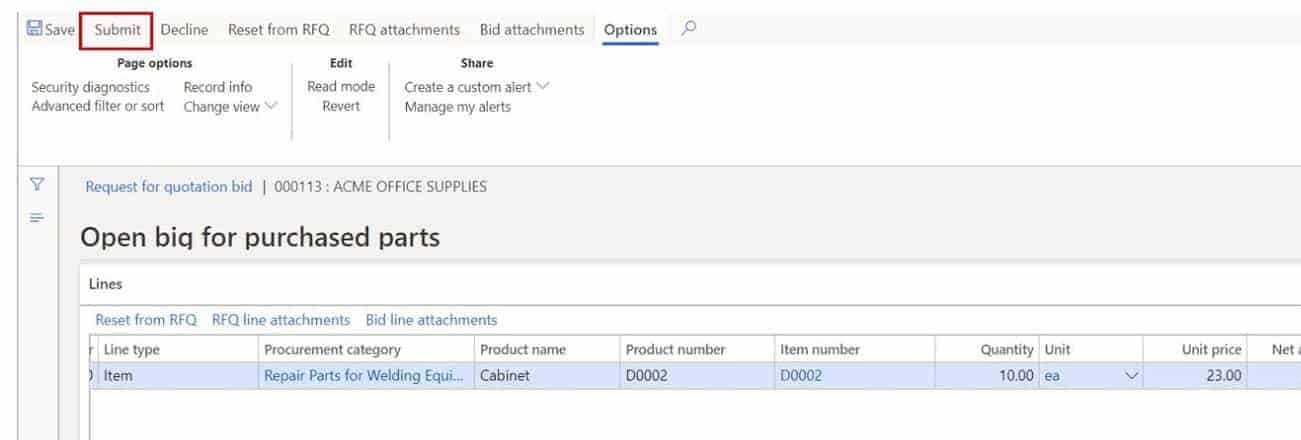
Once you are finished entering the details of the reply click the “Submit” button at the top left of the page.
Reply Header
After submitting the reply you will be returned to the RFQ replies page where you have the replies records for each vendor on the left side and a preview of the reply details on the right side of the page. You should now see the details you entered for the first reply in the pane on the right.
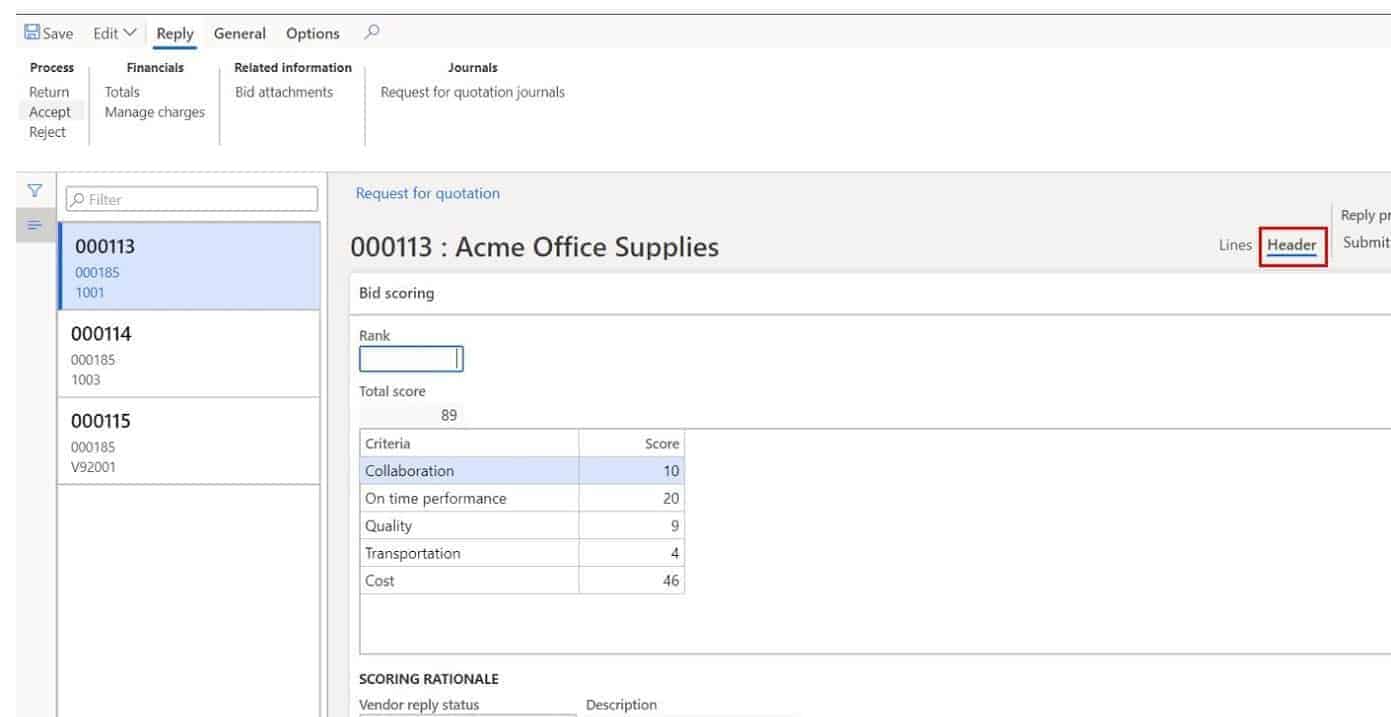
Optionally you can add scoring and ranking to the vendor reply. To do this click the “Header” button on the reply record.
Scroll down to the “Bidding and scoring” fast tab. Here you can enter the score for each of your scoring criteria defined by the solicitation type we selected at the very beginning of the RFQ creation process. As you enter the scores for each criteria you will see the “Total score” field summarize the total score. This will be used when we compare the vendors bids later.
You will repeat the process of entering replies and scoring the bids for each vendor reply you receive. As you do this you will notice the statuses change to “Received” on the RFQ to indicate that vendor bids have been received and recorded.
Comparing Replies
Once you have all the vendor replies entered, D365 provides a side by side comparison screen so you can compare all the vendor replies.
To compare replies, click on the “General” tab in the ribbon and click the “Compare replies” button.
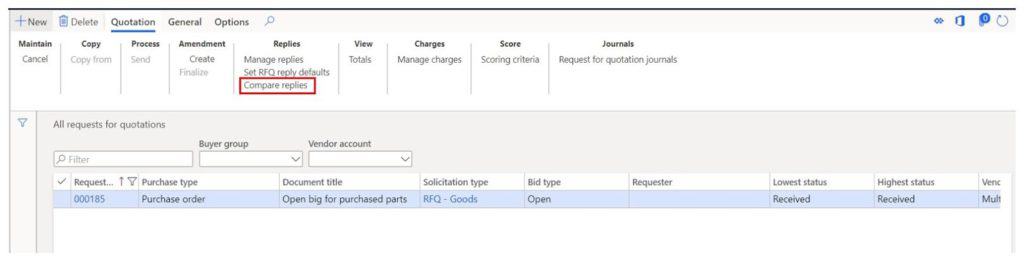
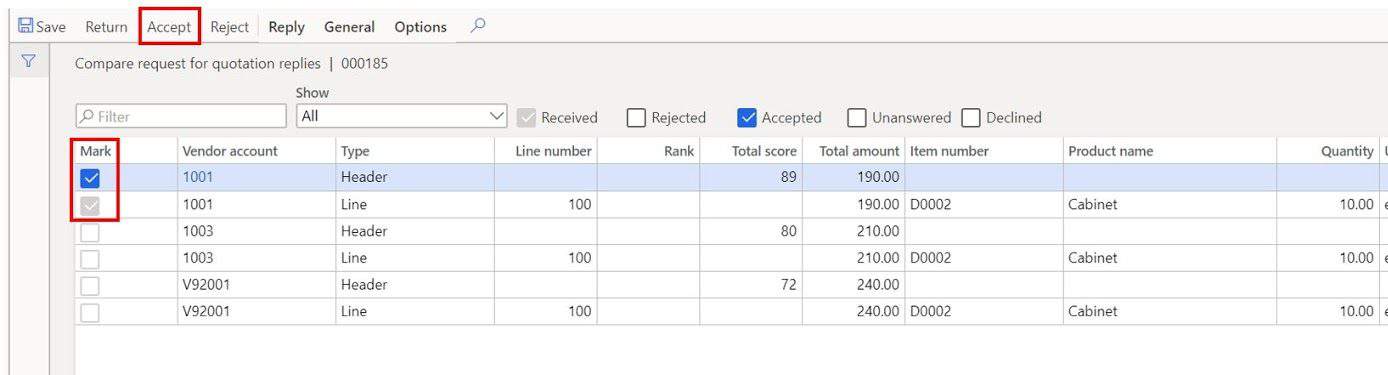
This will bring you to the comparison form. This form shows you all of the vendor replies you have entered for each vendor and for each item that the vendor bid on. On this form you will see the “Unit price”, “Quantity”, “Total amount”, “Total score”, “Lead time”, “Delivery date”, and “Rank” side by side so that it can easily be compared with the other vendor bids.
If you want to do the comparison you can use the “Export to Excel” option. If you don’t know how to use the “Export to Excel” option check out my article How to use Excel Add-In which explains not only how to export things to excel but also the difference between “Export to excel” and “Open in Excel”.

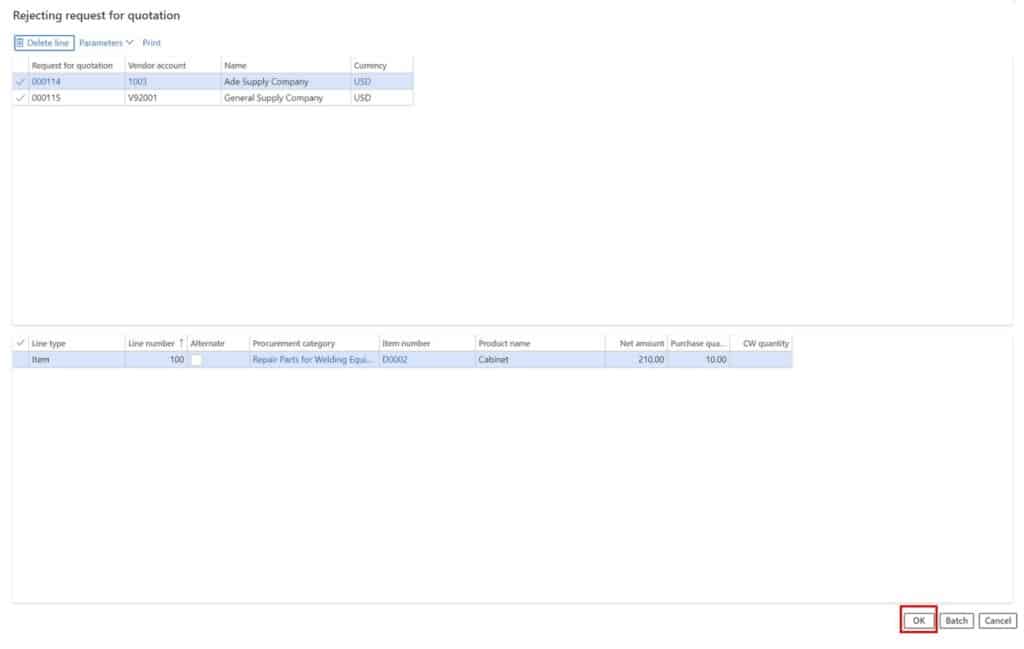
Once you have compared the bids and you are ready to pick your winning bid click the “Header” checkbox next to the vendor bid you would like to accept. If you are picking and choosing different bids for different items, you will need to select only the specific lines you are accepting. If you are accepting the entire bid, you can select the “Header” checkbox next to the winning bid. This will select all the subsequent lines under that header.
- Once you have the checkboxes selected next to the bids you want click the “Accept” button.
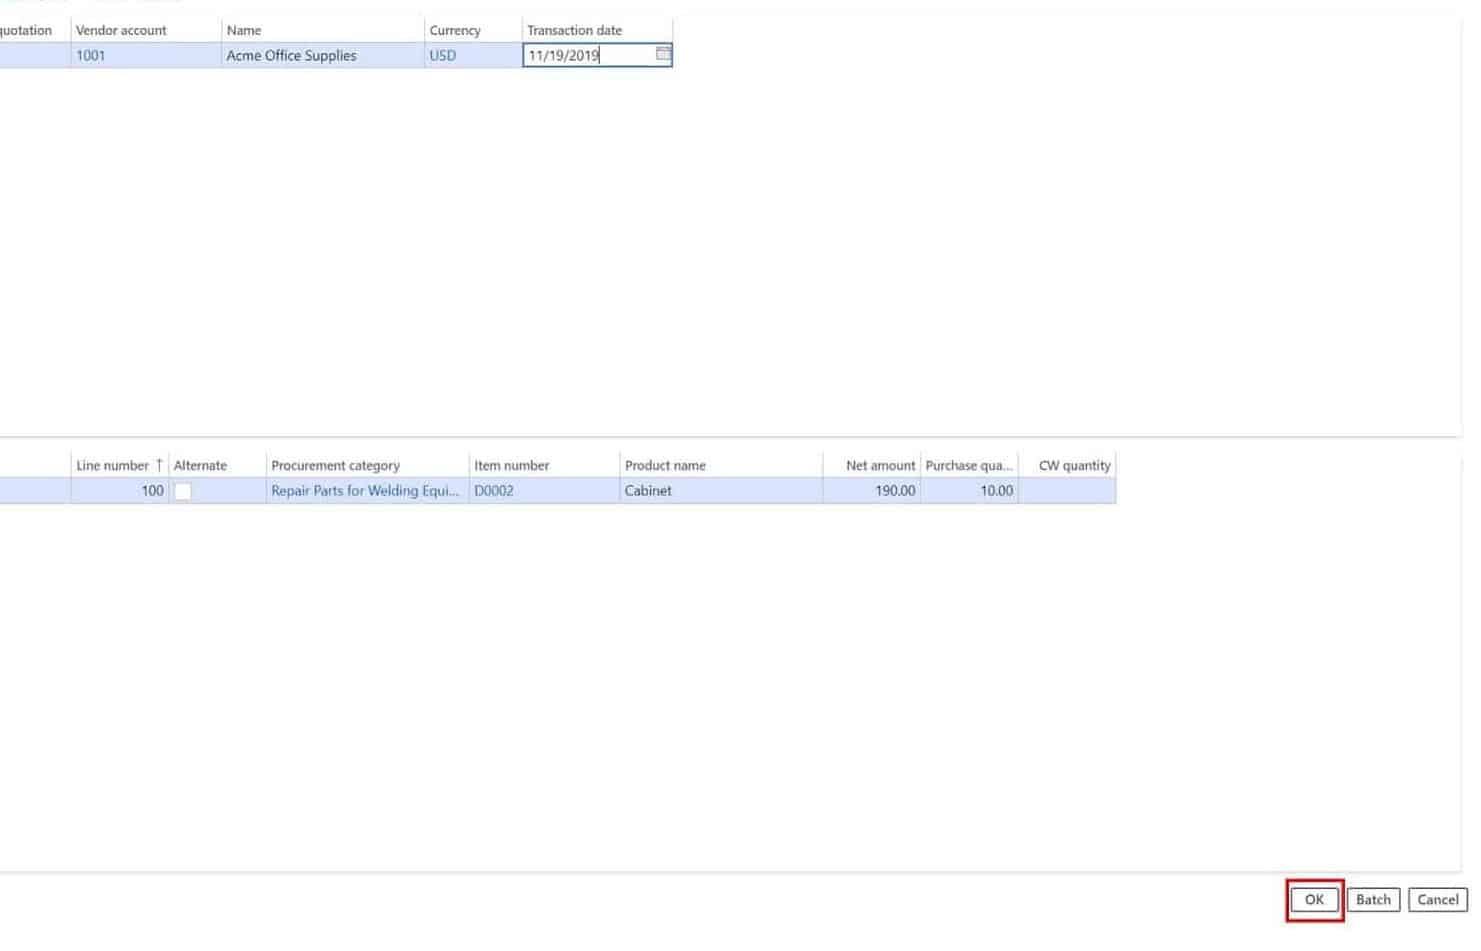
The RFQ acceptance confirmation form will open and if you want to print, you do it the same way we did it earlier in the article. Once you have set your print preferences click the “OK”.
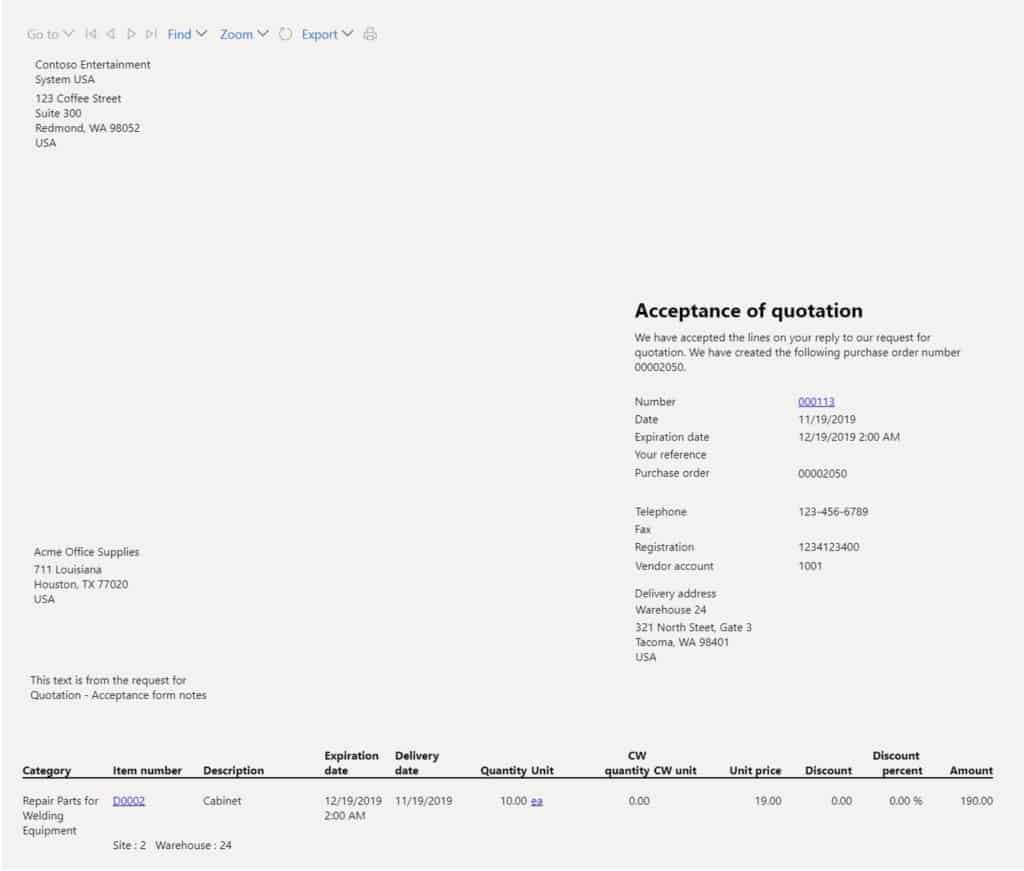
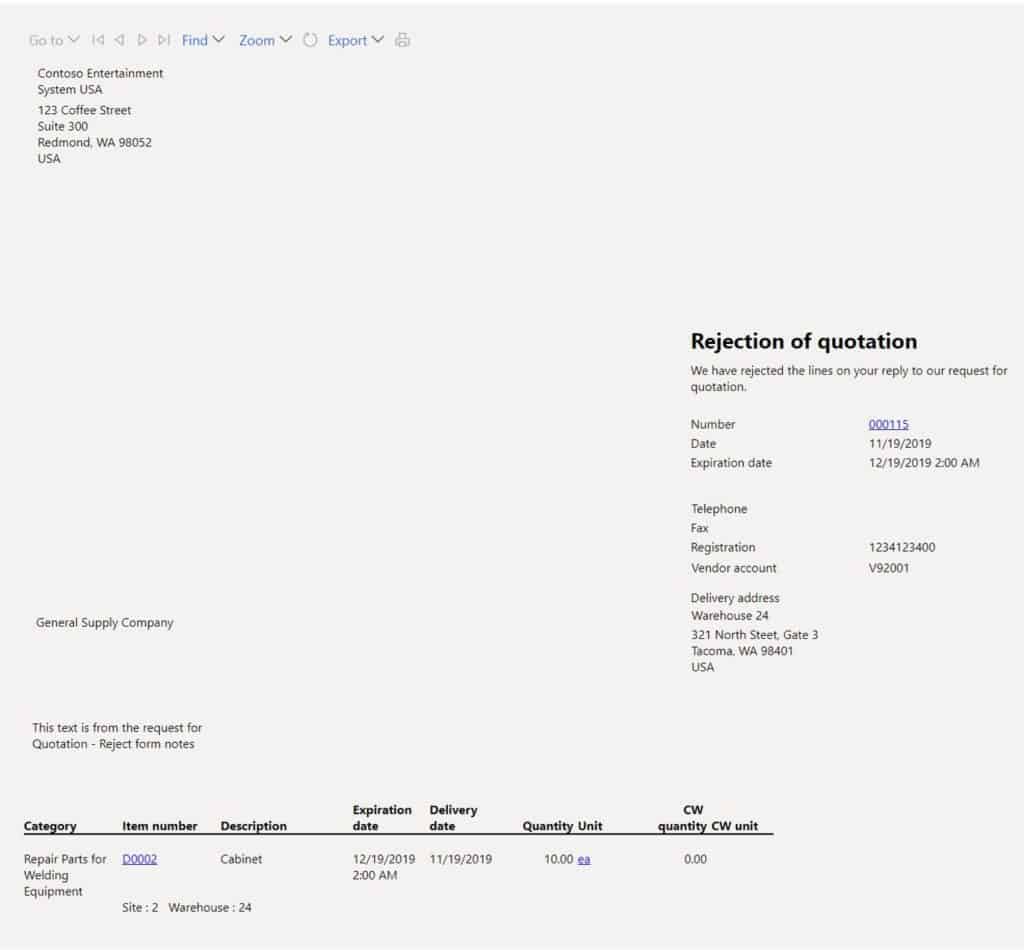
Next, the rejection confirmation form will appear. You can also choose to send out rejection letters. Click “OK” to confirm the rejections.
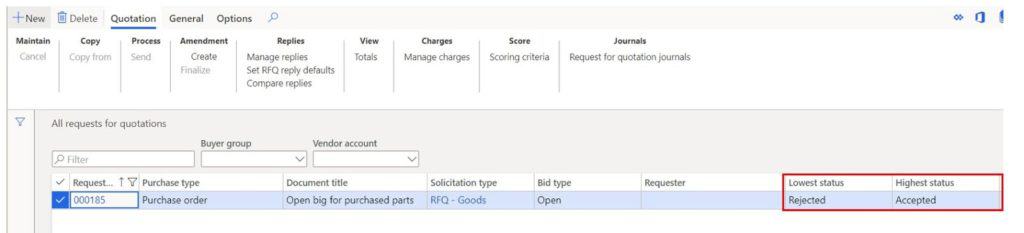
If you go back to the RFQ record you will now see the “Lowest status” is now set to “Rejected” and the “Highest status” is now set to “Accepted”.
Awesome! We have now accepted our bid and sent our rejection letters. In the background D365 has created a purchase order based on the winning bid we selected.
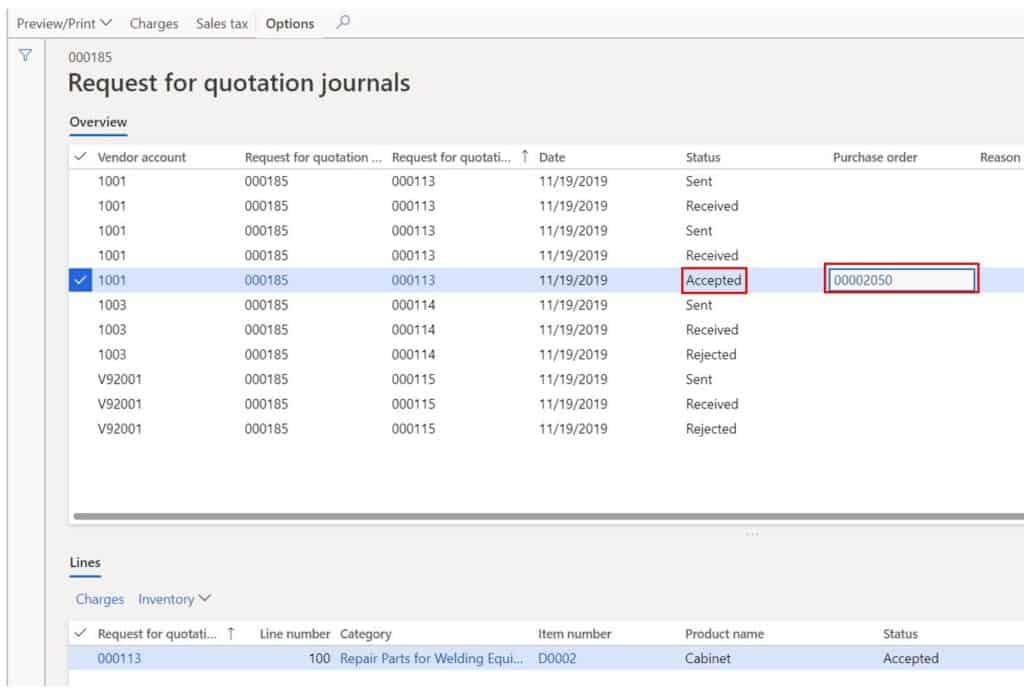
To view the purchase order that D365 created automatically, click the “Request for quotation journals” button in the “Quotation” tab in the ribbon.
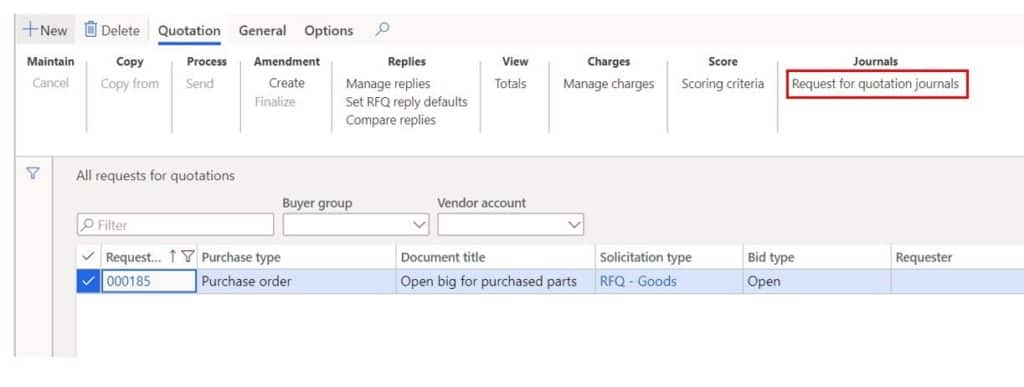
Here you will see all the different status updates related to this RFQ. If you look for the “Accepted” statuses, you will see the purchase order ID in the “Purchase order” field. If you click on the ID hyperlink D365 will take you directly to the purchase order. Very cool!
Takeaways
You have now seen from start to finish how to create and process a request for quotation in Dynamics 365 Finance and Operations. I tried to hit the really important pieces and the most widely used features of the request for quotation functionality in D365 but there is so much more that I did not cover in this article. Please explore the RFQ with the guidance from this article and see what works best for your specific business requirements.