Transfer orders between warehouses is a common practice for businesses with multi-site and multi-warehouse operations for replenishing and sharing inventory. Transfer orders work by issuing product from a physical warehouse into a virtual transit warehouse and then receiving the product at the destination warehouse. The type of warehouse (advanced warehouse or standard warehouse) will dictate how the transfer order must be received at the receiving warehouse when using the warehouse mobile application.
In this post we will look at the setup required to complete a warehouse transfer and how to process a transfer order in Dynamics 365 Finance and Operations.
Transit Warehouse Setup
The transit warehouse is a virtual warehouse where the inventory sits while the product is in transit between two warehouses. This virtual warehouse is required to process a transfer order.
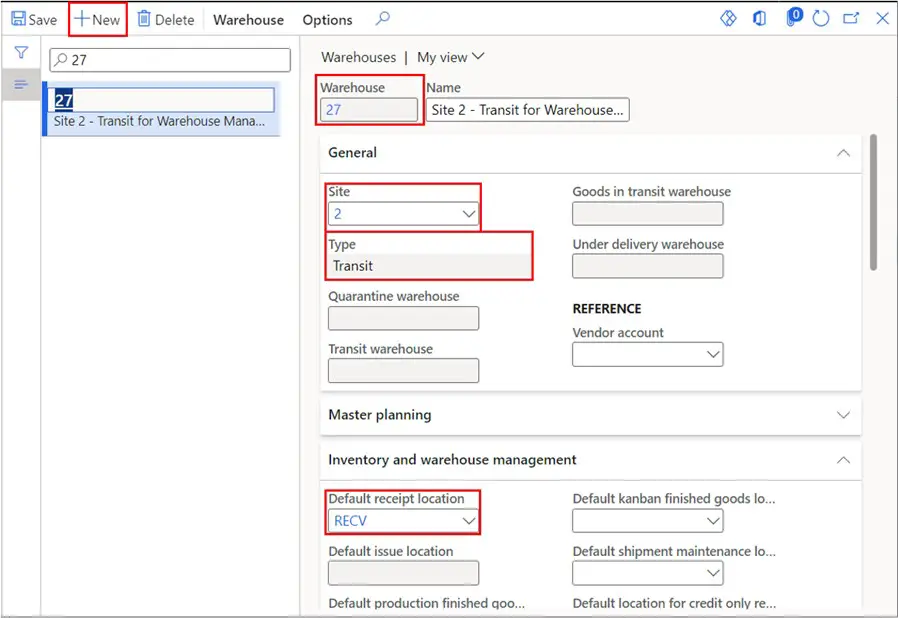
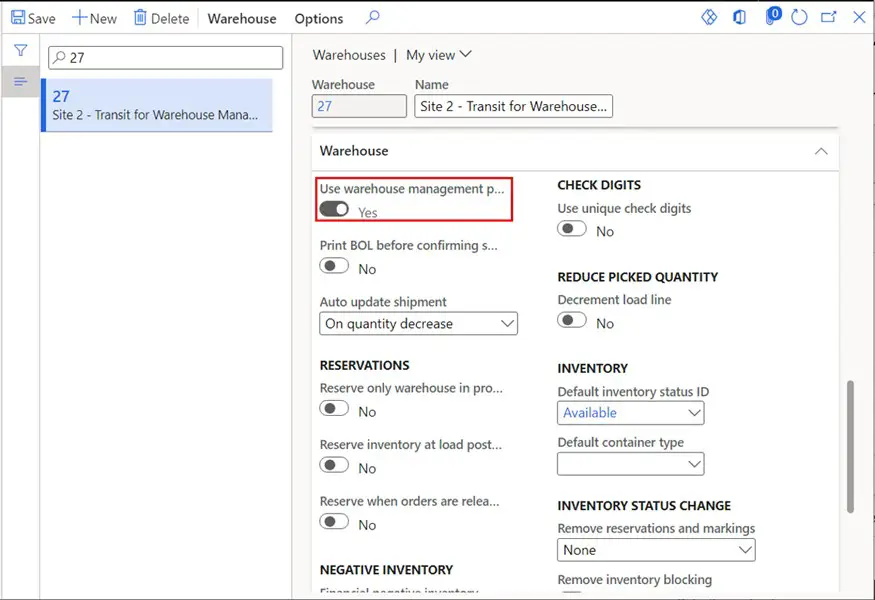
To set up a transit warehouse navigate to Warehouse management > Setup > Warehouse > Warehouses. Click the “New” button and enter the ID for the transit warehouse and give the warehouse a name. Set the “Type” to “Transit” and set the site to the site where the warehouses that you want to transfer between reside. Scroll down to the “Warehouse” fast tab and select the “Use warehouse management” option.
Next select the default receipt location. This will be the location that the product sits in while it is in transit and gets issued out of when it is received into the destination warehouse. You may need to right click and “View details” and create the location, and then select it.
Next, we need to set this transit warehouse as the transit warehouse to use for the two warehouses that we want to transfer between. In the warehouse list click on the first warehouse that you want to ship from or to and in the “Transit warehouse” field select the transit warehouse that you just created.
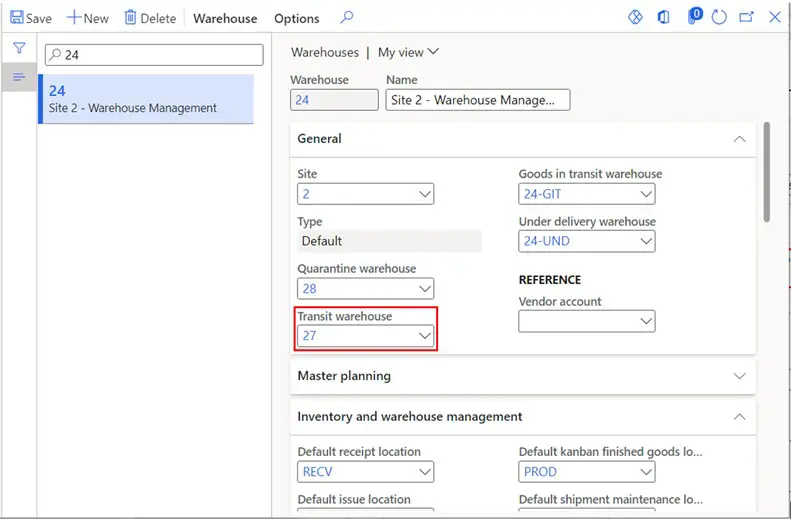
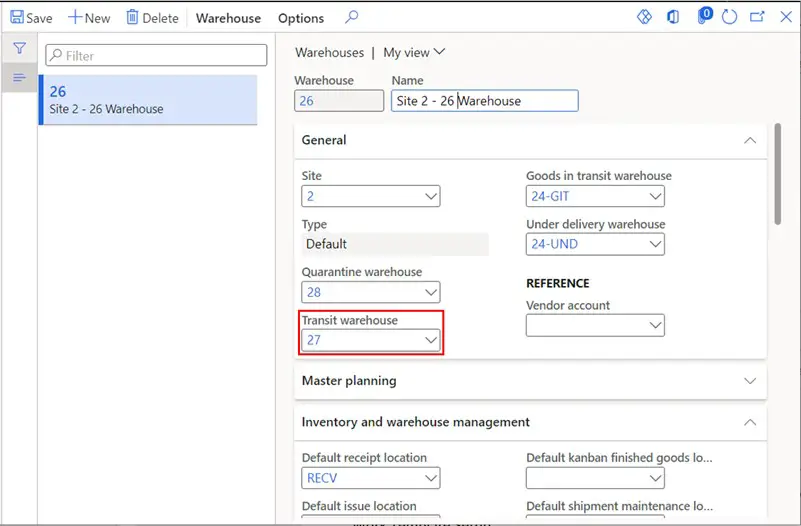
Next click on the second warehouse that you want to ship between and in the “Transit warehouse” select the same transit warehouse.
Work Template Setup
Now that we have set up the transit warehouse, we need to set up the work templates and location directives to support the transfer picking for the transfer shipping process and the transfer receipt for the inbound transfer order receiving process. I will not go into the details of how to set up work templates and location directives so if you do not know how to set them up, please see this post.
Navigate to Warehouse management > Setup > Work > Work template. Create a work template for the work order type “Transfer issue” you can create a work template for each warehouse, or you just create one without a filter.
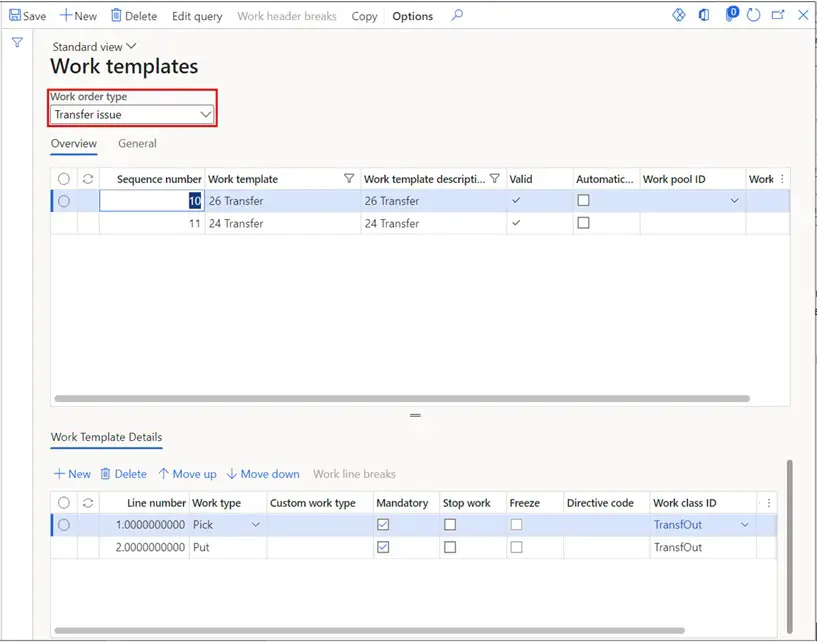
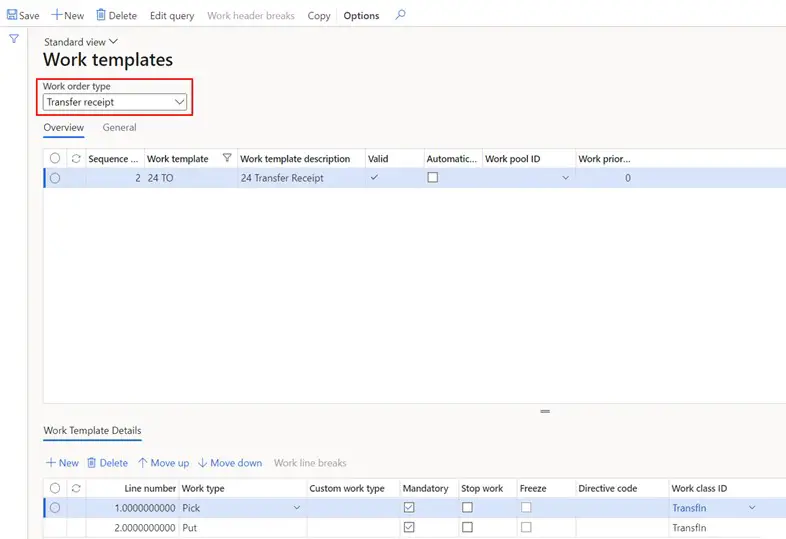
Next, we need to create a work template for the transfer order receipt. To do this we will stay in the same form and just change the “Work order type” to “Transfer receipt”. Create a work template similar to the one you created for the transfer order issue. You will need a pick and a put pair in the work template details section. You can use the “Edit query” button to enter a query for a specific warehouse or you can just leave it wide open.
Location Directive Setup
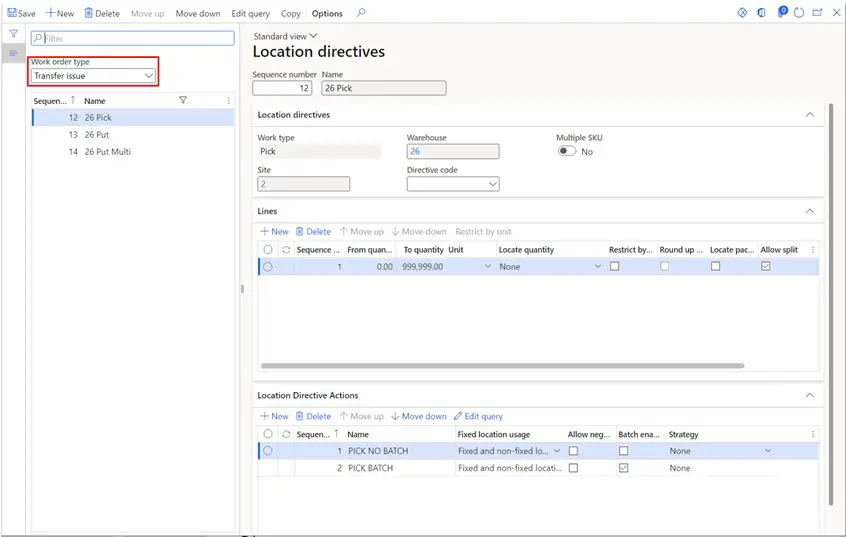
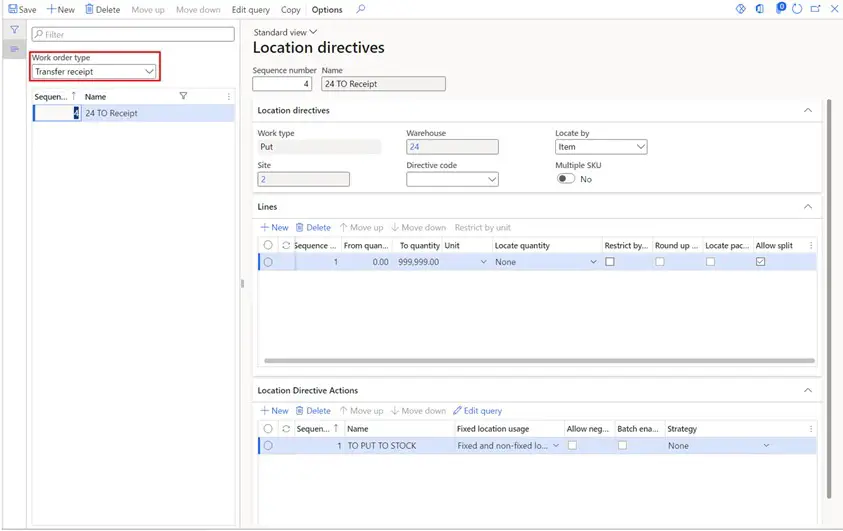
Next, we need to set up the location directives which will determine where we pick the product to be transferred and where we will put it. Since in this example we are transferring from warehouse 26 to 24 we will need to create a transfer issue location directive and a transfer receipt location directive for warehouse 24. In reality there would probably be transfers back and forth so you would want to create location directive to support both directions.
To set up location directives, navigate to Warehouse management > Setup > Location directives. We first need to set up a “Transfer issue” location directive shown below. The location directive action query will be locations where we are able to pick inventory for transfers.
Next, we need to set up location directives for the Transfer receipt. In this case it will be for warehouse 24.The location directive action query will be for stocking locations where our product will be put away to in the receiving warehouse.
Mobile Device Menu Item Setup
Now that we have the setup in place to create the work, we need to create the menu items on the WMS mobile app that will execute that work. Navigate to Warehouse management > Setup > Mobile device > Mobile device menu items.
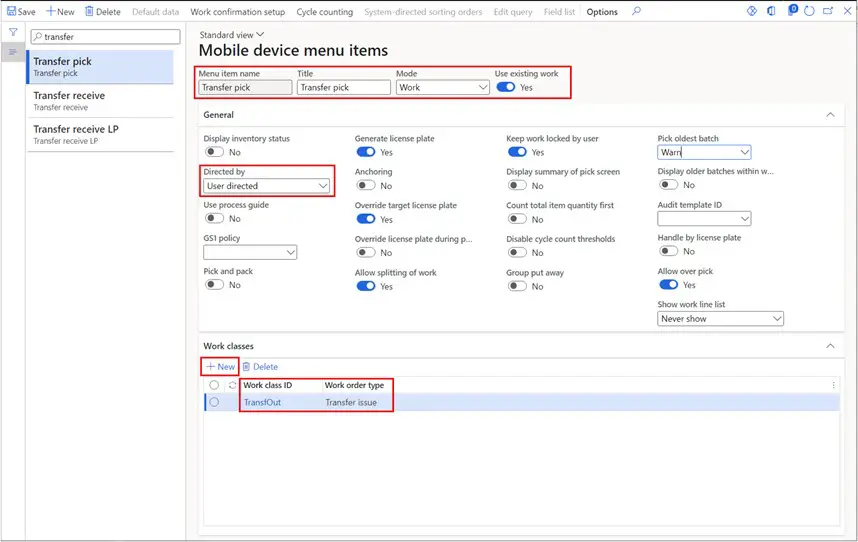
The first menu item we will create is for the transfer pick. Click the “New” button to create a new menu item. Give the menu item a name and title (the title is what will appear in the WMS mobile app). Set the mode to “Work” and “Use existing work to “Yes”. For this example, I will set the “Directed by” field to “User directed” but you can experiment with the other options.
The last thing we need to do is set the work class that is applicable for this menu item. Click the “New” button and select the work class associated with the “Transfer issue” work template. This ensures that only transfer picking work will be processed on this menu item.
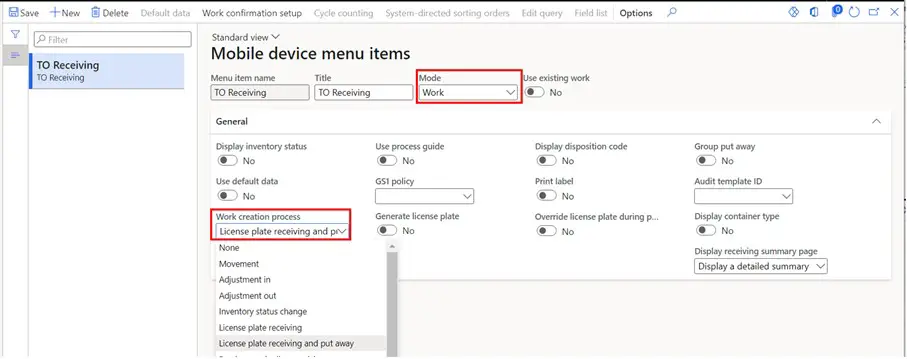
The second menu item we need is the transfer receive menu item. Click the “New” button and give the menu item a name and title. Set the “Mode” to “Work” and set the “Work creation process” to “License plate receiving and put away”.
Note: Using the “License plate receiving and put away” work creation process is a one-step receiving and put away process. This can be split into two steps by using the “License plate receiving” option along with an additional menu item for the put away.
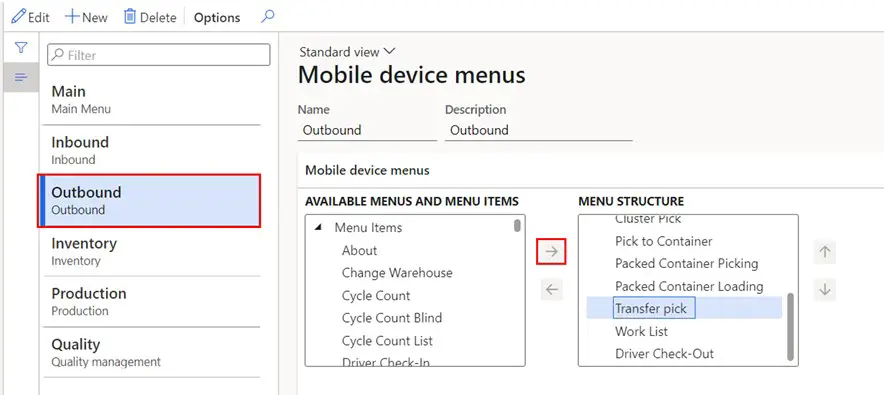
Next, we need to add those menu items to the mobile device menu item structure. To do this navigate to Warehouse Management > Setup > Mobile device > Mobile device menu. Use the arrows to move the menu items we created to the appropriate meu structure.
Wave Template Setup
The next thing we need to set up is the wave template. In this example we will set up the wave template to automatically process but this can be set to manual wave creation in the case of a warehouse with a wave planner.
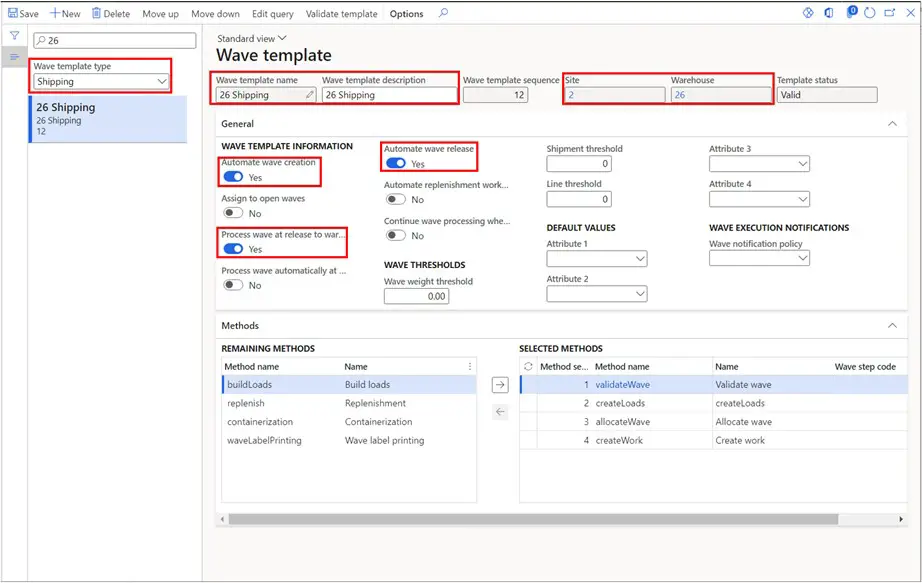
To set up a wave template navigate to Warehouse management > Setup > Waves > Wave templates. Click the “New” button and set the “Wave template type” to “Shipping”.
Next enter the “Wave template name” and the “Wave template description”. Set the “Site” and “Warehouse” for the shipping warehouse. In this example I will automate the wave creation and processing so I will enable the “Automate wave creation”, “Process at wave release to warehouse”, and “Automate wave release” fields.
In this case since I am shipping from warehouse 26 to warehouse 24 I will set it up for warehouse 26 but if you were going both ways you would want to set it up for both warehouses.
Create a Transfer Order
Now that we have the setup created for the transfer order process, we need to kick off the transfer process by creating a transfer order. The transfer order can come from master planning, or it can come from just manually creating the transfer. In this example I will manually create the transfer order from warehouse 26 to warehouse 24.
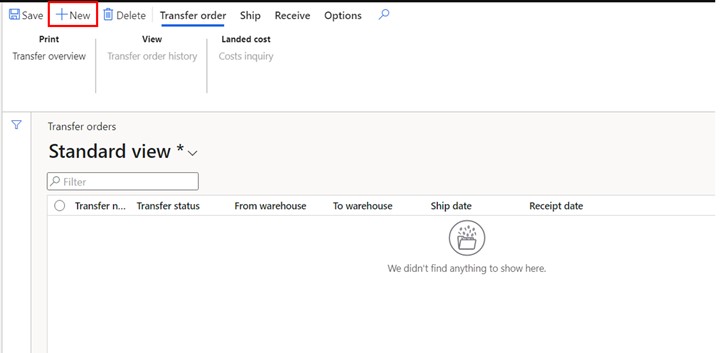
Navigate to Inventory management > Outbound orders > Transfer order. Click the “New” button to create a new transfer order.
Next enter the “From warehouse” (the warehouse you are shipping from) and the “To warehouse” (the warehouse you are shipping to). Then in the “Transfer order lines” section click “Add” button to add items to the transfer order. Enter the “Item number” and the “Transfer quantity”. In this case I want to go ahead and reserve the inventory to this transfer order.
Just like sales orders, in order to release a transfer order from the transfer order form you need to first reserve the inventory. Alternatively, you can use the “Automatic release of transfer orders” batch job that will reserve and release the transfer order automatically. This job is located in Warehouse management > Release to warehouse > Automatic release of transfer orders. After I have reserved my inventory, I am ready to release the transfer order to the warehouse for picking and shipping. To do this click the “Release to warehouse” button.
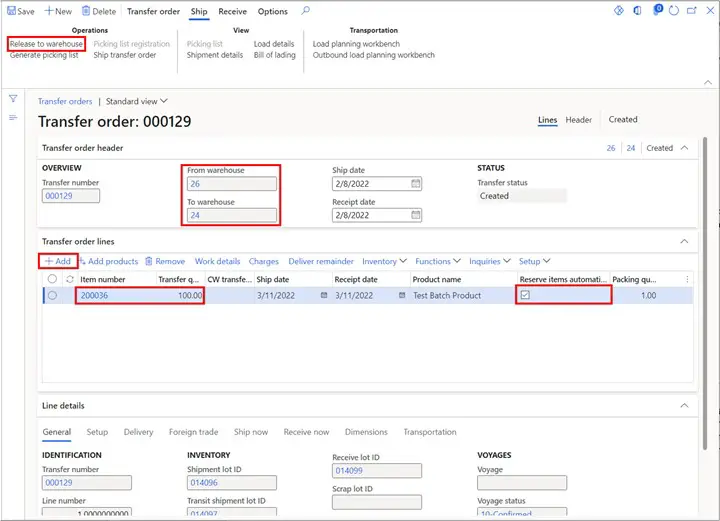
This will create picking work for us to complete on the warehouse mobile application.
Pick a Transfer Order
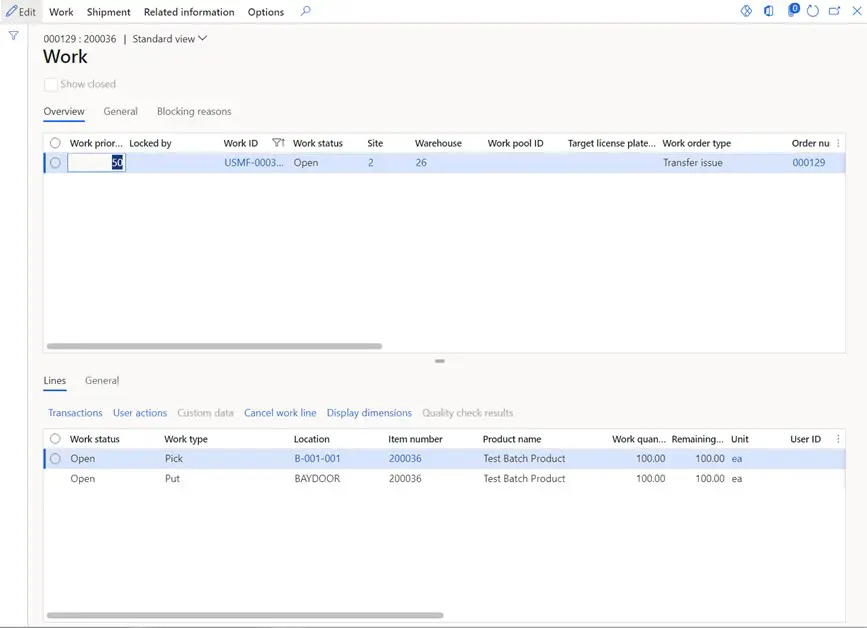
The release to warehouse has resulted in transfer order picking work being created in warehouse 26. You can view the generated work by navigating to Warehouse management > Work > Work details. As you can see, we have a pick from the stock location and a put to the bay door for shipping.
Now we will log into the WMS mobile application and navigate to the transfer picking meu item we created and added to our menu structure earlier.
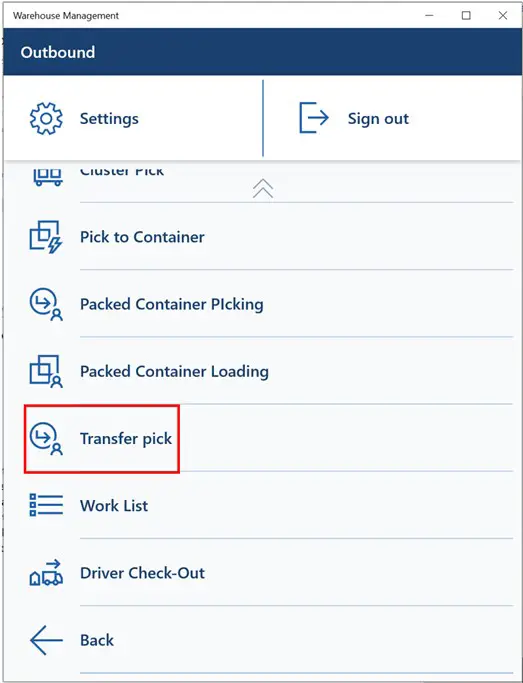
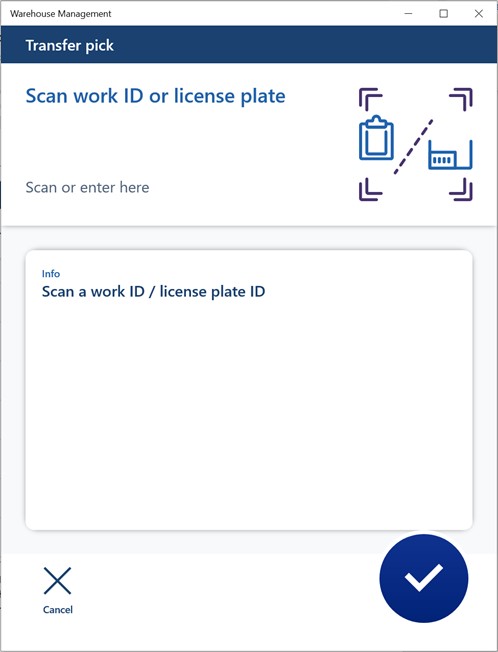
This particular menu item requests that I scan the work ID for the transfer picking work that I want to complete. However, there are a multitude of ways this can be configured to initiate the pick work depending on how you want to group and distribute the work to the warehouse team.
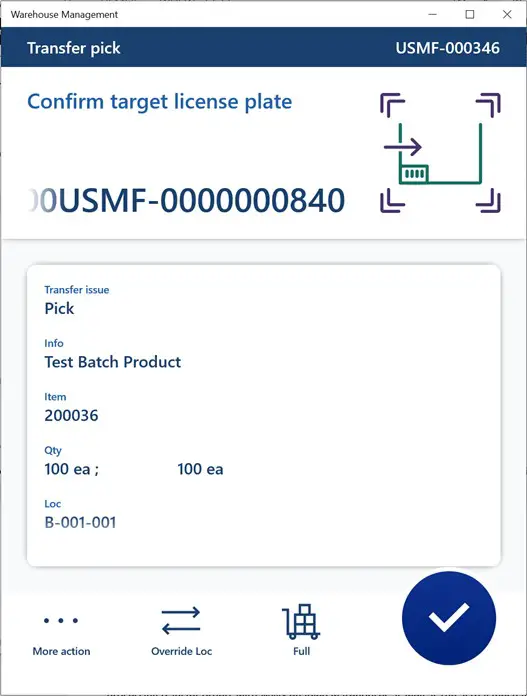
After scanning the work ID, the system prompts me to pick from location “B-001-001”. It has also generated a target license plate which just represents the container I am putting this product into. This license plate does not have to be system generated; it can be a reusable tote or pallet that the user scans. You can also configure scans that are required during the pick and put step for things like the location, product, batch, etc.
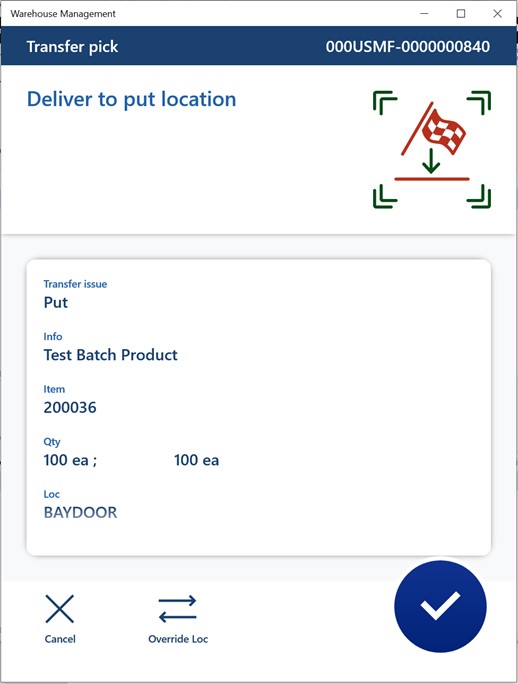
Next the system will direct me to put the product to the bay door. Again, you can require the user to scan certain things if required.
Ship Transfer Order
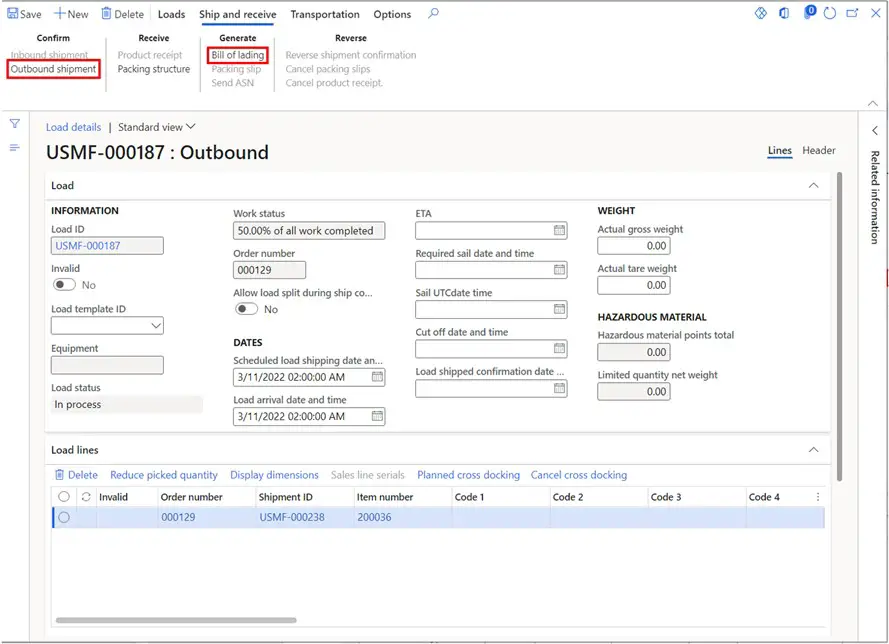
Now that the product has been picked and put to the bay door, we need to ship the transfer order. There are several ways to do this, but I usually recommend going into the load. For there we can confirm the outbound shipment which will actually set the transfer order to “Shipped” status.
Navigate to Warehouse management > Load > All loads. Here you can filter for the transfer order you want to ship in the “Order number” column. Click on the load hyperlink to open the load.

On the load header you can enter the carrier details if applicable as well as the pro number and seal number.
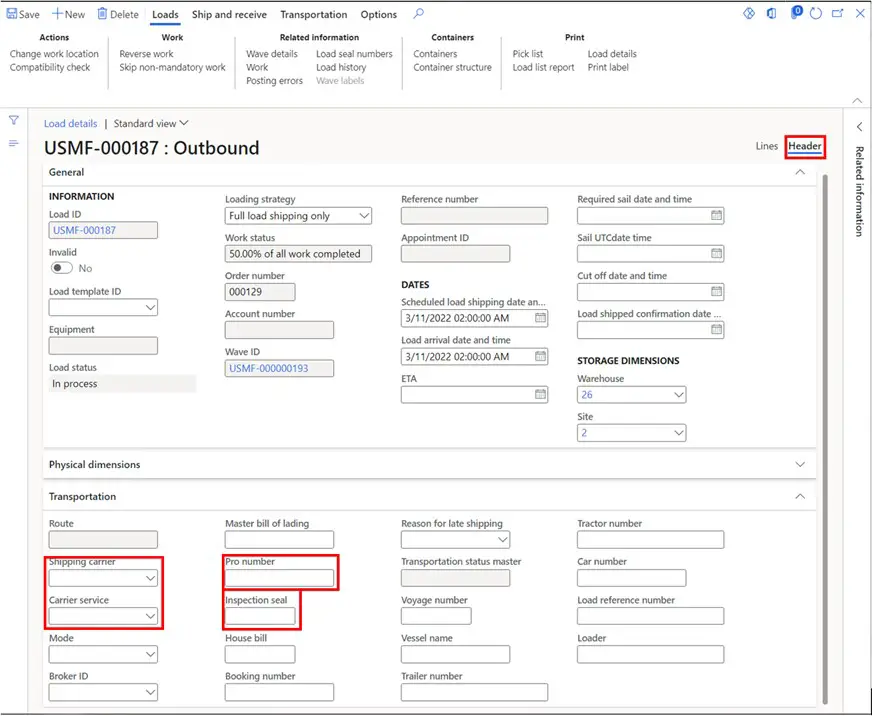
If applicable you can print a bill of lading by clicking the “Bill of lading” button. Then when you are ready to ship the transfer order click the “Outbound shipment” button in the “Confirm” section of the “Ship and receive” tab.
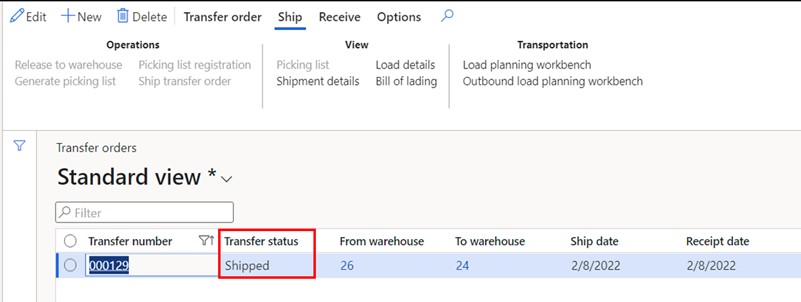
Now if we look at the transfer order status it will say “Shipped”.
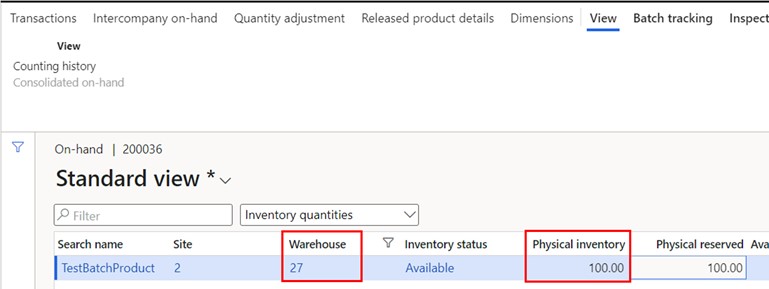
If we look at the on-hand inventory you will see it has been moved into the virtual transit warehouse we configured earlier. For more on on-hand inventory see this post.
Receive Transfer Order
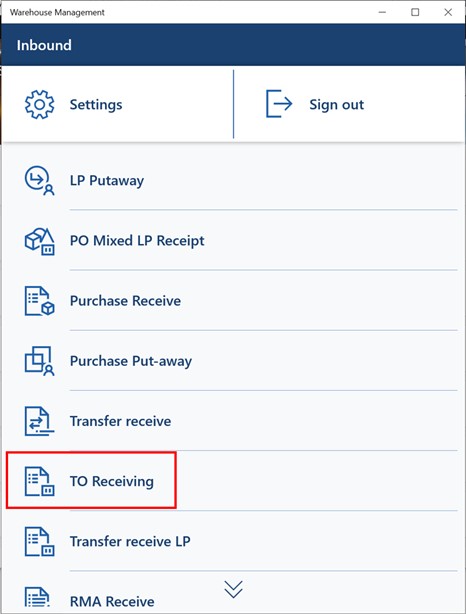
Now when the product gets to warehouse 24, we can receive the product. On the warehouse mobile application, we will use the “TO receiving” menu item. For this make sure you are signed into the correct warehouse. You can either create a new user ID with a different default warehouse or you can add a change warehouse menu item.
Now we will be prompted to scan the license plate that we are receiving.
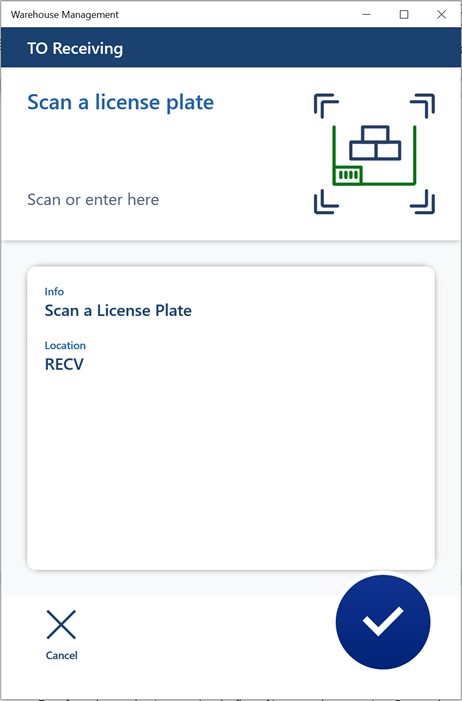
Next, we will confirm the license plate and the contents of that license plate.
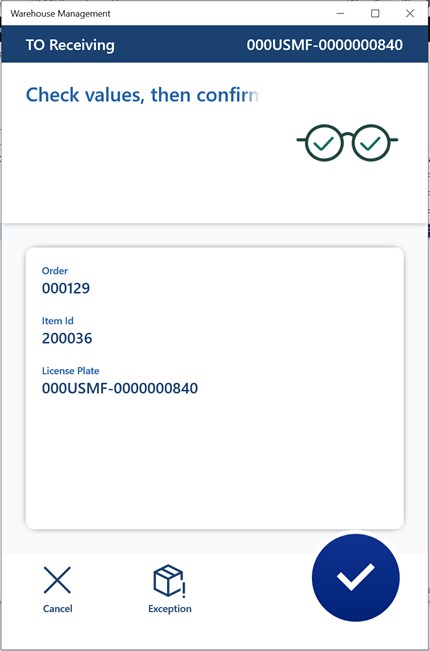
Since I configured this as a one-step process the system immediately prompts me to pick the license plate up from the receiving dock.
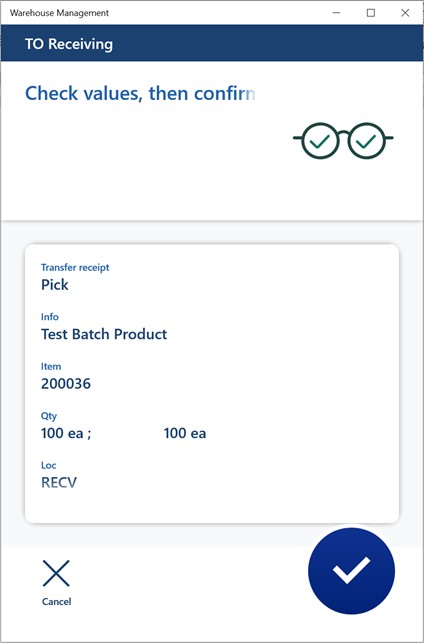
Now the WMS app prompts me to take the product to the stock location that was located by the location directive.
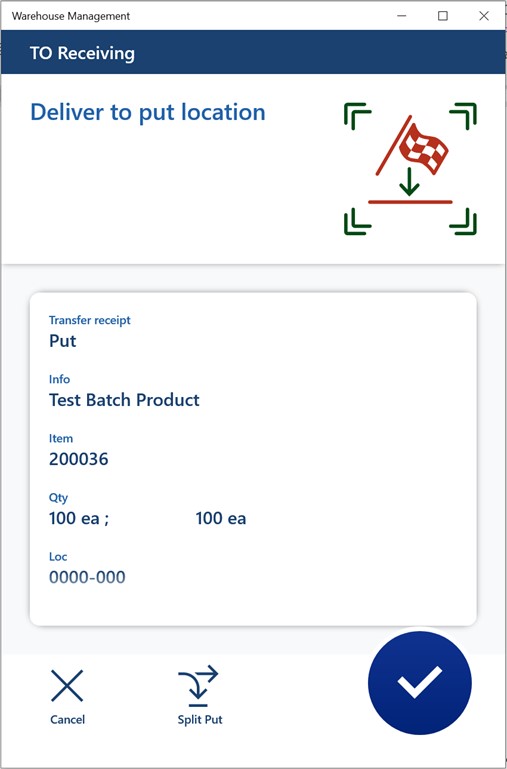
Once I finish with the receipt the transfer order automatically updates to “Received”.
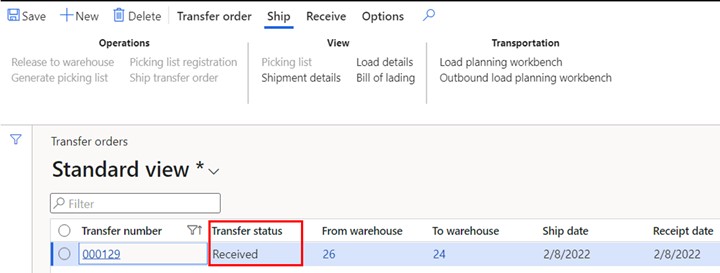
The product is now sitting in warehouse 24.

Takeaways
Transfer orders are key in managing the flow of inventory between sites. For warehouses that share inventory or use 3PL warehousing services transfer orders are a necessity. In this post we have seen the core setups involved in processing transfer orders with WMS enabled warehouses as well as the actual mechanics involved in processing those transfer orders. There are many different ways you an configure this simple flow to meet your unique more complex business needs. You can include things like label printing, multi-step staging processes, and step automation to reduce the number system touchpoints. I hope this has given you the tools to setup and test your own transfer order process!

