
Quality orders in Dynamics 365 Finance and Operations are the primary mechanism for recording and processing quality results for quality related tests during various inbound, outbound, and internal warehouse processes. Quality tests and checks are very common practice during various warehouse and manufacturing processes. During these checks inventory is reserved against the quality order to ensure that the inventory under inspection cannot be moved, picked, or status changed until the quality order is closed.
In this post we will go through the setup to process a quality order as well as the WMS setup required to trigger the quality integrated warehouse management functionality recently released. Although we will only cover a very specific business process flow, the setup and processing of the quality order will be similar for other quality order scenarios you may face.
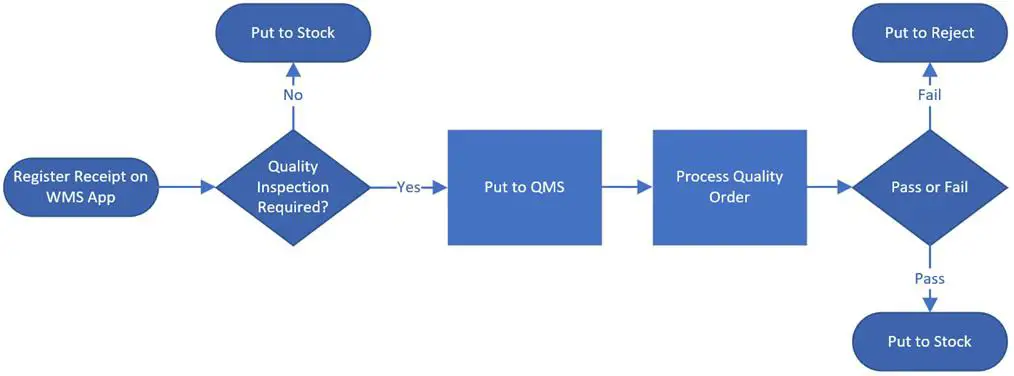
In the scenario below we will register the receipt of product from the WMS mobile application on the warehouse dock. This will trigger a quality order to be generated if the product should be quality checked, as well as route the user to put the product to the quality location. Then we will perform the quality test and process the quality order. Upon completion of the quality order the system will generate put away work based on the outcome of the quality order to have the user place the product in the “Return” location if the quality order fails or an available stock location if the quality order passes.
Advanced Warehouse Setup
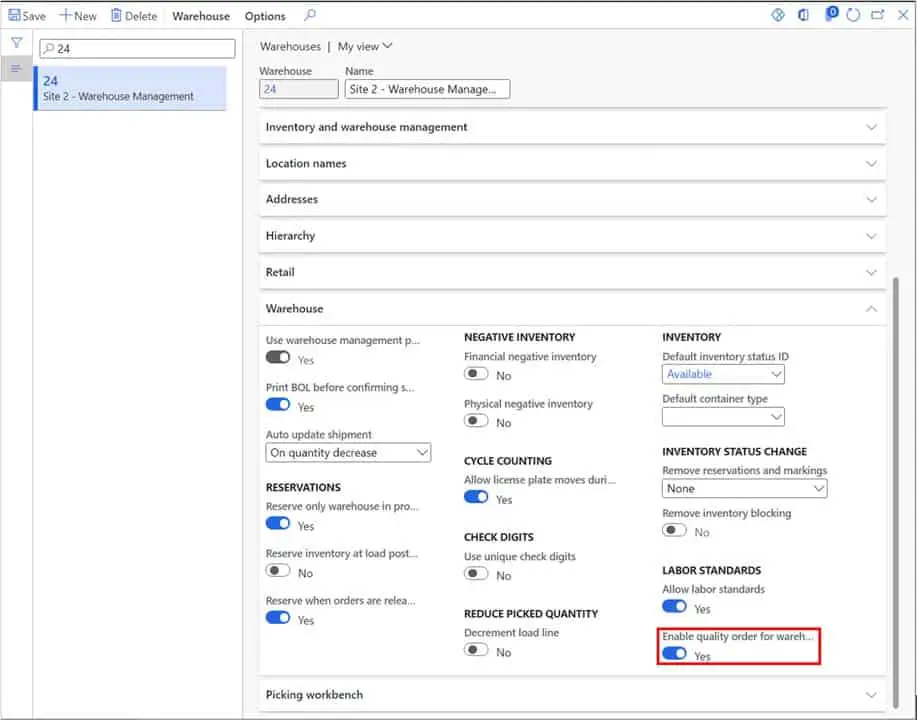
For this process to work we need to first set some things up on the advanced warehouse side. First navigate to Warehouse management > Setup > Warehouse > Warehouses. On the warehouse record we need to first select the “Enable quality order for warehouse processes” this will enable the work creation processes for quality orders and item sampling.
Next, we need to create a work template and location directives for the work that will be created when we register the purchase order receipt and when we validate the quality order. For more information on how to set up work templates and location directives see this post.
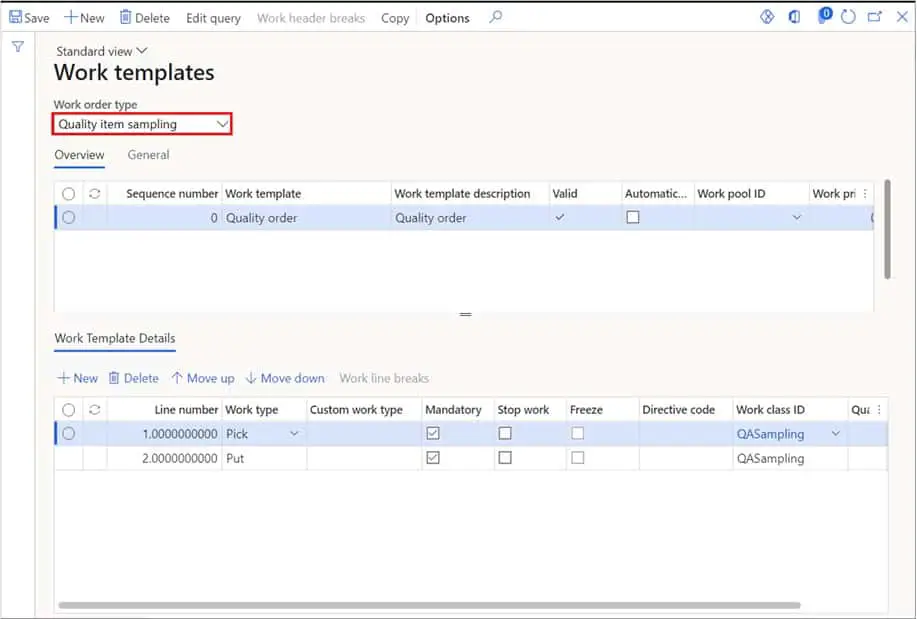
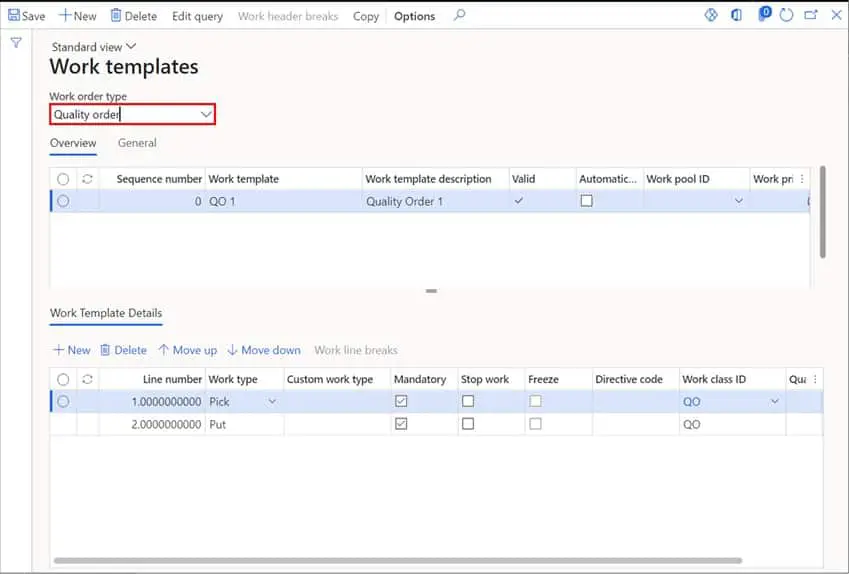
Navigate to Warehouse management > Setup > Work > Work templates. We will need to create the first template for the “Quality item sampling” work order type. The “Quality item sampling” work order type is used when the quality association (which we will discuss later) is triggered and generates work.
Next, we will need to create a work template for the “Quality order” work order type. The work order type “Quality order” will be used at the time we validate the quality order to generate the work that will be processed after the quality order is completed.
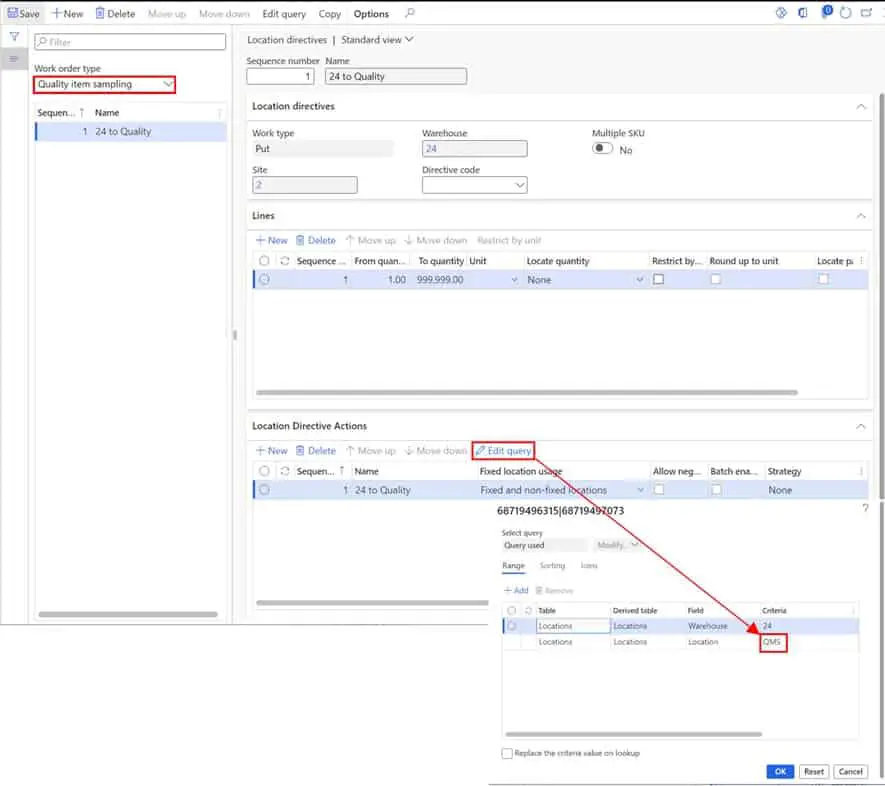
Now we need to create the location directives for the same work order types we created the work templates for. Navigate to Warehouse management > Setup > Location directives.
Now we will create a location directive for work type “Quality item sampling” and we will set the location directive action to put the product to the “QMS” location.
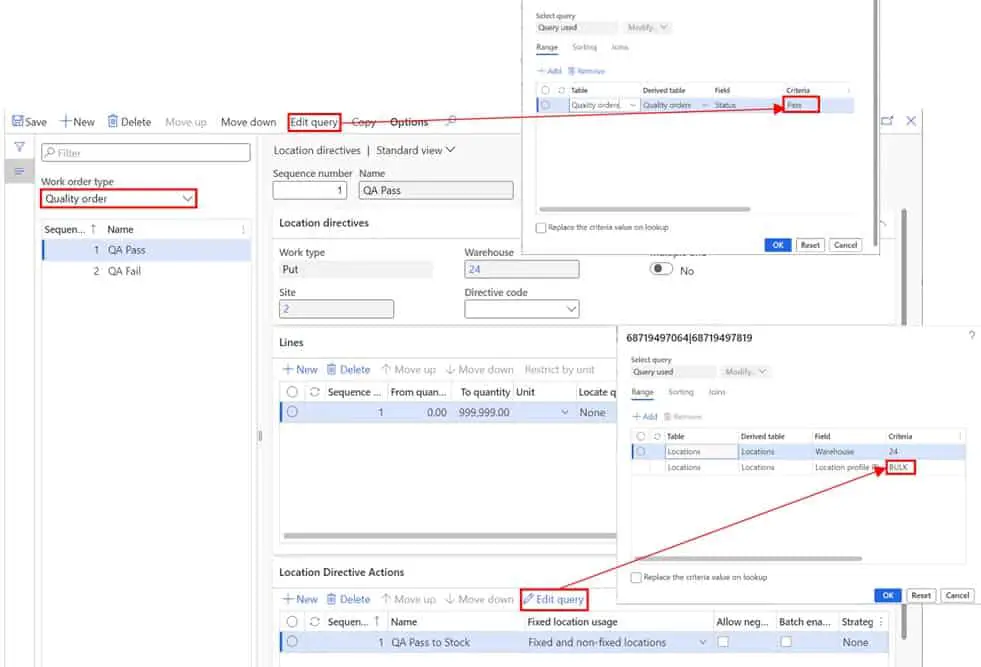
Next, we will create a location directive for the outcome of the quality order using the work order type “Quality order”. In this simple example I have two location directives. On the first I have a location directive query for the “Pass” status of the quality order and a location directive action set to put it to a “BULK” location in stock.
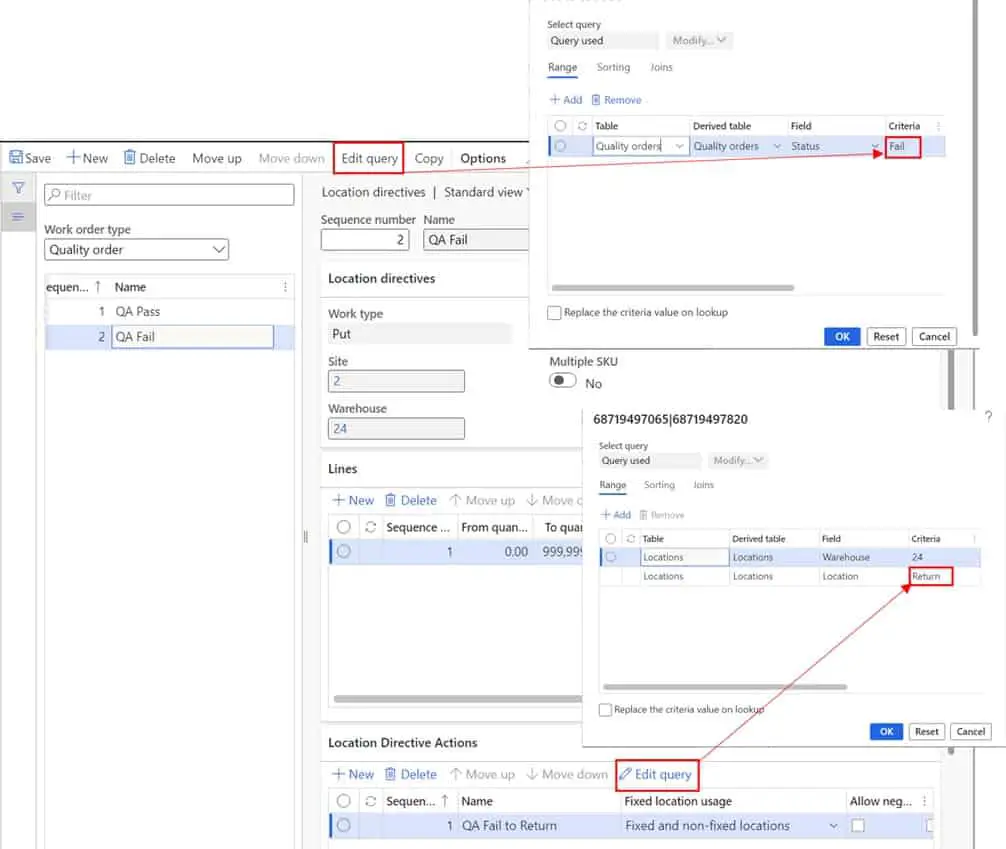
On the second location directive I have a location directive query for the “Fail” status of the quality order and a location directive action set to put the product to a “Return” location.
Now that we have the setup in place to create the work the way we want we need to create the WMS menu items to complete the work. Note: This section assumes you already have a purchase order put away menu item configured.
Navigate to Warehouse management > Setup > Mobile device > Mobile device menu items. For the work created when we perform the purchase order registration, we just need to add the work class to the purchase order put away menu item so that the menu item has access to that work.
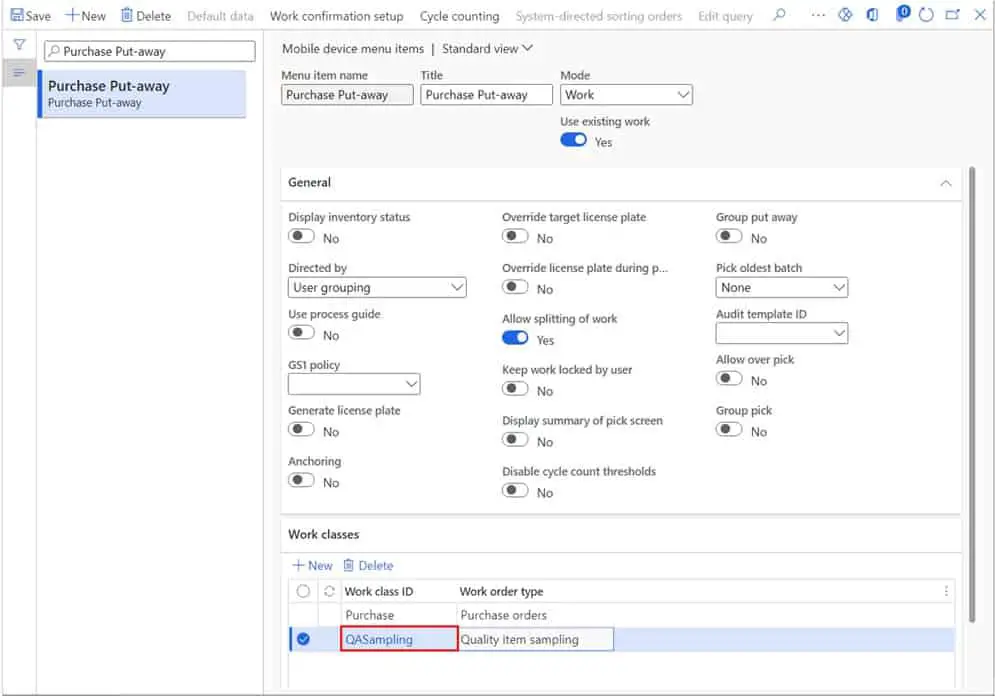
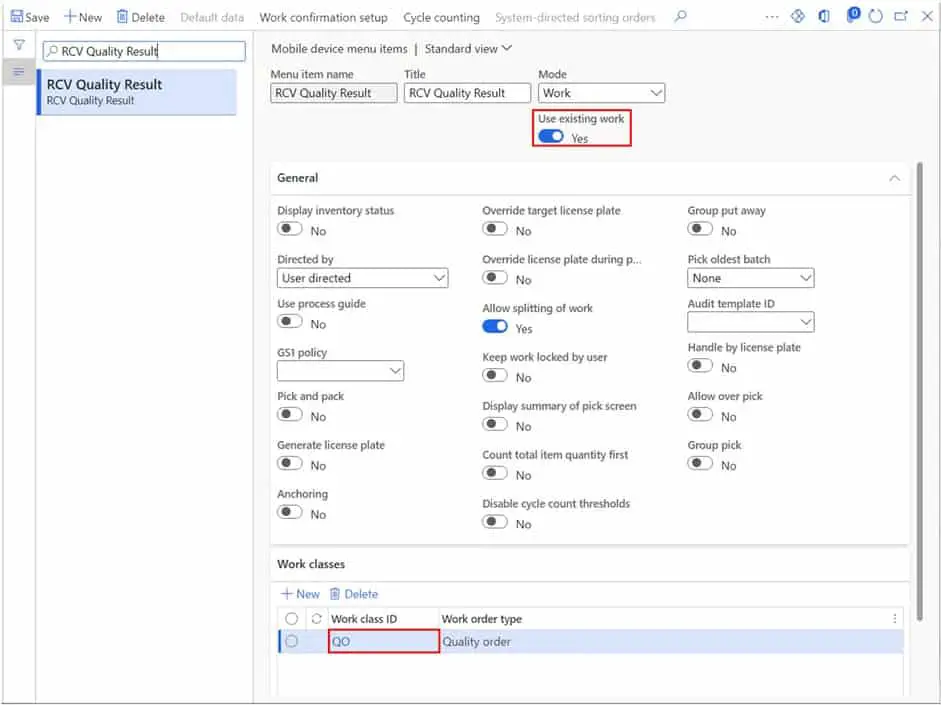
Next, we need to create a menu item to complete the work that is created when we validate and complete the quality order. Create a menu item which uses existing work and add the work class that you created during the work template setup for the “Quality order” work order type.
Quality Management Setup
Quality orders can be created manually or generated automatically by the system. In order to have the system generate the quality order automatically you must set up a quality association. In this example we will create a quality association that will be created from a purchase order. But before we can set up a quality association, we need to set up test groups and items sampling.
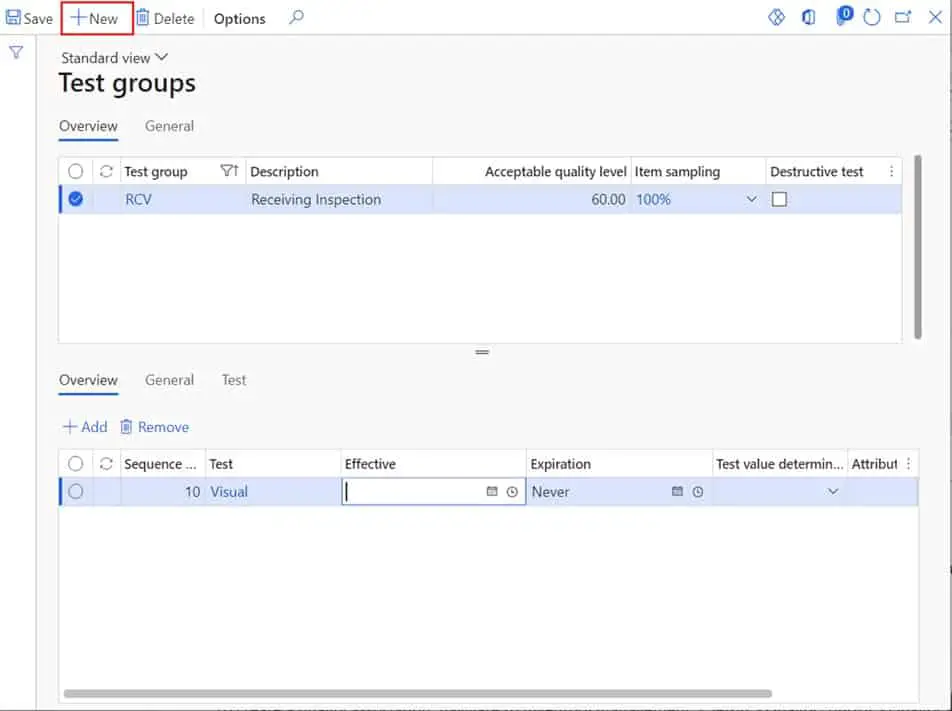
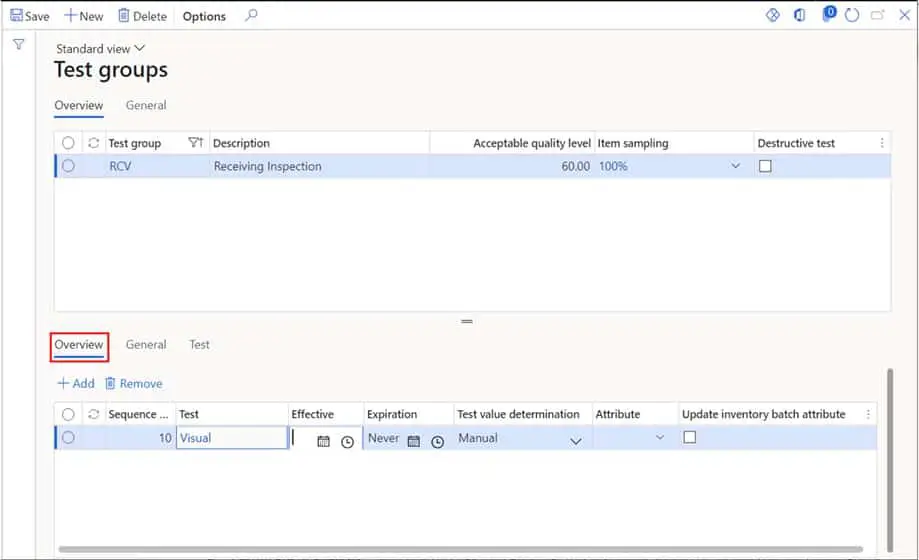
To set up a test group navigate to Inventory management > Setup > Quality control > Test group. Click the “New” button and enter a test group ID and name to create a test group. Next, we will go through some of the fields on this form.
Overview Tab
- Acceptable quality level – The acceptable quality level at the test group header is a percentage that is used when you validate the quality order to determine if the overall quality order is a pass or fail. It looks at all the outcomes of each test to determine if the quality order as a whole is a pass or fail. For example, if the acceptable quality level is 75 and 3 out of 4 of the tests evaluate as passed then the quality order status when validated will turn to “Passed”.
- Item sampling – This defines the quantity that will be tested on the quality order.
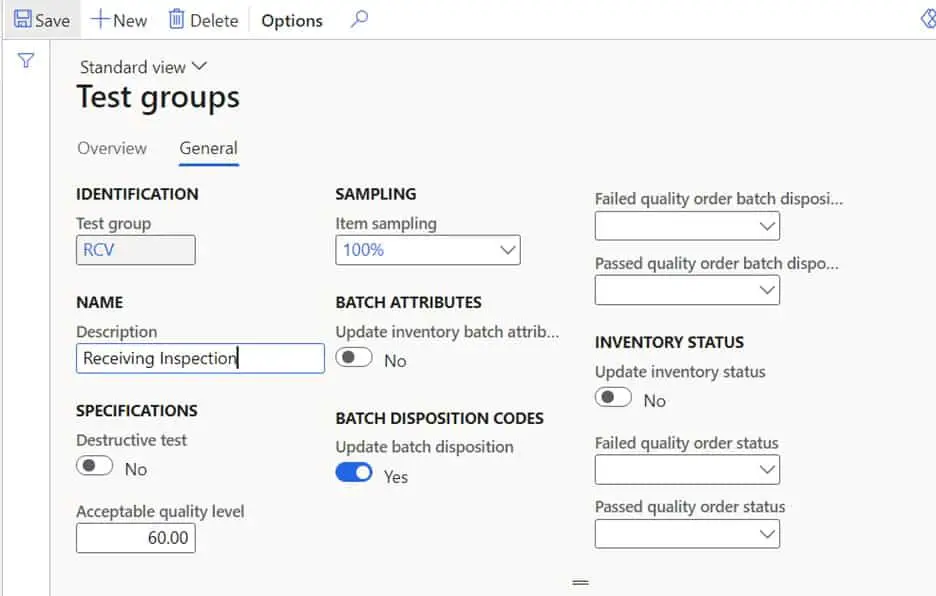
- Destructive test – If this field is enabled it means that the test that is performed is a destructive test and the product tested will be destroyed during the testing process. D365 will issue out the inventory following the validation of the quality order.
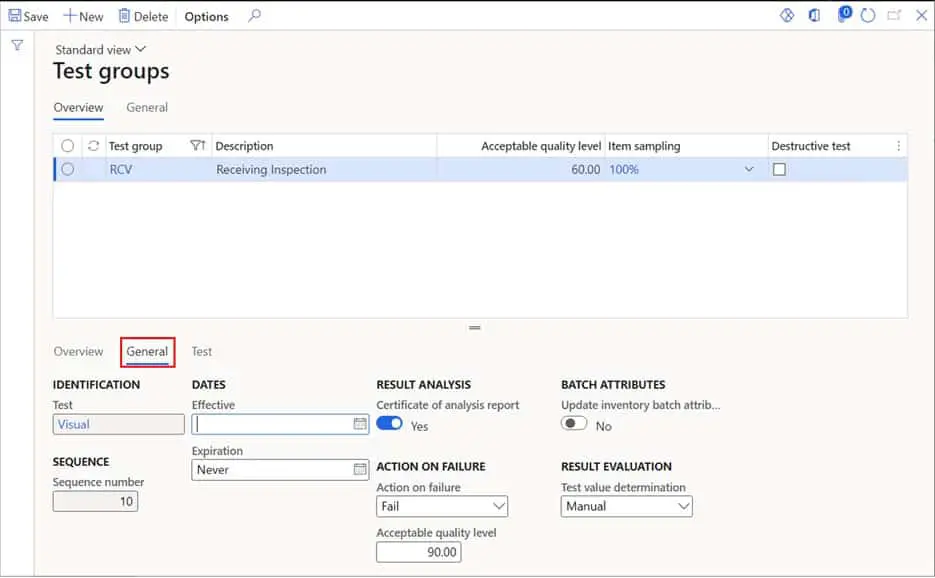
General Tab
- Update inventory batch attributes – Enabling this flag allows the quality order to update a specific batch attribute based on the results entered for a test. The specific attribute is defined at the quality group line level where the tests are defined. Selecting this flag will default this option for each of the test lines.
- Update batch disposition – Batch disposition is similar to inventory status except it is specific to an individual batch. Selecting this option allows the system to set the batch disposition code based on the overall status of the quality order.
- Failed quality order batch disposition – If “Update batch disposition” is selected this is where you can define the batch deposition that a batch should be set to if the quality order fails.
- Passed quality order batch disposition – If “Update batch disposition” is selected this is where you can define the batch deposition that a batch should be set to if the quality order passes.
- Update inventory status – This option allows the quality order to update the inventory status based on the overall outcome of the quality order.
- Failed quality order status – If the “Update inventory status” flag is selected, after you validate and complete a quality order and the quality order fails, the system will update the inventory status of the inventory associated with the quality order to this inventory status.
- Passed quality order status – If the “Update inventory status” flag is selected, after you validate and complete a quality order and the quality order passes, the system will update the inventory status of the inventory associated with the quality order to this inventory status.
Overview (Lower Pane)
- Sequence number – This is the sequence in which tests in the quality order should be executed.
- Test – This is the test that is to be completed.
- Effective and Expiration – Individual tests can have effectivity dates. So, if certain tests are phased out over time and new tests are added you can use these fields to do it on a certain date.
- Test value determination – This value determination is used when you are updating the inventory batch attribute. For example, if you select “Average” and you enter two test results for a measurement it will take the average of the two measurements and use that value to update the batch attribute value.
- Attribute – If you are using the “Update inventory batch attribute” functionality, this is the attribute that will be updated.
- Update inventory batch attribute – If this flag is selected the results of this test will be used to update the inventory batch attribute selected on this line. This option can be turned off or on for individual tests.
General (Lower Pane)
- Certificate of analysis – Selecting this flag indicates that this test result should be included in the certificate of analysis. This is selected by default.
- Action on failure – This indicates what the outcome of the individual test should be if the test evaluates to a failed test. In some cases, even if the test fails, we may not want to include this in the evaluation of the overall quality order.
- Acceptable quality level – This is the percentage of the passed test results that constitutes a passed test. For example, if I have a test that requires 90% acceptable quality level and I have entered in my tests results for the test that 80 have passed and 20 have failed, that particular test would evaluate to a failed test.
Test (Lower Pane)
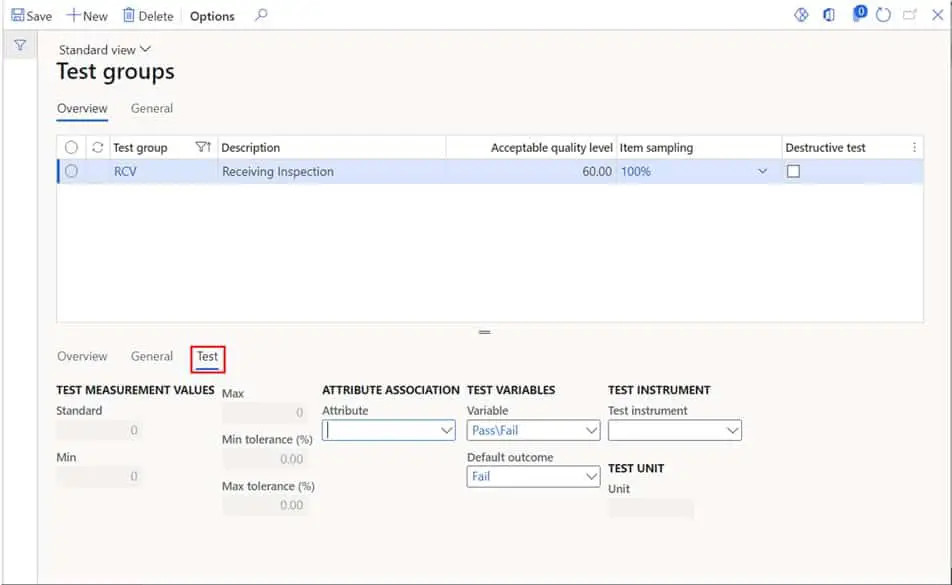
- Standard – For tests with a type “Integer” or “Fraction” you can define a standard value that represents a normal or standard value for this test.
- Min and Max – For tests with a type “Integer” or “Fraction” you can define a minimum or a maximum range that defines the acceptable bounds for this type of test.
- Min and Max tolerance – This field is automatically calculated based on the values you put in the min and max fields compared against the standard value.
- Variable – For tests with a type “Outcome” this defines the available values for test result entry.
- Default outcome – This defines the outcome that is selected by default. The user will need to change this value to the actual outcome of the test during result entry. I usually create a variable with an option of “Untested” and set the default outcome to this to indicate to the user that no test results have been entered.
- Test instrument – If the test uses a test instrument like a thermometer, or tape measurer you can define that on the test setup.
- Test unit – This is the unit of measure that the results for this test are entered in. This is defined on the test setup form.
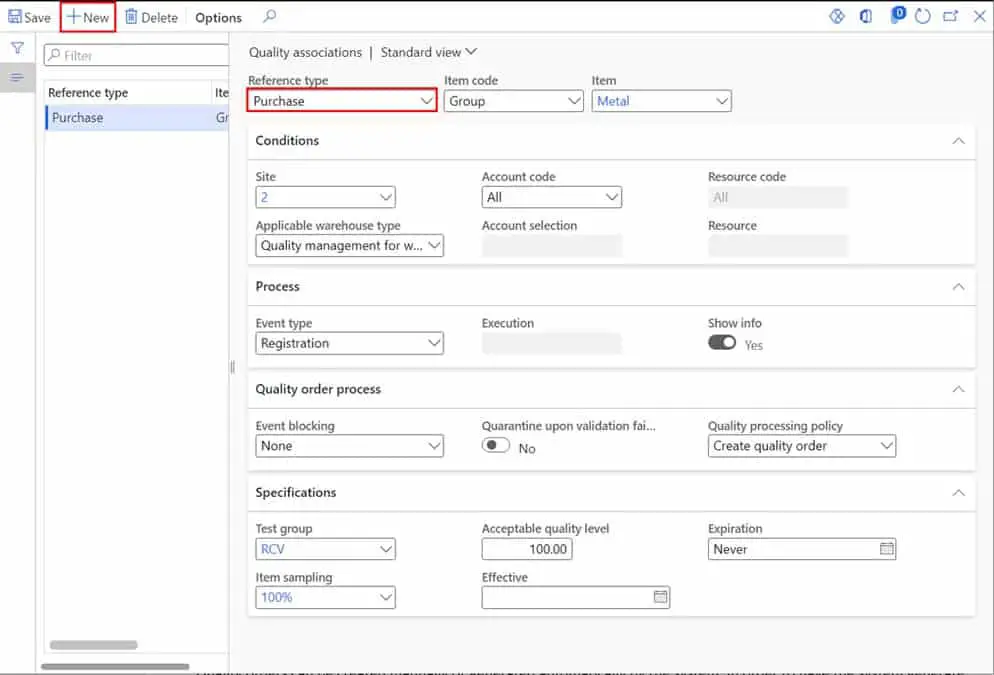
To create a quality association, navigate to Inventory management > Setup > Quality control > Quality associations. Click the “New” button to create a new quality association record.
- Reference type – This is where you select the source of the quality order. In this example I will select “Purchase” because I want the system to generate a quality order from the purchase order that I do a registration against.
- Item code – This field allows you to select at which level you want the quality association to apply to. “Item” allows you to select a specific item for which the quality association applies. “Group” allows you to select an item quality group for which the quality association applies. “All” means that this quality association applies to all products.
- Item – depending on the “Item code” selection you will select either a specific item or an item quality group for which the quality association should apply.
- Site – This is the site for which the quality association will be applied.
- Applicable warehouse type – This is a way you can make the quality association apply to all warehouses by selecting “All” or only warehouses that have the “Enable quality order for warehouse processes” option selected.
- Account code – This works in a similar way to “Item code” where you can select either a specific vendor or customer account depending on the “Reference type” selected.
- Account selection – Depending on the “Account code” selection you can select a vendor/customer account or vendor/customer group.
- Resource code – This works in a similar way as the “Account” code and is only applicable when the “Reference type” is Production. If you select “Table” you can select a specific resource the quality association will apply to and if you select “Group” you can select a route group that the quality association will apply to.
- Resource – Depending on the “Resource code” selection you can either select a specific resource or a resource group for which the quality association will apply.
- Event type – This is the event that will trigger the quality order. In this example the quality order will be created as soon as I register the receipt on the WMS mobile device.
- Event blocking – depending on the “Reference type” selected you can block certain postings or events if the quality order has not been closed. For example, in the case of a purchase order you can block the product receipt or vendor invoice if the quality order has not been closed.
- Quarantine upon validation failure – This will create a quarantine order if the quality order fails. However, quarantine orders are not used with WMS functionality.
- Quality processing policy – This option allows you to either have the system create the work and quality order or just the work.
- Test group – The test group defines things like what tests need to be executed, the acceptable quality level, etc. The test group will be defaulted to the quality order when it is created.
- Item sampling – This defines the quantity that will be tested on the quality order.
- Acceptable quality level – This defines what percentage that is successfully tested and passed constitutes a passed quality order or a failed quality order. For example, if you are testing a quantity of 100 and you have an acceptable quality level of 90, that means 90 percent of the tests have to pass for the quality order to be evaluated as a passed quality order.
- Effective and Expiration – Quality associations can have effectivity dates meaning you could set up quality associations to expire and new ones to take the place of the old one.
Inbound Flow
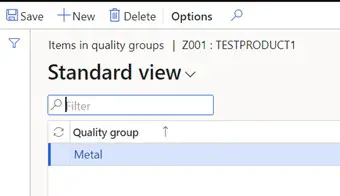
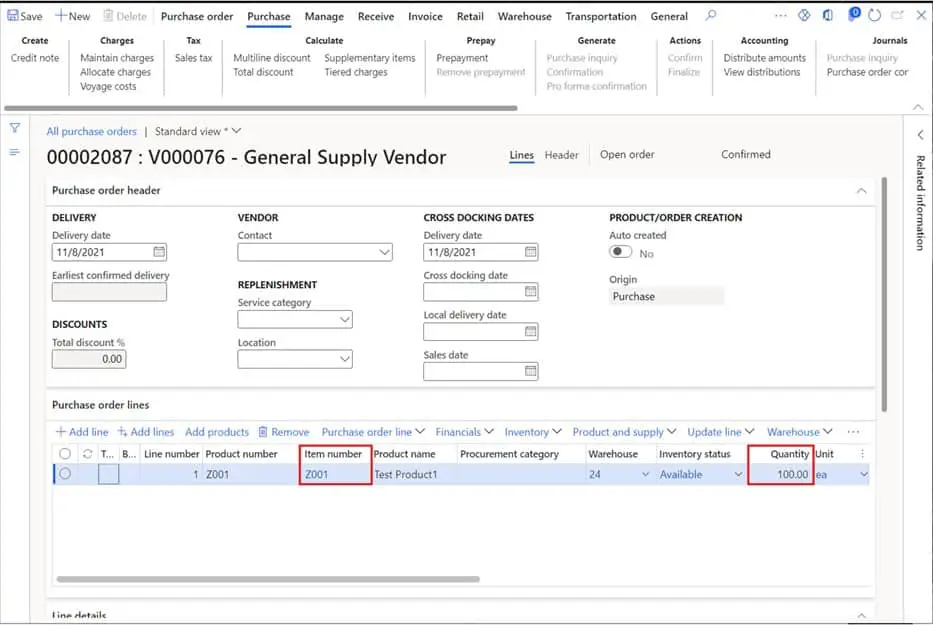
Now that we the setup required for our inbound flow with quality order, we can start the process. Below I have a purchase order for item “Z001”, and that product has the “Metal” item quality group assigned to it. As discussed above because we have a purchase quality association set up for this item quality group, this will trigger a quality order.
On the purchase order for item “Z001” I have a quantity of 100.
Now I will receive the purchase order using the WMS mobile application. For a more details on how to process a purchase order with advanced warehouse functionality please see this post.
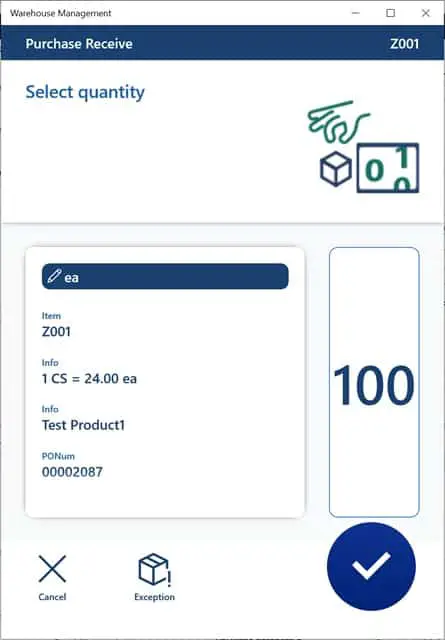
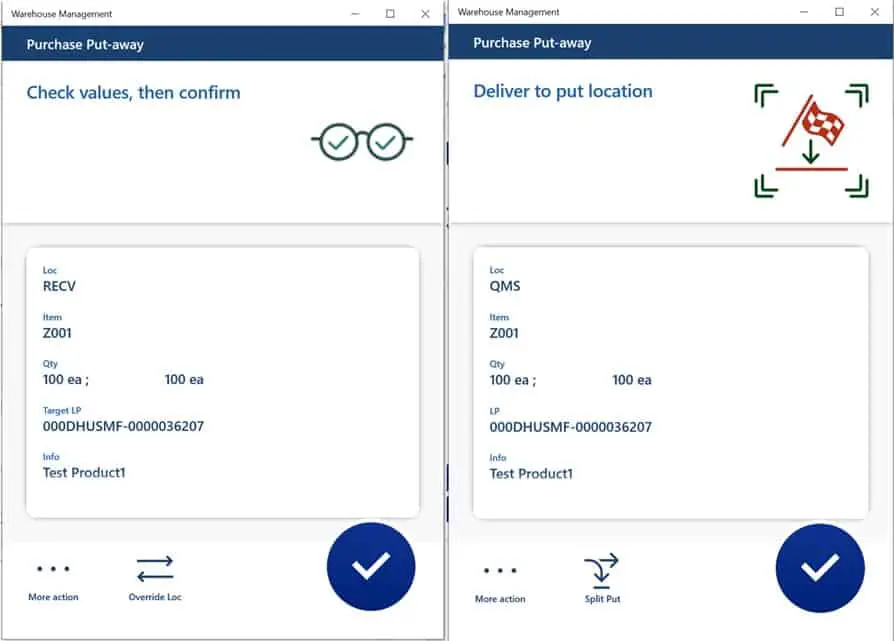
After the receipt the system has created put away work of type “Quality item sampling” and it is directing me to put the product in the “QMS” location.
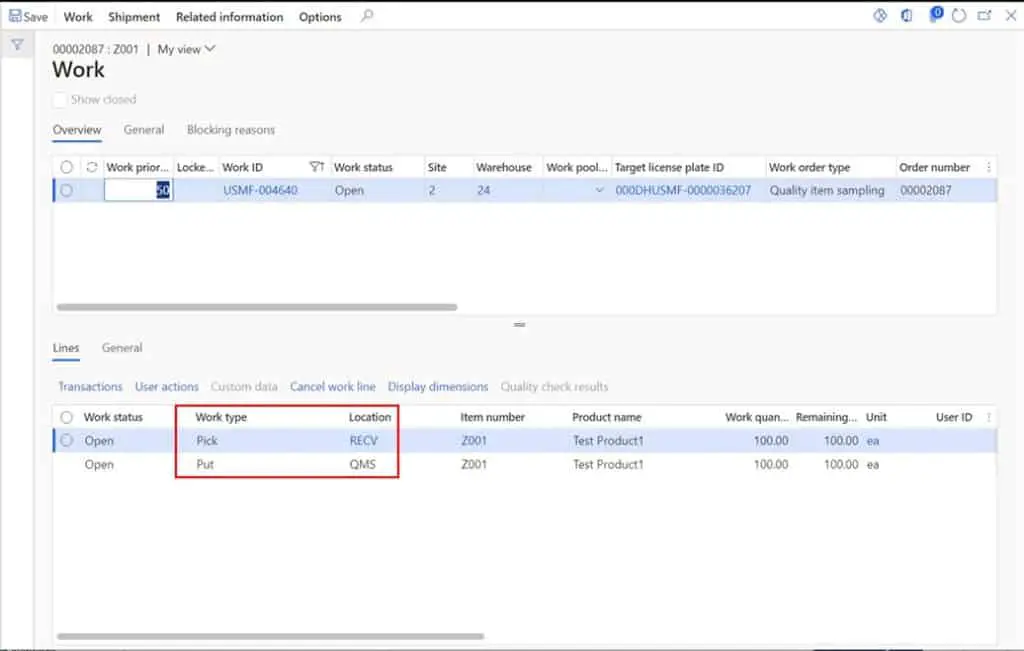
Now I will complete the pick and the put steps on the WMS mobile application. The result is that I have put the item to the QMS location, and the system has automatically created a quality order for this product.
Process The Quality Order
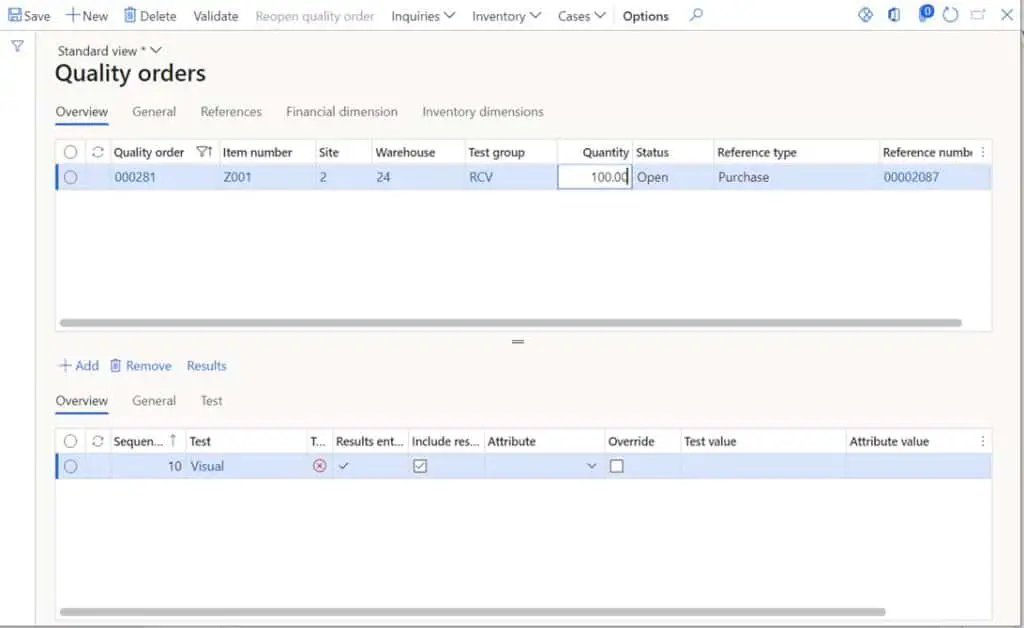
The next step is to process the quality order. Below you can see we have a system generated quality order related to the purchase order for the entire quantity on the purchase order (sampling was 100%). The quality order consists of one visual test and our acceptable quality level is 100 so if any number of the visual inspection fails this will cause the entire quality order to result in a “Fail” status.
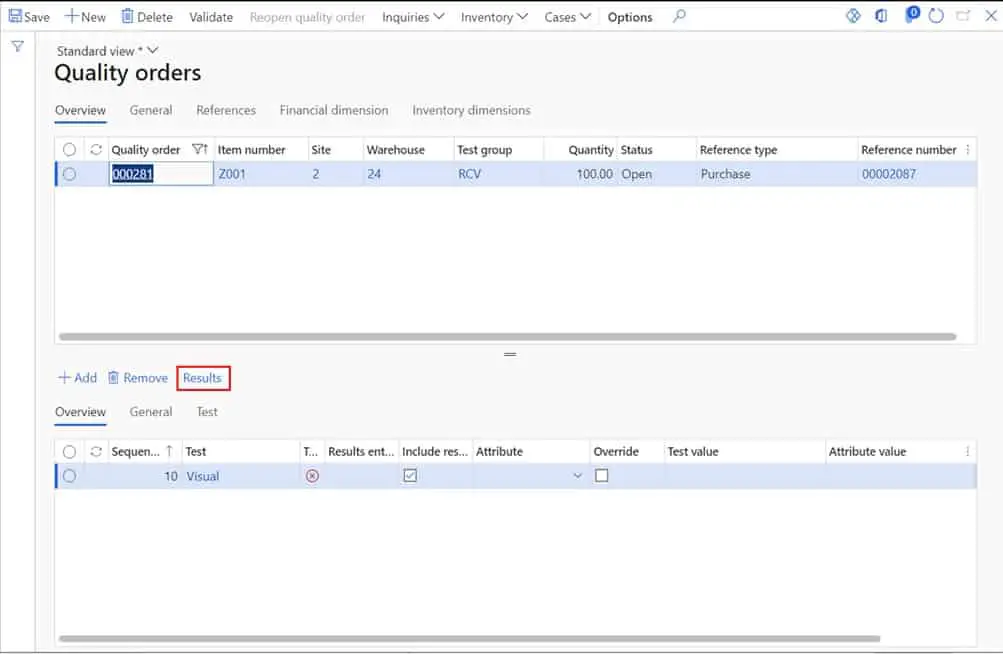
To enter the results of the visual inspection, click the “Results” button as shown above. Now in the quality order line results for you can click the “New” button to enter the results which is how many correspond to the outcome you enter. So, in this case I am saying that all 100 have passed visual inspection. If there were some that failed, I would just click “New” again and enter the quantity that failed and set the outcome for those to “Fail”.
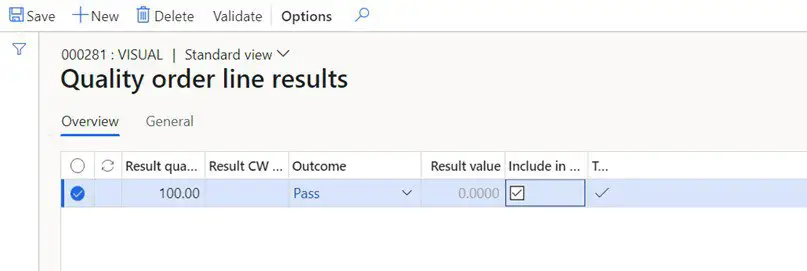
Now the system will evaluate whether the individual test is a pass or a fail based on the acceptable quality level for that specific test. In this case all 100 passed so the test was evaluated to passed.
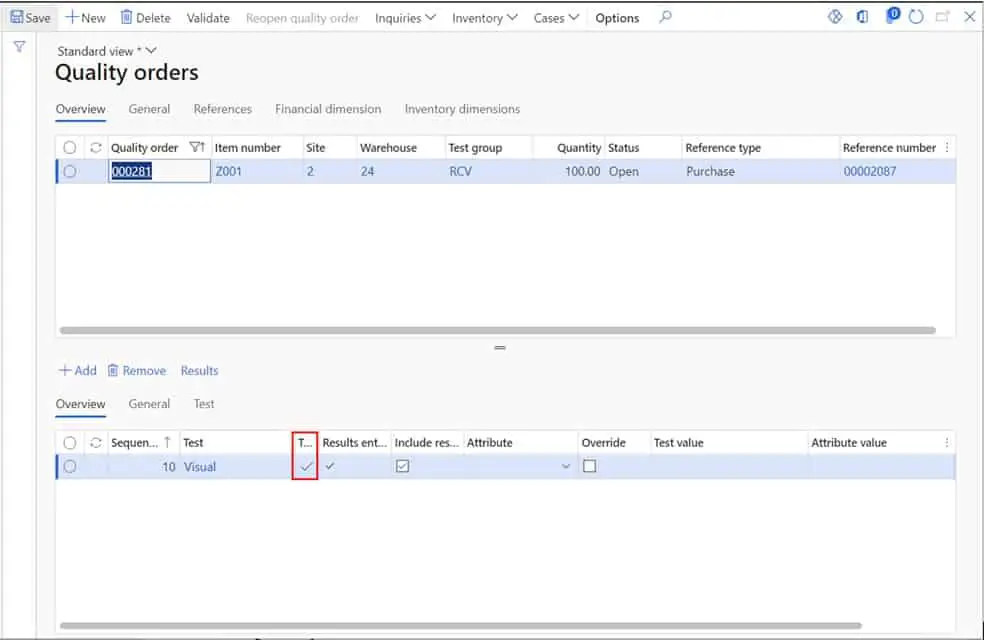
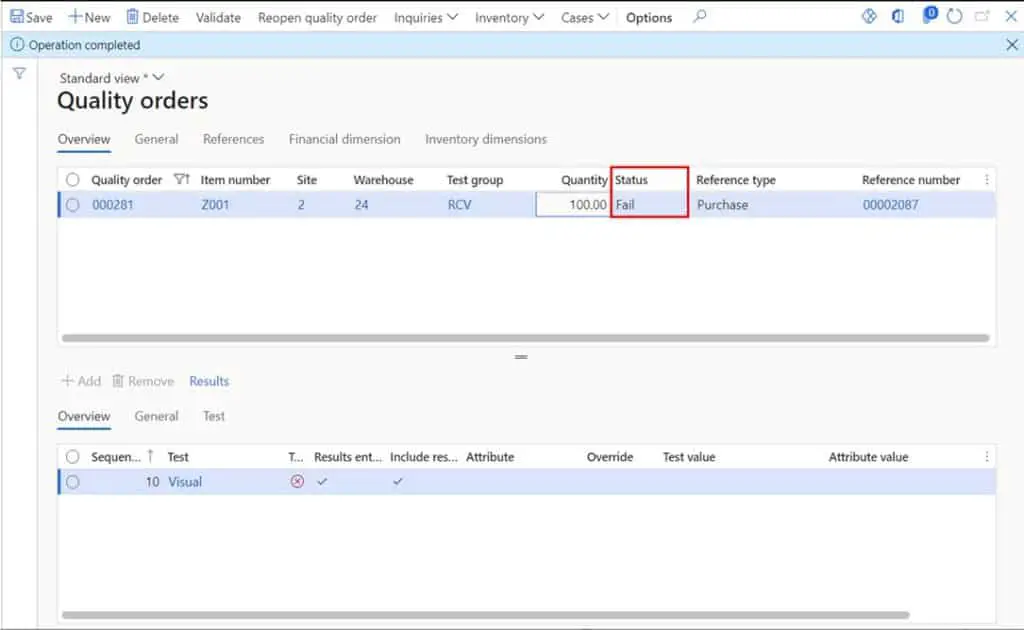
Now I am finished with all the tests required for this quality order. Next, I need to close the quality order and have the system evaluate the quality order to either pass or fail status. To do this click the “Validate” button and click the “Ok” button on the flyout form.
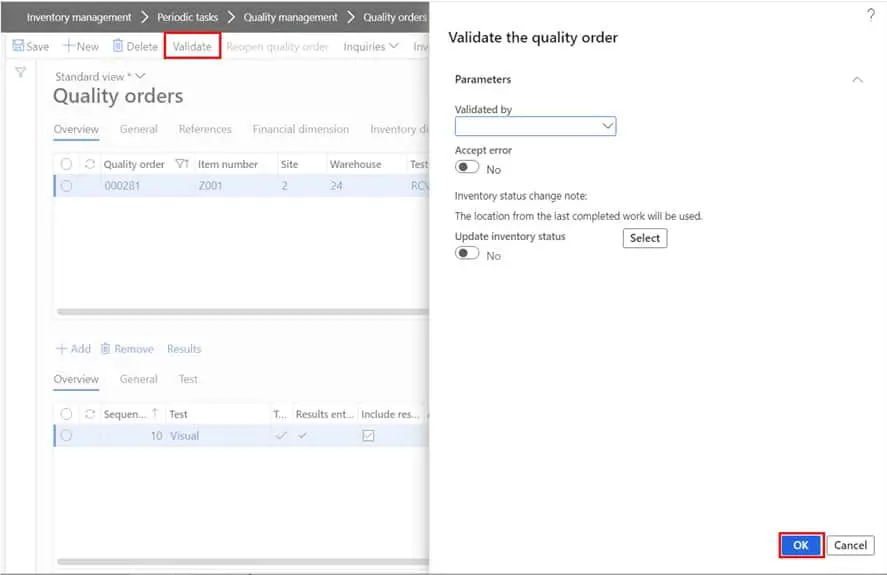
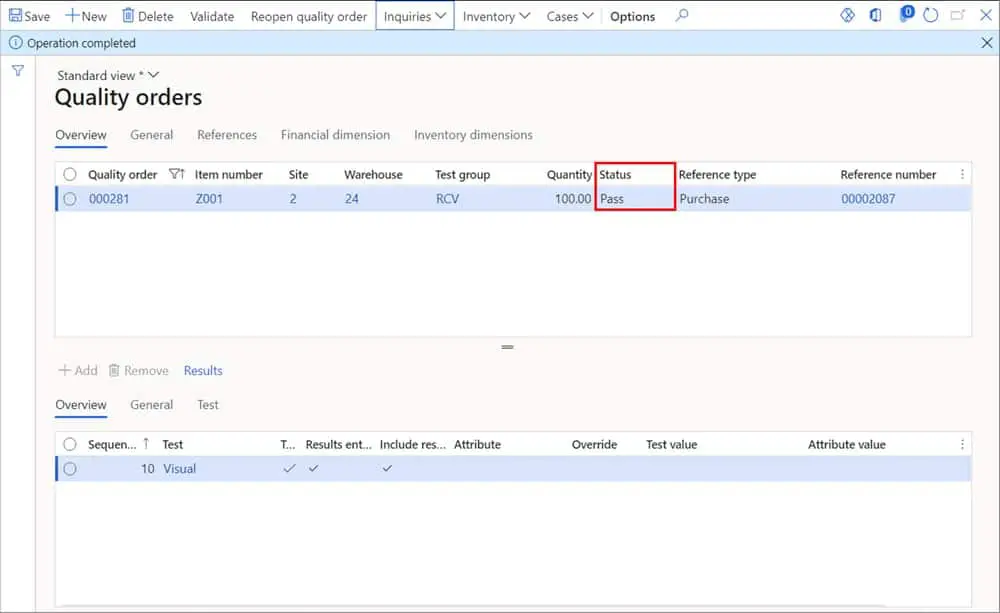
This will update the “Status” field based on the acceptable quality level set on the quality order.
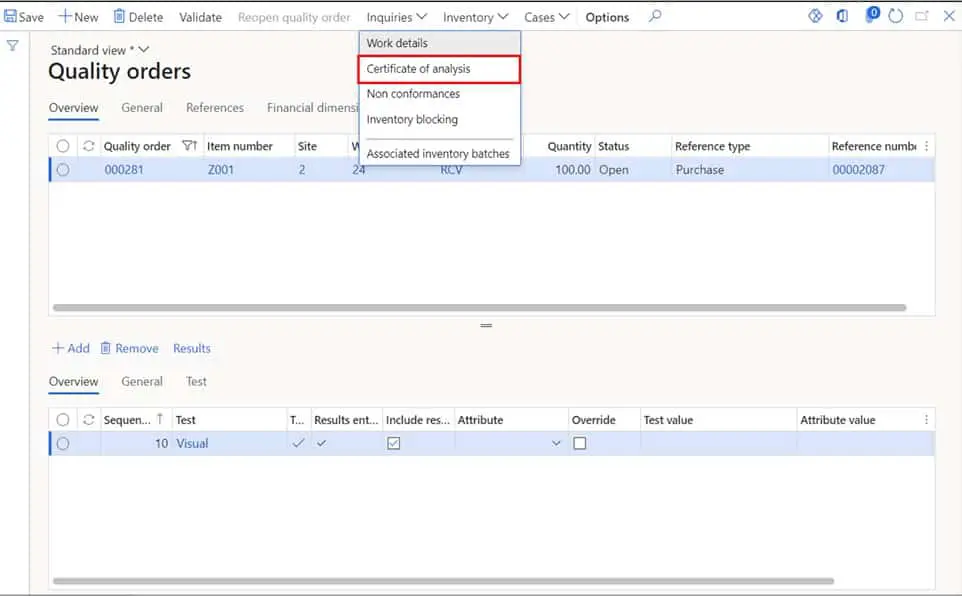
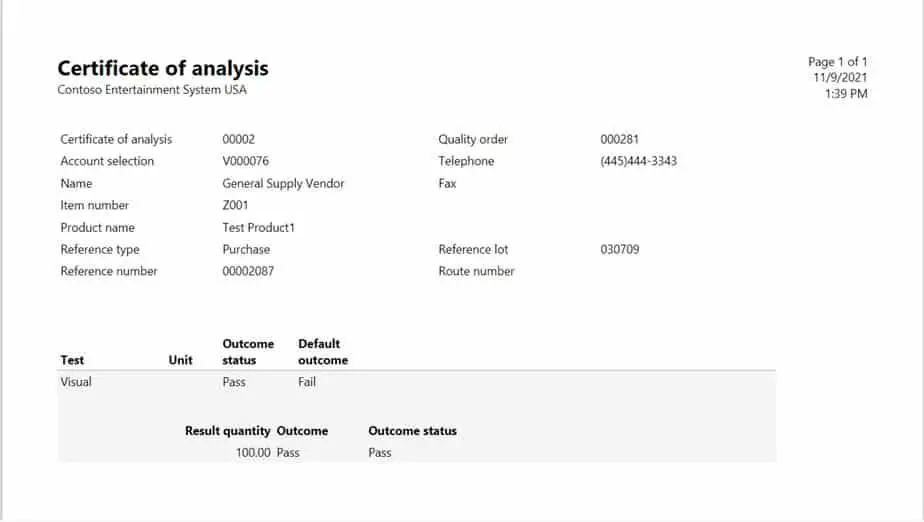
If we need to produce a certificate of analysis for documentation purposes, we can do that by clicking “Inquiries” and then clicking “Certificate of analysis”.
In this form click the “New” button to create a new certificate of analysis record and click the “Print” button.
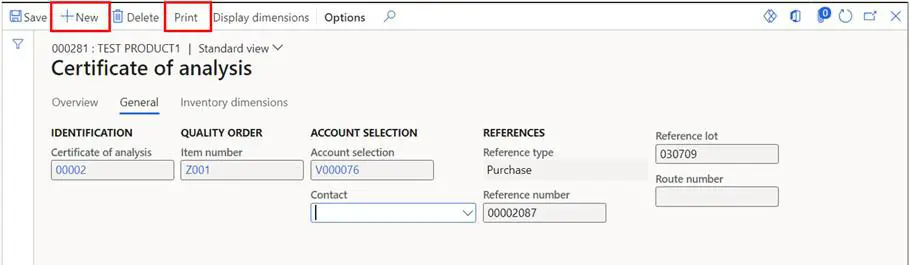
This will produce a certificate of analysis printout that can be printed and put physically with the product if required.
Quality Order Put Away
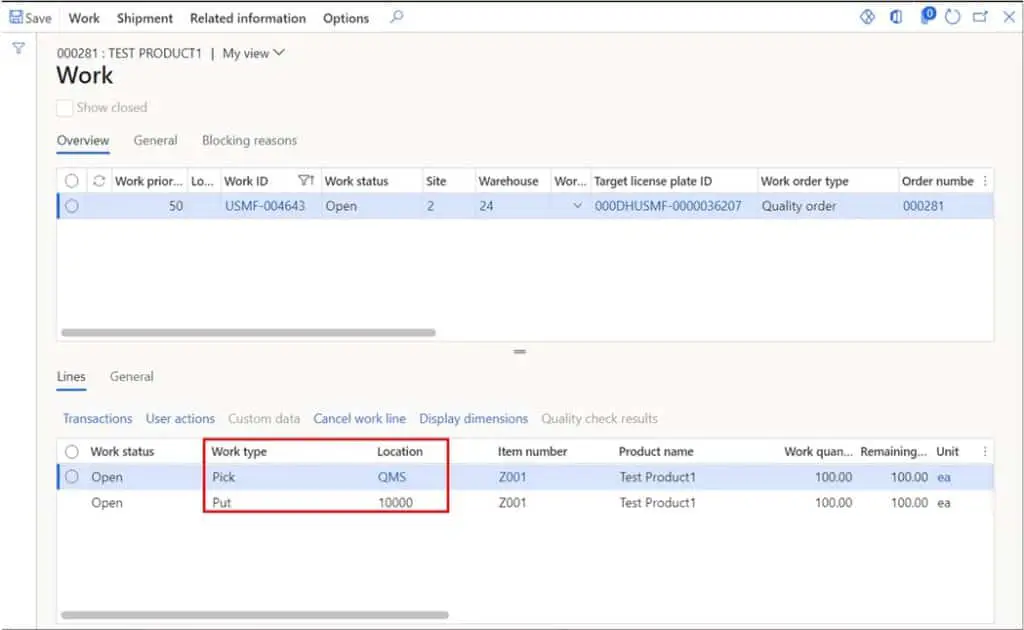
Upon completion of the quality order the system will create put away work based on the status of the quality order. In this case the quality order passed so I have work to pick the product up from “QMS” and put it to a stock location.
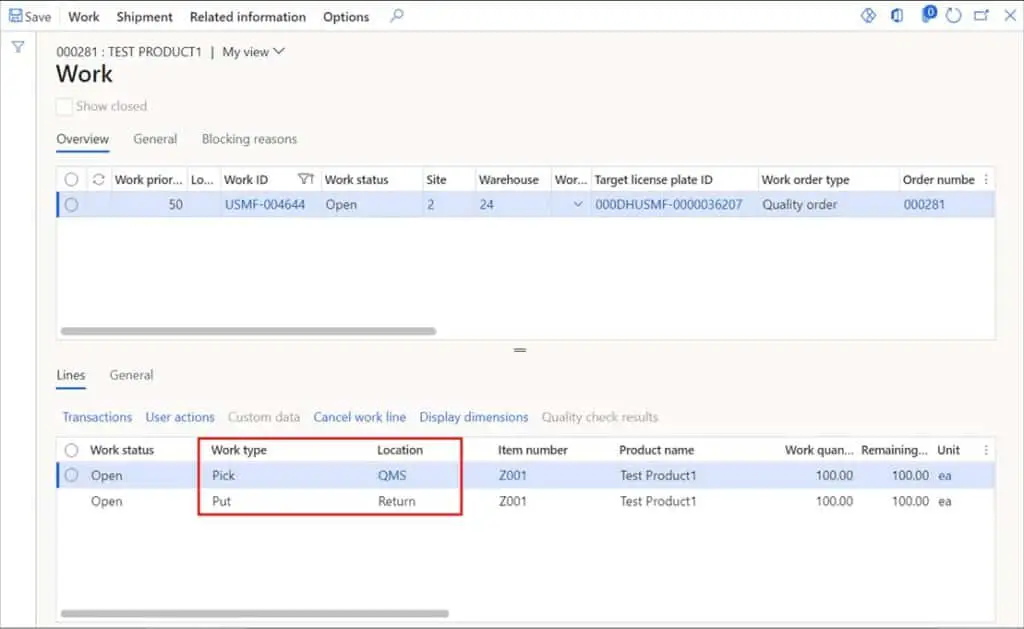
Now let’s cancel the work, reopen the quality order, and fail the visual inspection test and then validate the quality order.
This will result in the quality order evaluating to “Fail”.
Now if we check the work that the was generated, we can see the I have a pick from “QMS” and a put to the “Return” location.
Takeaway
I hope this very simple example has shown you the power of not only quality orders in D365 but also how the new integrated advanced warehouse functionality can be used to set up a robust quality warehouse process. The main setups were covered in this post but there are some more nuanced setups in quality orders that were not covered here. The purpose of this post was to get you up and running and then let you play with the configuration and tweak it to satisfy your own business requirements.