

In Dynamics 365 Finance and Operations a purchase agreement is the promise to buy a given quantity or value of a specific product or category from a specific vendor. Purchase agreements often come with associated discounts for agreeing to buy a specific quantity or value so those can be established as well on a purchase agreement. Purchase agreements also allow you to track the fulfillment of these agreements over time.
There is often confusion between trade agreements and purchase agreements, so I’ll make that clear now. In Dynamics 365 Finance and Operations a trade agreement is just a price or a discount. While a purchase agreement can include prices or discount, it also constitutes an agreement to purchase a certain quantity or value from a vendor over a given period of time.
In this post we will go through the setup required for purchase agreements as well as how to process a purchase agreement, and then track the progress of the fulfillment.
Purchase Agreement Setup
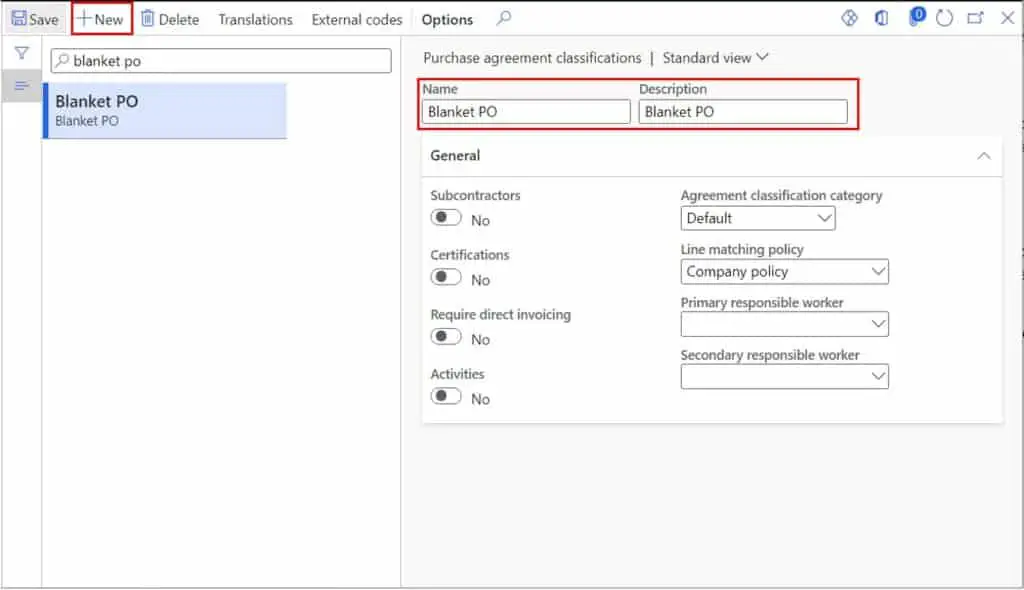
The only configuration required to use purchase agreements is the “Purchase agreement classification” setup. The purchase agreement classification is primarily used to classify the type of purchase agreement you are creating. However, it does have some fields related to public sector finance that are available but not relevant for most businesses.
To create a purchase agreement, navigate to Procurement and sourcing > Setup > Purchase agreement classification. Click the “New” button and in the “Name” field give the classification a name. In the “Description” you can give the classification a longer descriptive name.
In the “General” fast tab you have some fields that are primarily for public sector finance but are still available if you need to use them.
- Subcontractors – This indicates that this type of purchase agreement will have subcontractors. You can create a purchase agreement for the primary contractor and subcontractor and link them in a parent child relationship.
- Certifications – This is an optional reporting field that allows you to track compliance with vendor certifications.
- Require direct invoicing – This option prevents releasing orders.
- Agreement classification category – This is a system defined agreement classification category. Currently there is one value, “Default”.
- Line matching policy – This allows you to define the line matching policy for purchase orders released against this purchase agreement.
- Primary responsible worker – This allows you to optionally define a primary responsible person for this type of purchase agreement.
- Secondary responsible worker – This allows you to optionally define a secondary responsible person for this type of purchase agreement.
Create a Purchase Agreement
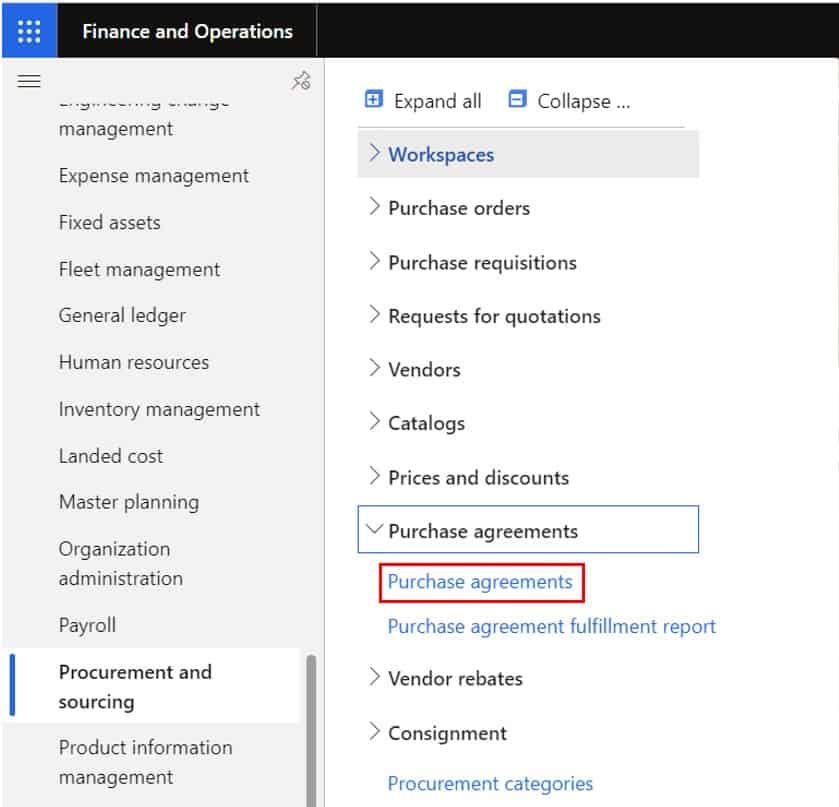
To create a purchase agreement, navigate to Procurement and sourcing > Purchase agreements > Purchase agreements.
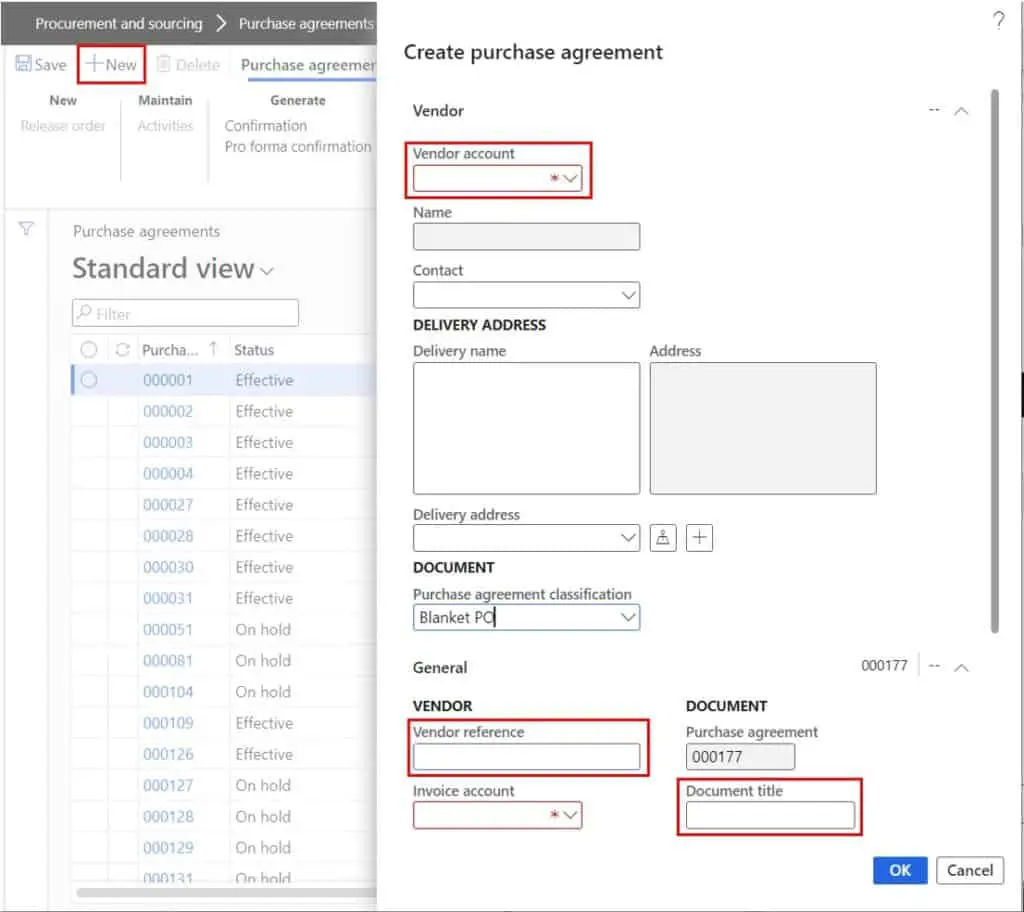
Click the “New” button and select the vendor account that this purchase agreement will apply to. In the “Vendor reference” field you can enter a reference number or code that may reference the purchase agreement in the vendor’s system. In the “Document title” field you can enter a free text description of the purchase agreement.
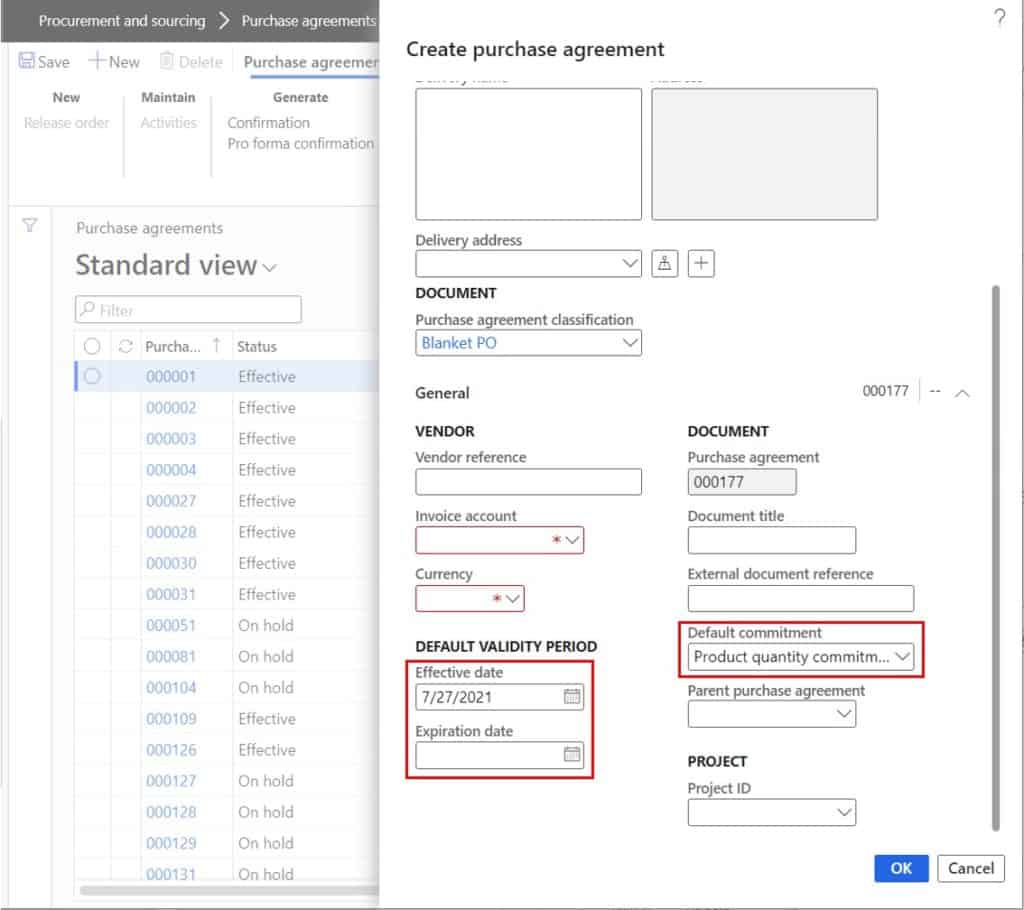
Next scroll down and select the “Default commitment” which is basically the type of commitment the purchase agreement will define. There are four types of commitments:
- Product quantity – This option is where you promise to purchase a specific quantity of a product over the life of the purchase agreement.
- Product value commitment – This option is where you promise to purchase a specific value of a product regardless of physical quantity of the product received.
- Product category value commitment – This option is where you promise to purchase a specific value from a procurement category.
- Value commitment – This option is where you promise to purchase a specific value from the vendor regardless of category or product.
You can also set the effectivity dates of the agreement by setting the “Effective date” and “Expiration date”. Next click the “Ok” button to create the purchase agreement.
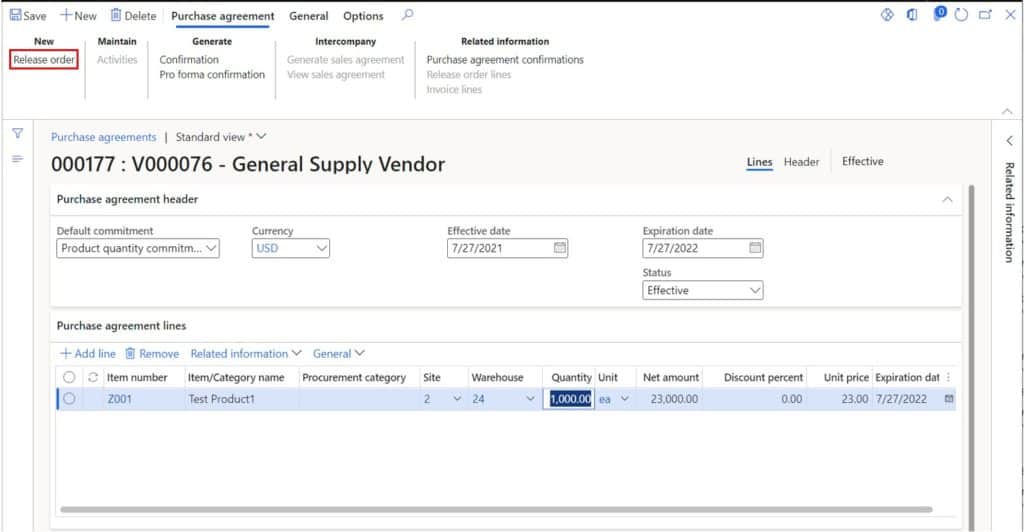
Now we can start to enter the purchase agreement lines. Click the “Add line” button to add a purchase agreement line. Now in the “Item number” field enter the part number that the agreement is for. Next define the “Site” and “Warehouse” dimensions where the agreement should apply. If the agreement applies for all sites and warehouses you can leave it blank and populate them in the released purchase order.
This purchase agreement has a “Default commitment” set to “Product quantity commitment” which means the agreement is based on quantity. So next we will need to define the quantity that we will commit to purchasing of this specific product. Enter this quantity in the “Quantity” field. Typically purchase agreements come with special pricing or discounts. Next enter the “Discount percent” or the special pricing in the “Unit price” field.
If the “Expiration date” is different than the header expiration date you can override the agreement expiration date for this line, otherwise you can leave it alone. Down in the “Line details” fast tab in the “General” tab there is field called “Max is enforced”. If your purchase agreement is tightly enforced, you can select this option to ensure that there are no releases against this purchase agreement that breach the quantity or amount agreed upon.
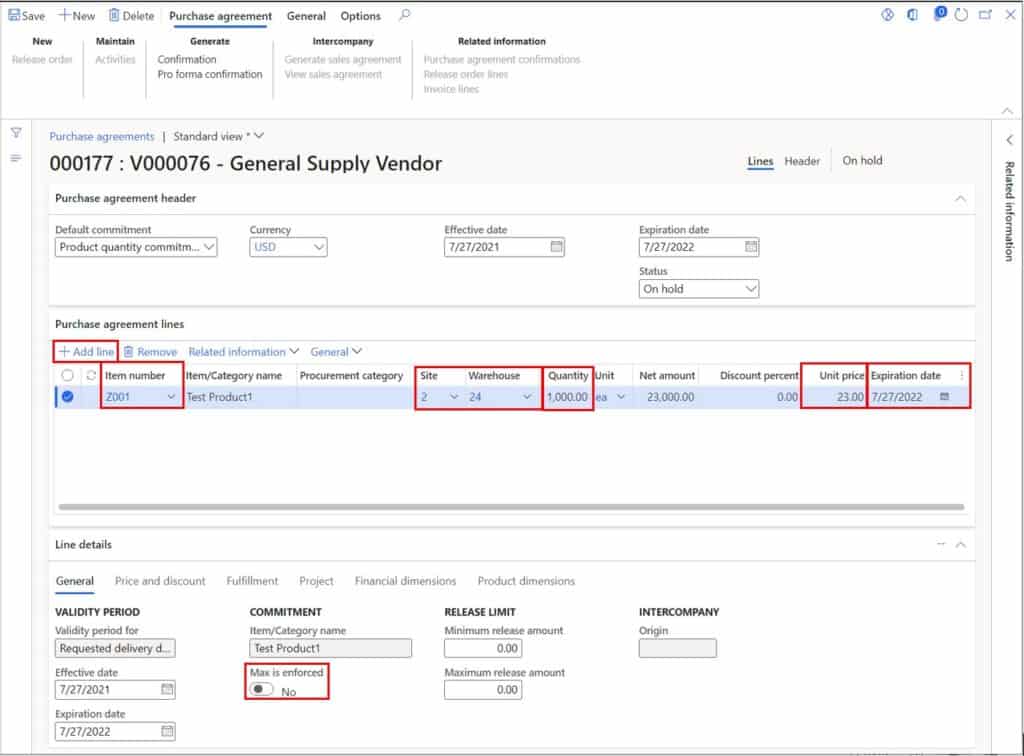
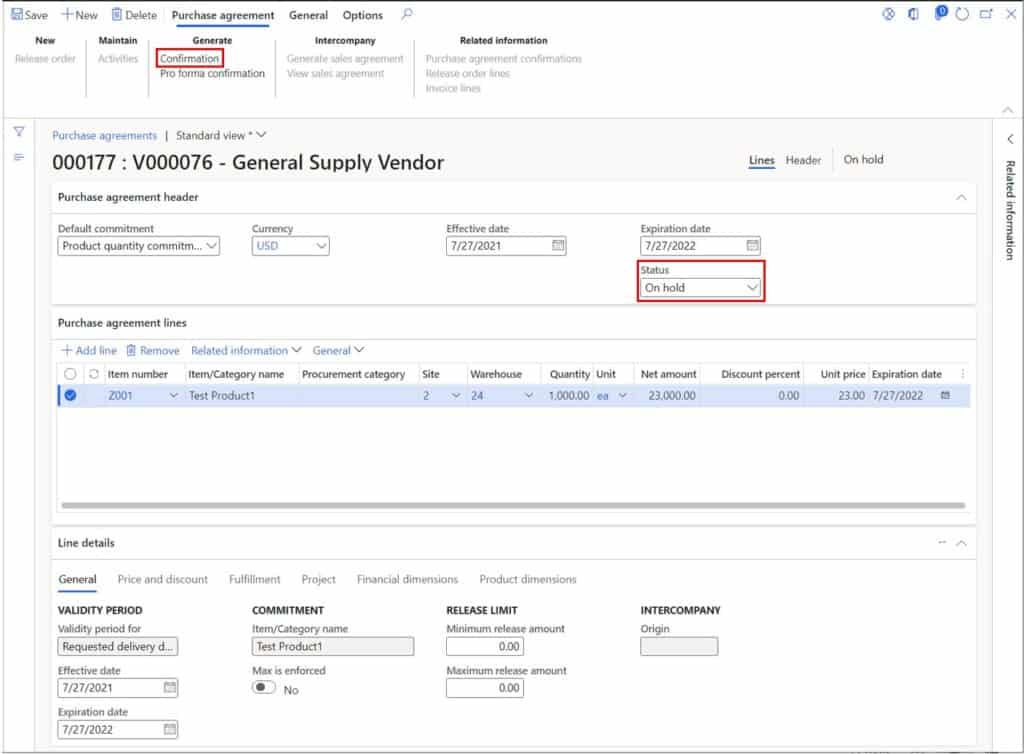
You can repeat this process until you have all the lines of the purchase agreement. Then when you have the purchase agreement completed, the next step is to activate the purchase agreement. You’ll note that the “Status” is currently set to “On hold”. This means that right now the purchase agreement is not active, and no releases can be made against this purchase agreement.
We need to activate the purchase agreement. To do this click the “Confirmation” button.
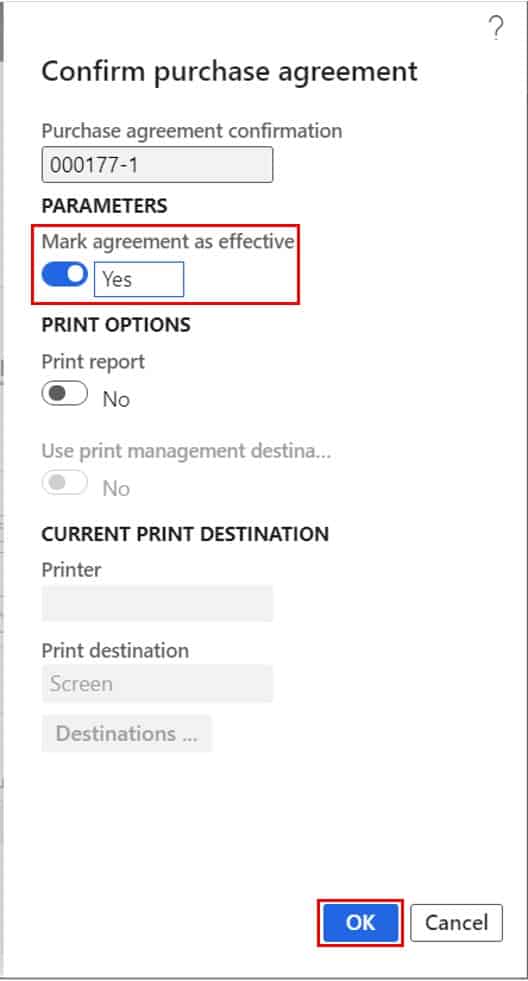
On the fly out form click the “Mark agreement as effective” and click the “Ok” button.
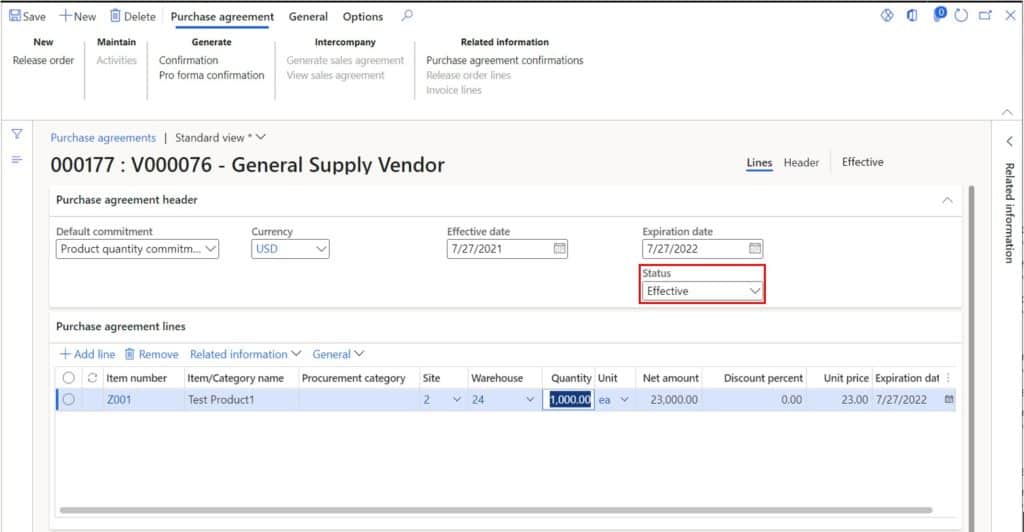
Now you will notice that the “Status” has changed to “Effective”. Now we are ready to start releasing orders from the purchase agreement.
Release a Purchase Agreement
The next step with purchase agreements is to start releasing from the purchase agreements. You can release certain quantities or amounts directly from the purchase agreement or you can create the purchase order and link it to the purchase agreement at the time the purchase order is created. I will show you both ways.
To release quantities or amounts directly from the purchase agreement click the “Release order” button.
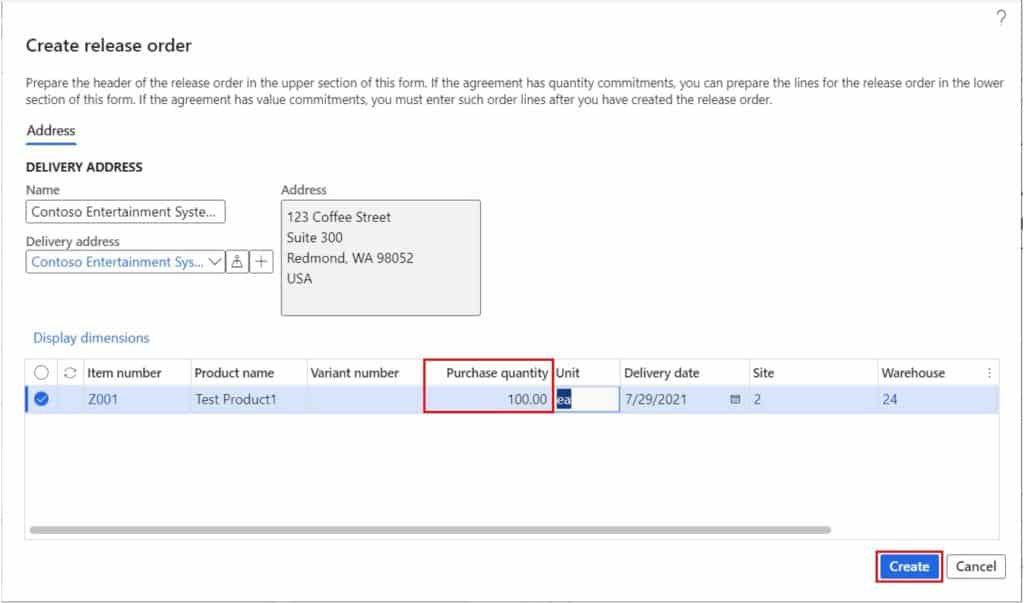
On the “Create release order” form specify the quantity you would like to release from the purchase agreement. Then click the “Create” button.
You will get an information log that tells you the purchase order number. To go straight to the purchase order, click the “Release order lines” button.
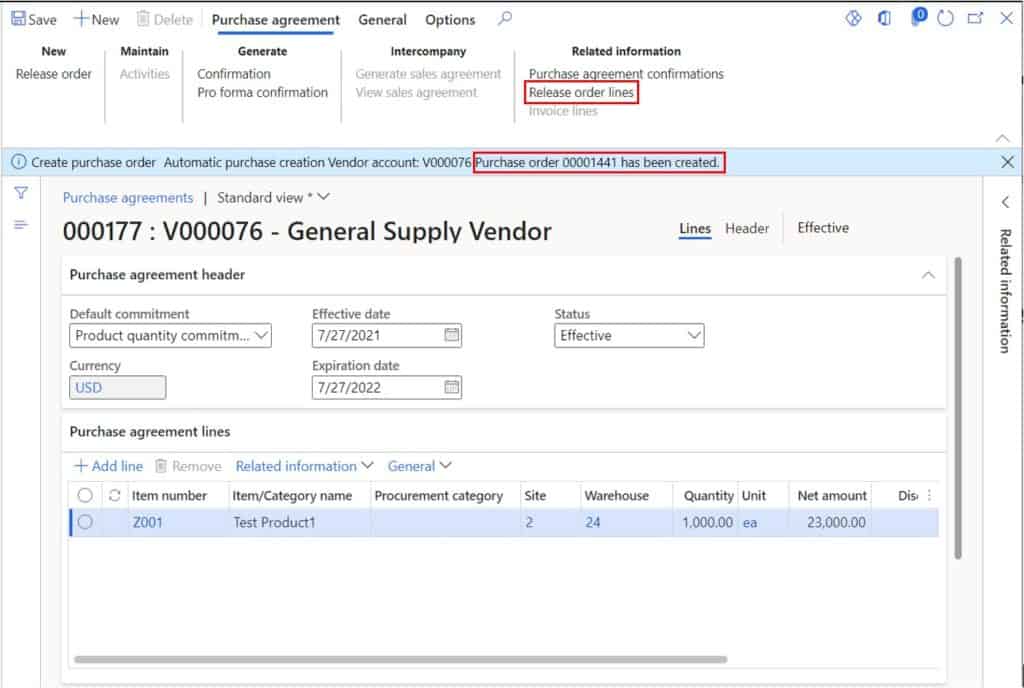
This form shows you all the released lines against this purchase agreement. From here you can drill into any of the created purchase orders by clicking on the purchase order ID hyperlink.
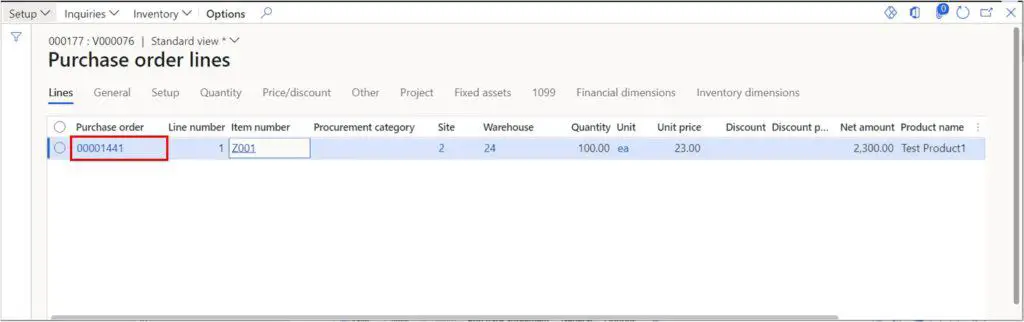
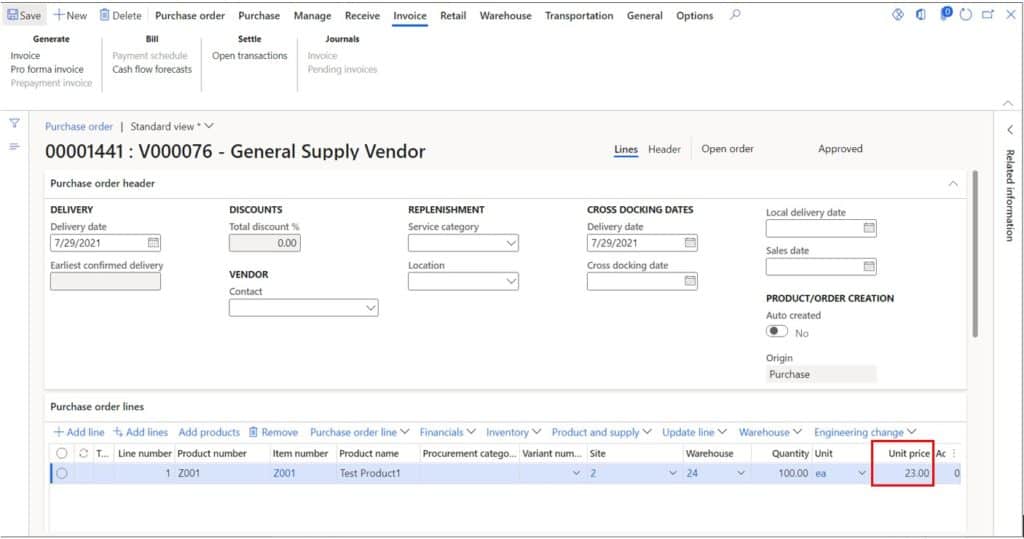
This will take you directly to the created purchase order. Now this purchase order can be processed like any other purchase order. You will also notice that the purchase agreement unit price has flowed over from the purchase agreement.
Next, we will go through how to release lines from a purchase agreement directly from a purchase order instead of going through a purchase agreement. Typically, you wouldn’t want a buyer to have to change their process of creating a purchase order, so this usually the preferred method.
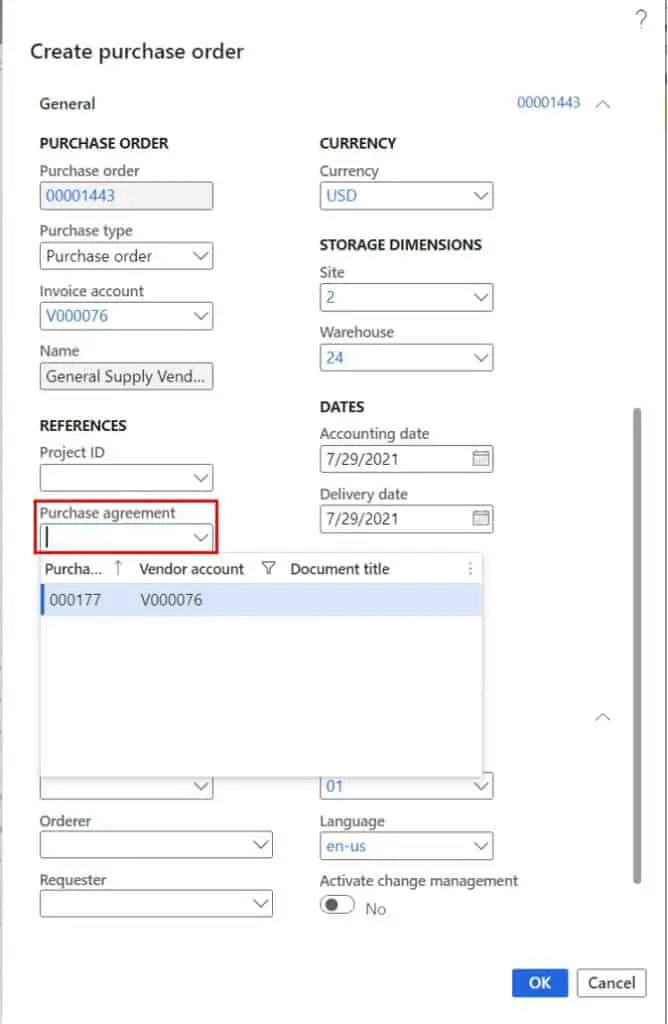
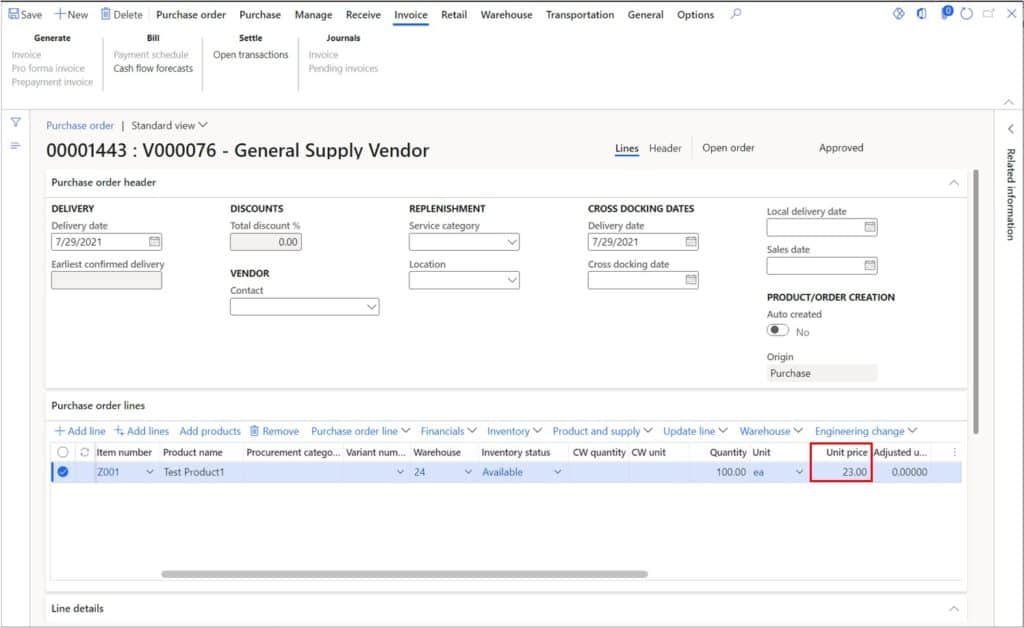
When you create a new purchase order you can link it to a purchase agreement by selecting the purchase agreement in the “Purchase agreement” field. Then you just need to add the items that apply to the purchase agreement and the prices will default from the purchase agreement as you would expect. For more information on how to create a and process a purchase order check out this post.
Purchase Agreement Fulfillment
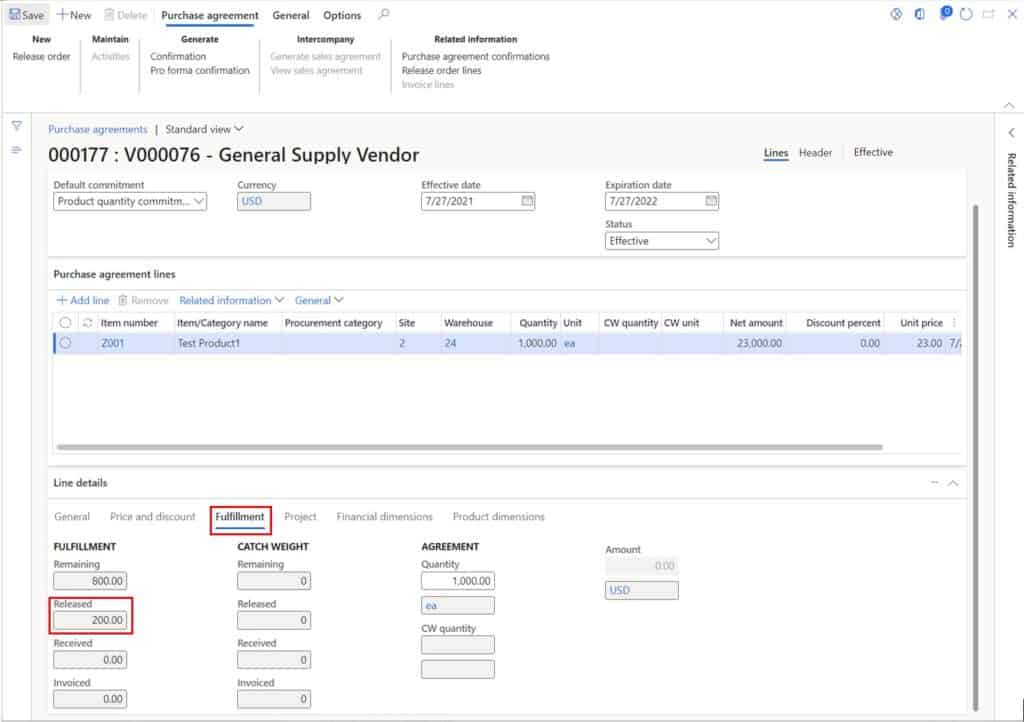
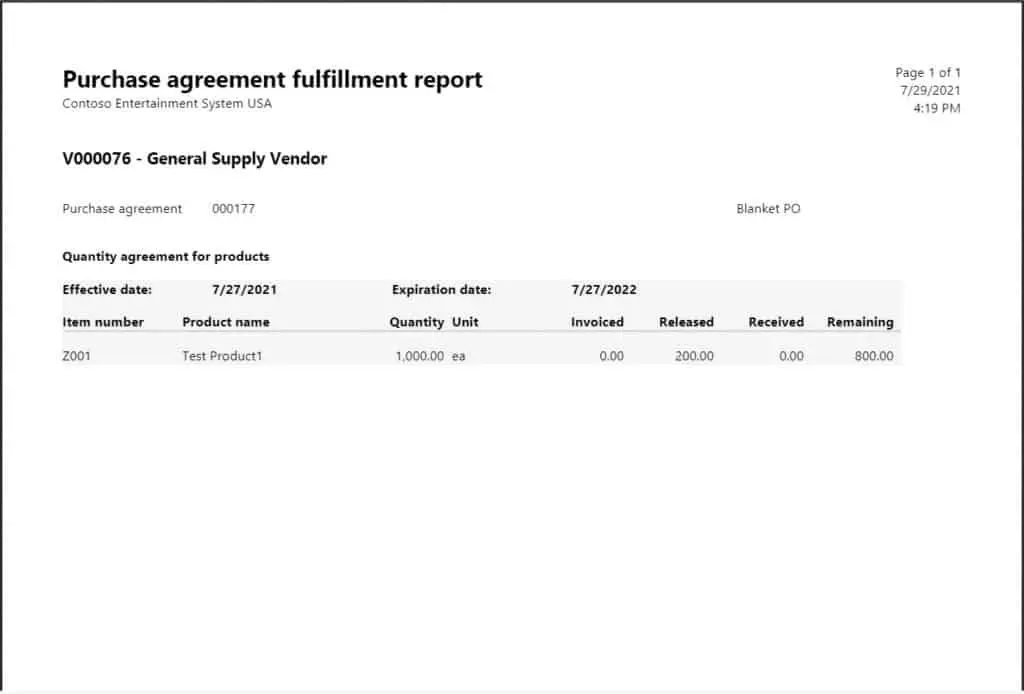
Now that you have learned how to release orders against a purchase agreement. The next question you might ask is how do I track how much I have released, how much have I received, how much have I been invoiced for? In Dynamics 365 Finance and Operations there are a couple of way to see this. If you want to check the fulfillment of an individual purchase agreement you can do this buy opening up the purchase agreement and clicking on the “Fulfilment” tab in the “Line details” fast tab. This will show you the breakdown of what all has been released, received, and invoiced. In our example we have released a quantity of 200.
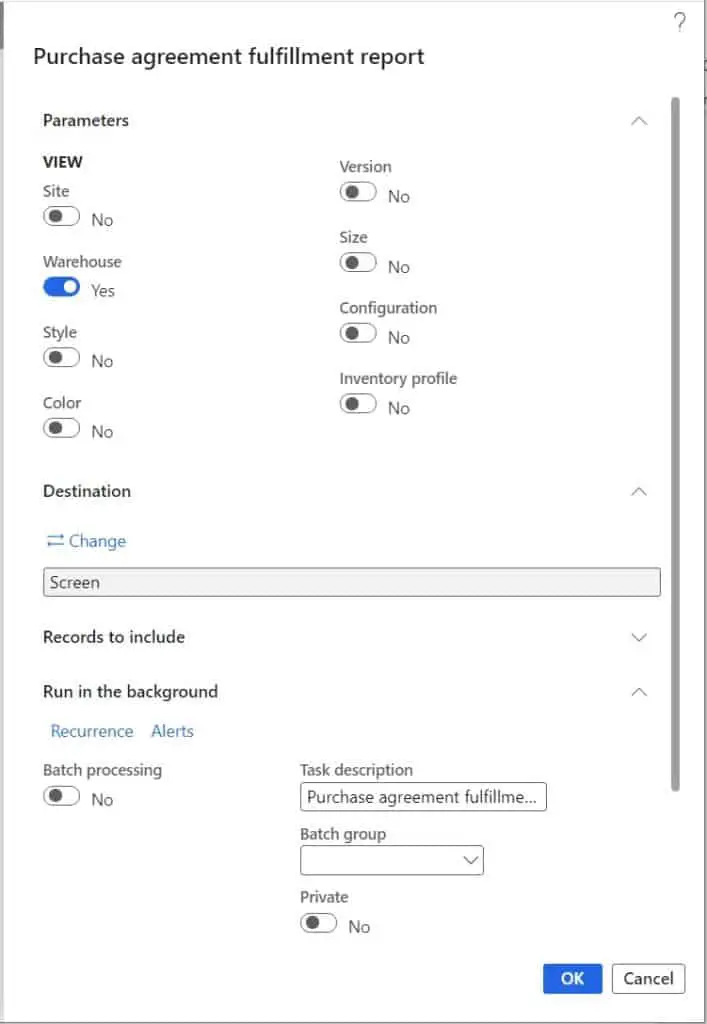
If you want to see the fulfilment of all purchase agreements, you can run the “Purchase agreement fulfillment report” by navigating to Procurement and sourcing > Purchase agreement > Purchase agreement fulfillment report. Select the dimensions that apply to you and then click the “Ok” button to run the report.
Purchase Agreement in Master Planning
If you are using master planning, you may want MRP to consider purchase agreements when firming a planned purchase order into an actual purchase order. If you do, you can enable a parameter on the master planning parameters called “Find purchase agreements”. If this option is selected, D365 will look for an applicable purchase agreement based on the item and vendor at the time the planned purchase order is firmed.

Takeaways
Purchase agreements in D365 Finance and Operations can be very useful to set up and track contractual agreements between your company and vendors whom you promise to buy form. The ease of tracking these purchase agreements and the fact that it is integrated with master planning makes it very seamless to use in a purchase heavy organization. Take a look at the purchase agreement functionality and see if it can improve how you are tracking blanket orders or long term agreements.