

Trade agreements are the primary means by which pricing and discounts are set up and applied in Dynamics 365 Finance and Operations. Trade agreements are commonly confused with sales and purchase agreements so don’t be one of them! The trade agreement form and the logic that the system uses to determine which price is used can also be confusing.
In this post we will go through each trade agreement type including prices, line discounts, multi-line discounts, and total discounts as well as how the system evaluates trade agreements.
Setup
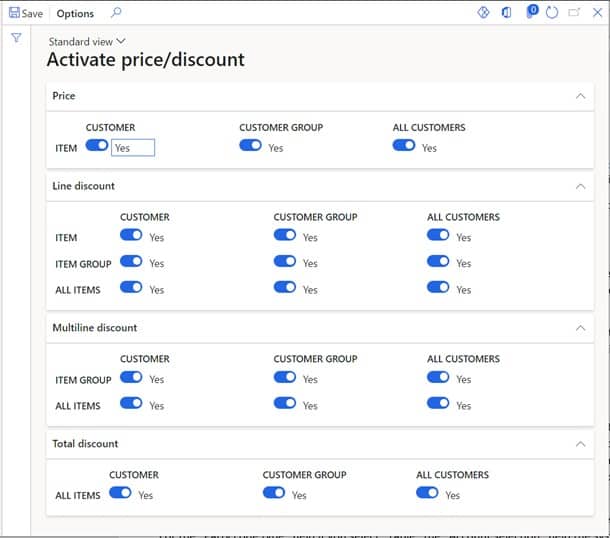
Before we even begin, we need to make sure we activate all of the applicable trade agreement types. If these are not active the system will not evaluate the trade agreement and you will be trying to figure out what you did wrong. Don’t make this simple mistake.
For sales trade agreements navigate to Sales and marketing > Setup > Price and discount > Activate price/discount. For purchase trade agreements navigate to Procurement and sourcing > Setup > Activate price/discount.
Here you can activate the exact types and combinations of trade agreements you would like to enable but usually I just enable everything unless there is a specific reason not to.
Trade Agreement Logic
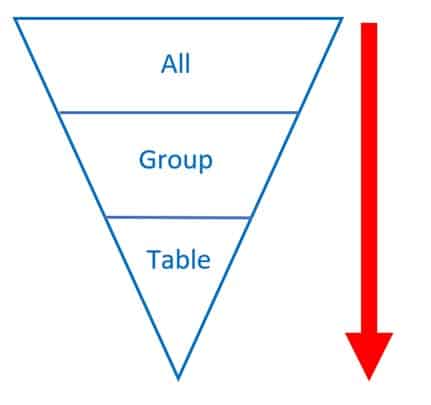
Before we go and set up a trade agreement let’s first discuss how the system evaluates trade agreements. When Dynamics 365 Finance and Operations evaluates trade agreements it tries to find the most specific pricing that falls within the validity dates. What I mean by “most specific” pricing is, the system checks the “Party type code” as well as the “Product code type” to see if there is a valid price specific to that customer or vendor for the specific product selected on the sales order or purchase order line respectively. Then if it cannot find that most specific combinations it looks for the next level up which are the price groups and then finally if it can’t find prices at the group level it looks for prices that may apply to all vendors or customers.
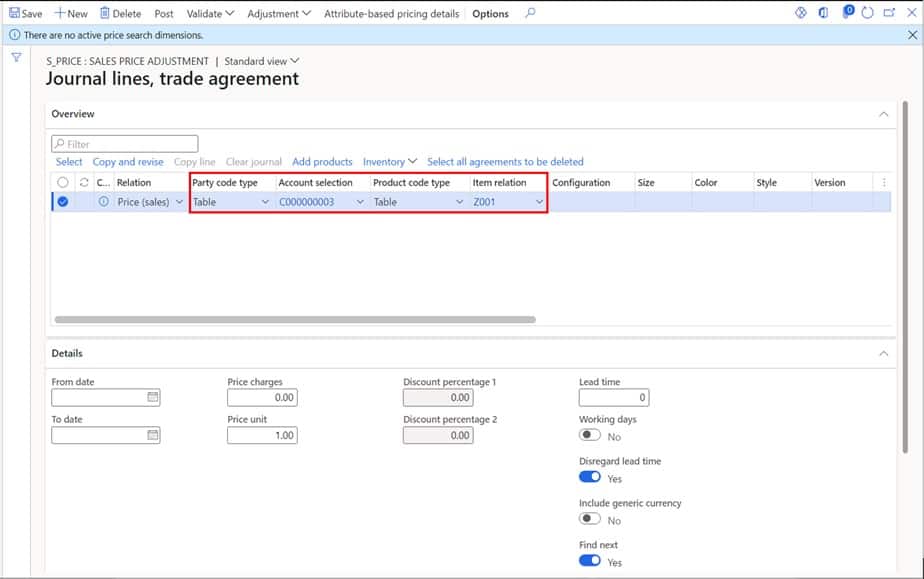
The “Party code type” and the “Product code type” have the same values available to select: “Table”, “Group”, and “All”. For the “Party code type” field if you select “Table” the “Account selection” field will allow you to select a specific customer account that this price will apply to (for purchase trade agreements it would be a vendor account). If you select “Group” you will be able to select a customer price group; meaning that the price will apply to any customer that is associated with this price group. If you select “All” the price is applicable to “All” customers. Similarly, with the “Product code type” you will see that the dropdown values in the “Item relation” field change from specific items, to item price groups, to blank if you choose “All”.
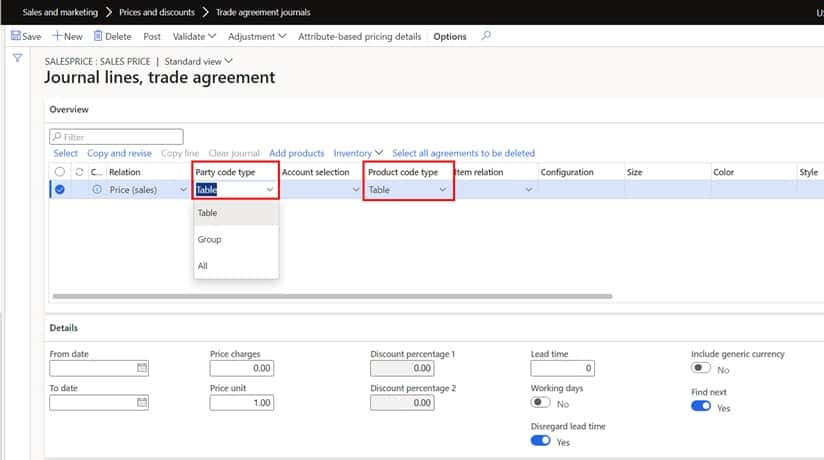
The system will find the most specific price taking into account the combination of values selected in the “Party code type” and “Product code type” fields. So, for example lets imagine you have two trade agreement records that both fall within the same validity dates. On the first trade agreement we have “Party code type” set to “All” which means it applies to all customers and “Product code type” is set to “Table” and we have selected a specific item.
On the second trade agreement we have “Party code type” set to “Table” and we have a customer account defined along with a “Product code type” also set to “Table” where we have the same product selected. When we create a sales order and we create a line for that product the system will select the price on the second trade agreement because even though both trade agreements apply, the second trade agreement was the most specific.
Now that you have a better understanding of how D365 evaluates trade agreements lets get into the details of how each type of trade agreement works. In the sections below the examples will be on the sales side of the coin but the same principles and functions discussed apply to purchase trade agreement prices and discounts.
Simple Price
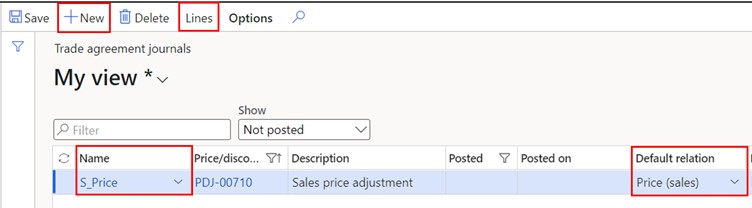
The most common use for a trade agreement is just a simple unit price for a product or service. To create a simple price trade agreement, navigate to Sales and Marketing > Prices and discounts > Trade agreement journals.
Click the “New” button at the top of the form and select the journal name in the “Name” field. This will set the “Default relation” field which determines the type of price you are entering inside the journal. The “Price (sales)” option indicates that we are entering a simple sales price in our journal.
Note: you can override this “Default relation” field on a line by line basis but in my opinion, it is easier to just create a different journal name if you want to enter a different type of price or discount, so you don’t have to remember to change the “Relation” field.
Next click the “Lines” button which will take you into the journal.
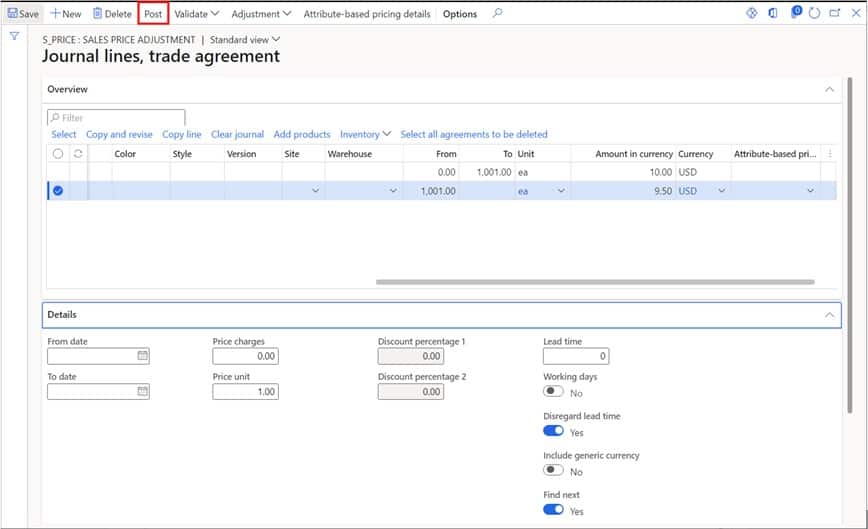
Now that we are in the journal lines, we can start to enter our price. In this example we will create a price with a quantity break for a specific customer and part number. For a quantity of 1 to 1000 the price is $10.00 and if the quantity is 1001 or greater the price is $9.50. The first thing we need to do is select “Table” for the “Party code type” and select the customer account the price will apply to.
Next we need to select “Table” in the Product code type” field. Then we need to select the product that the price will apply to. You may notice, depending on your configuration, that you have a blue information log message saying “There are no active price search dimensions” this just means that prices do not differ by site or warehouse or by any product dimensions like size, style, and color. If your pricing is dependent on these factors, you can enable pricing by these dimensions on the storage dimension form (for site and warehouse) and on the product dimension group form (for size, color, style, and configuration).
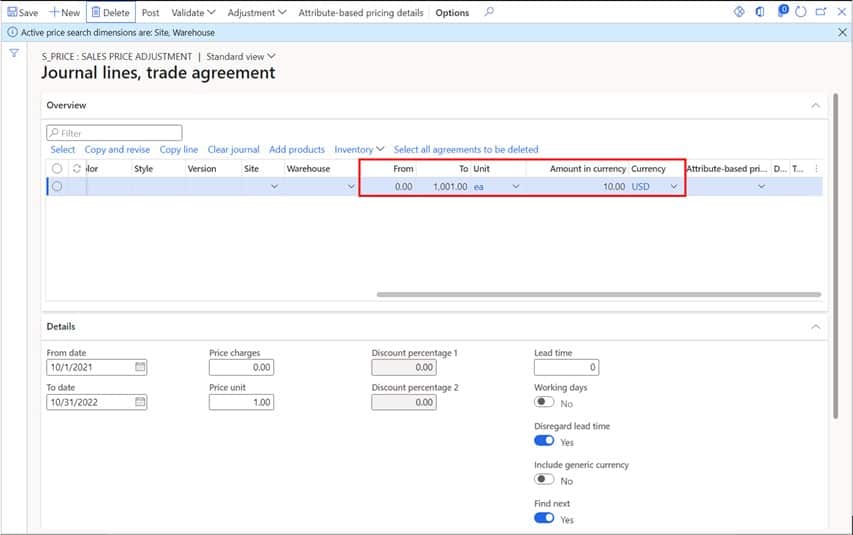
Now if we scroll to the right, we have a few other fields. The “From” and “To” fields allow you to specify the quantity range that the price applies to. In this example I want the quantity break to be at 1,000 so I will enter 1001. This is because the “From” field is inclusive and the “To” field is exclusive. The unit of measure will default based on the inventory unit of measure. If you have pricing in different units of measure will have to enter those prices explicitly. The system will not use unit conversions to calculate the price based on the inventory unit. In the “Amount in currency” field enter the unit price.
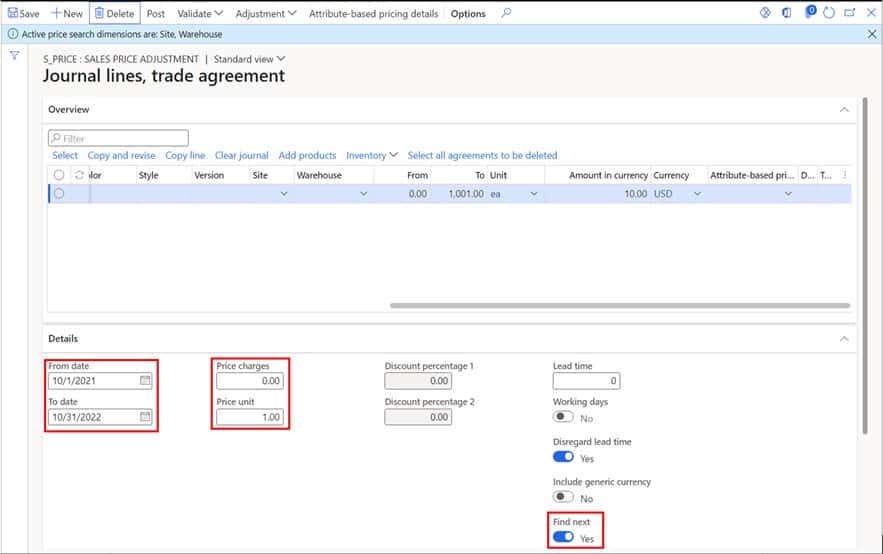
In the “Details” section you can enter the price validity dates in the “From” and “To” fields. In the “Price charges” you are able to enter an additional charge to the price if applicable. The “Price unit” field allow you to define if the price that was entered is per 1 unit or per X many units. If you have pricing that goes out beyond two decimal places you will need to use the “Price unit” field to move the decimal place since D365 only goes out to 2 decimal places.
Finally, the “Find next” field will indicate whether you want the system to continue searching for a better price or if you want the system to stop searching once it finds this price. So, if you have two applicable prices for a customer and you want the system to search for the best price for the customer you would leave this flag set to “Yes”. Typically, this is always set to “Yes”.
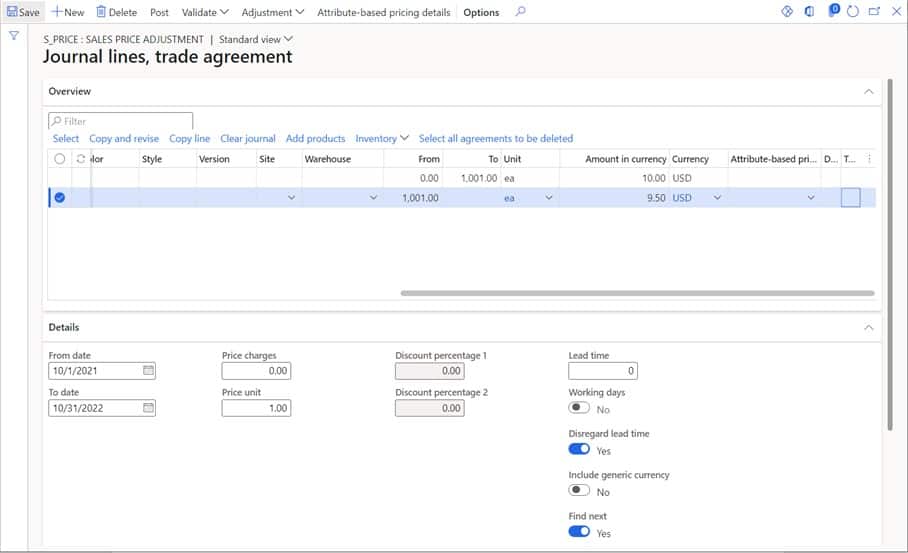
Next, I will need to add another line by either clicking the “New” button at the top of the form or by pressing the down arrow key on the keyboard. Then we can enter the same details except we will set the “From” and “To” fields to the next price break based on quantity.
The last step is to make the price active by posting the price. To do this click the “Post” button and click “Ok”.
Line Discount
The next trade agreement type is a line discount. As the name suggests a line discount will appear on the sales order line as a percentage discount or a per unit discount depending on how the trade agreement is set up. To create a line discount, create a journal as described above and select a journal name with the “Default relation” of “Line discount (Sales)”. This will default the “Relation” field to “Line discount (Sales)”.
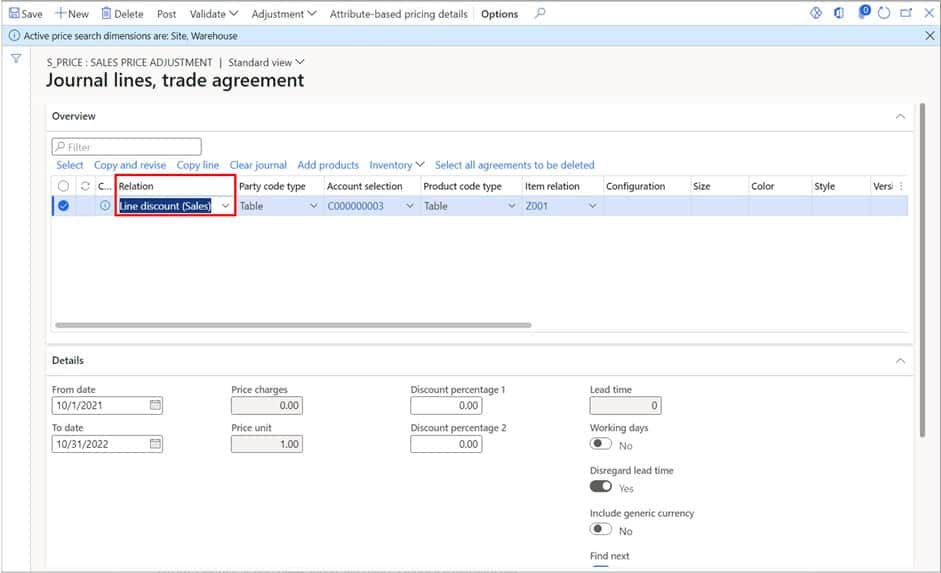
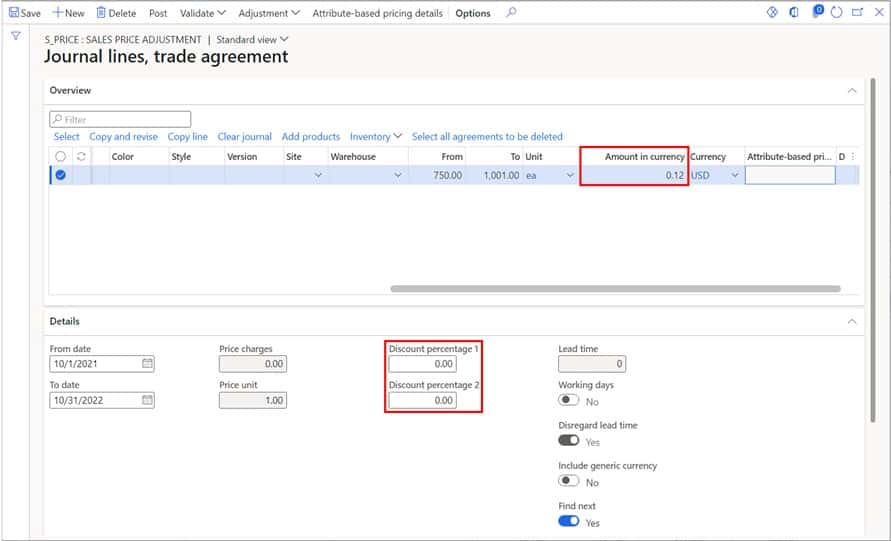
Now if we scroll to the right, we have some fields disabled and we have two additional discount fields enabled. The “Amount in currency” field for a “Line discount (Sales)” type line is a per unit discount. So, in this example I have a $0.12 discount per unit once the quantity is between 750 and 1,000. I will reiterate that this is a per unit discount not a flat discount amount as it is sometimes confused for. The “Discount percentage 1” and “Discount percentage 2” fields are percent discount fields that are combined. So, if you only have a value in the “Discount percentage 1” field you will get a single percentage discount for that specific line. If you have a value in both discount percentage fields the system will apply the first percentage discount first and then apply the second percentage discount.
Multi-Line Discount
The next trade agreement type is a multi-line discount. A multi-line discount is a discount given when a customer buys a certain total quantity of a single product or multiple products accumulated over multiple order lines. Qualifying items are defined using a multi-line discount group. To create a multi-line discount, follow the same steps as described above to create the journal. The relation field should be set to “Multiline disc. (Sales)”. The party type code works the same way so in this example we will select a specific customer account that the multi-line discount will apply to.
Next instead of selecting “Table” on the “Product code type” field we will select “Group”. This will allow us to select a multi-line discount group. Items that are associated with this multi-line discount group will be used to evaluate whether or not the system should consider that item when evaluating the multi-line discount and whether or not the multi-line discount should be applied.
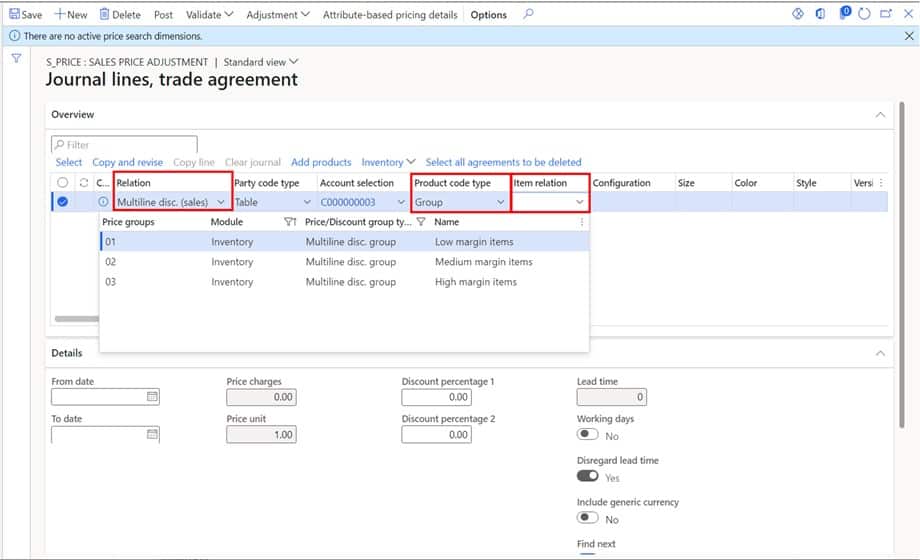
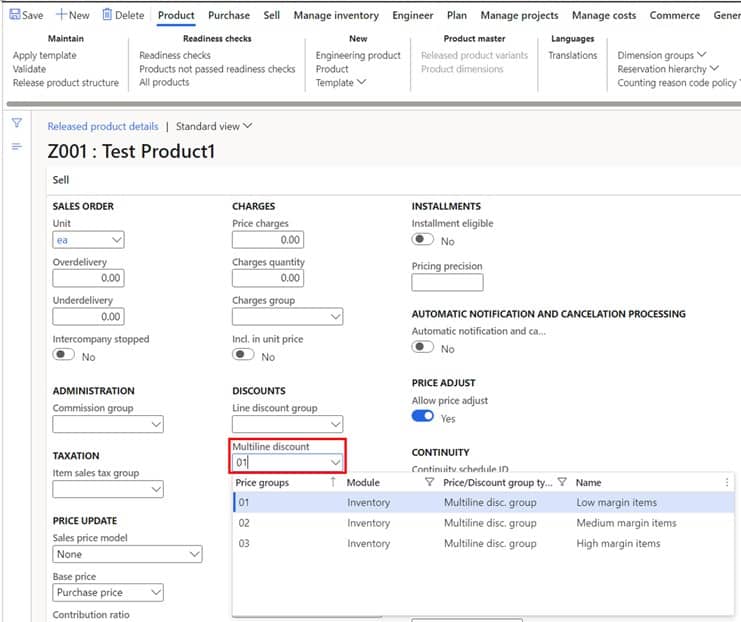
The multi-line discount group can be associated with the item on the released product form by navigating to Product information management > Products > Released products. In the “Sell” fast tab of the form you will find the multi-line discount group field.
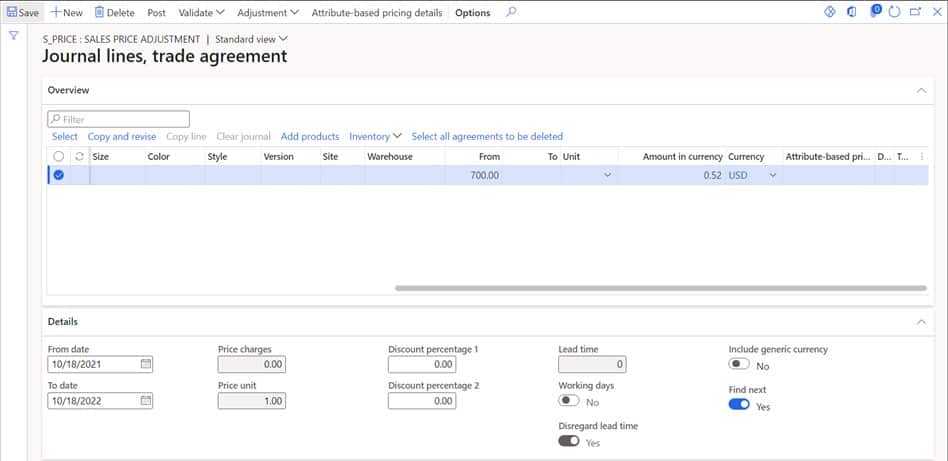
Now if we go back to our journal, we can enter the quantity ranges in the “From” and “To” fields and set the per unit discount in the “Amount in currency” field or the discount percentage. With a multi-line discount, the system will use the quantities from all products on the sales order that are associated with the multi-line discount group to determine if the lines qualify for the multi-line discount.
In the example shown below I will get a $0.52 per unit multi-line discount applied if the total quantity for all the items on the order that are assigned the “01” multi-line discount group are greater than or equal to 700.
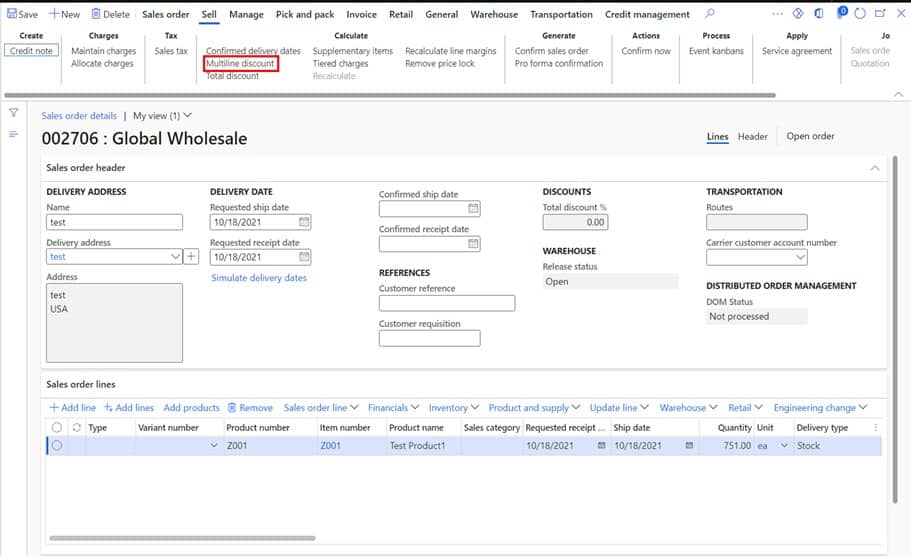
Next you can post the journal to make the multi-line discount active. Please note that for multi-line discounts to be calculated you will need to click the calculate “Multiline discount” button to have the system calculate the discount unlike other trade agreements that the system will calculate automatically.
Total Discount
The total discount trade agreement type is a discount that is applied to the entire order amount. You can set a total discount amount or a discount percentage. Unlike the multi-line discount, you do not need to click the calculate button for the discount to be applied, the system will do it as soon as the trade agreement conditions are met.
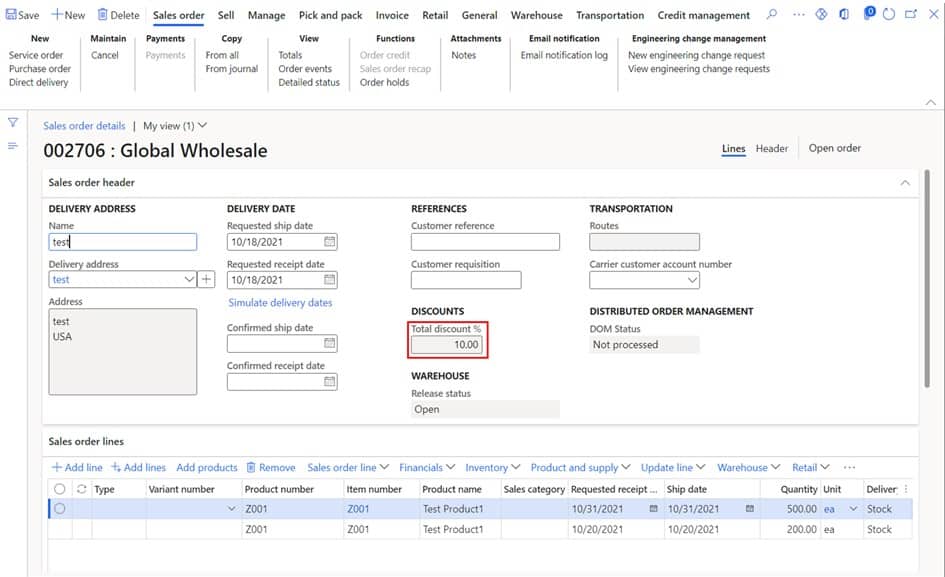
Creating a total discount is the same as creating any of the other types of discount trade agreements. However, the “Product code type” field will automatically be set to “All” because the total discount is applied at the order level and not the line level. In the example below if the total quantity of the order reaches 700 units, a 10% discount will be applied to the order total.

You can see the total discount directly on the sales order.
How to See all Active Prices
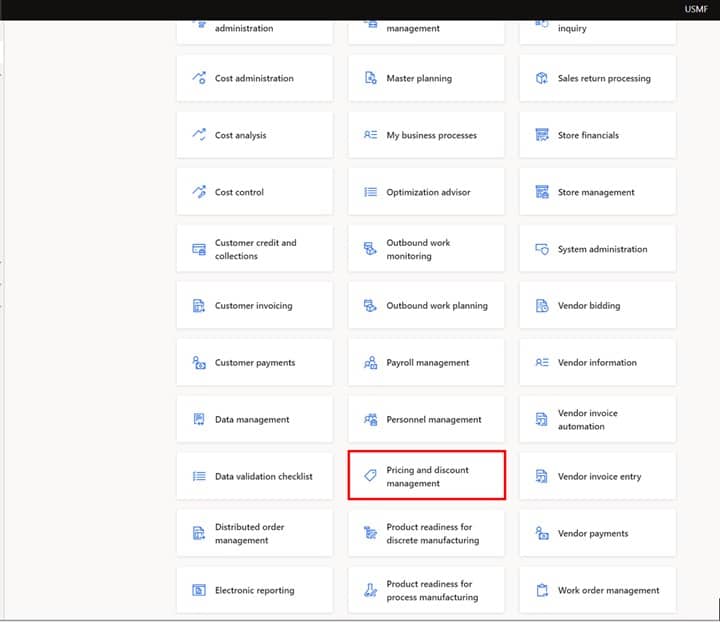
In the past it was very difficult to see all active trade agreements. Now there is an inquiry screen that shows all active trade agreements that can be exported to excel for easy analytics and price updates. To see all current active prices, you will need to click on the “Pricing and discount management” workspace.
Now click the “Active trade agreements” link.
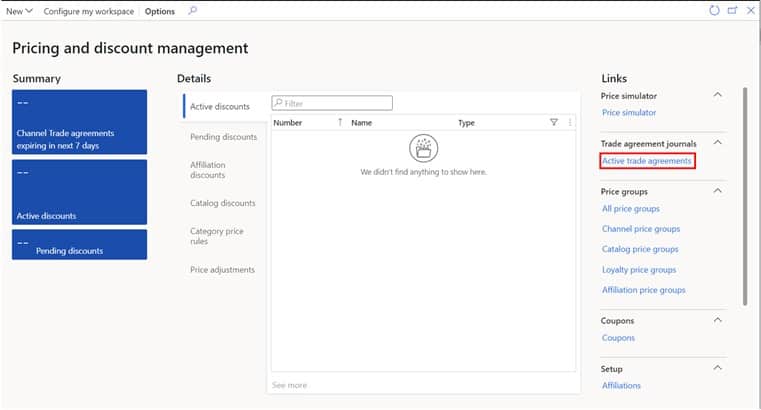
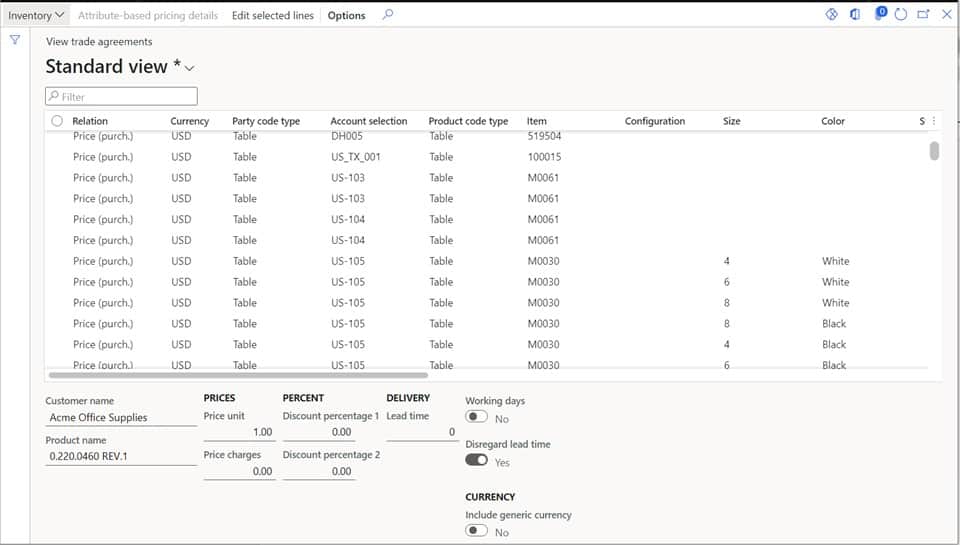
This will show you all current active trade a agreements in an easy to filter inquiry form.
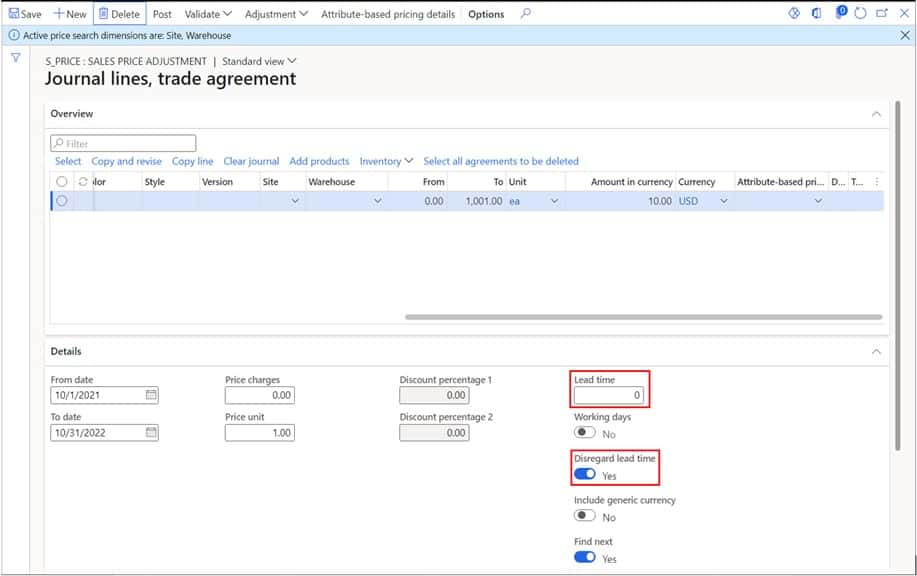
Trade Agreement Lead Time
You may have noticed that there is a lead time field on the trade agreement. This can be used to set the lead time of either the purchase order or sales order lead time. For sales orders this will depend on the delivery date control that is set for the line. When a trade agreement is applied to the order the lead time is also evaluated and applied to the delivery date (purchase order) or the requested ship date (sales order). If you are using the lead time field, you will need to unselect the “Disregard lead time” field. If you are not using lead time on the trade agreement you will need to leave this selected so that the system does not think there is a zero lead time.
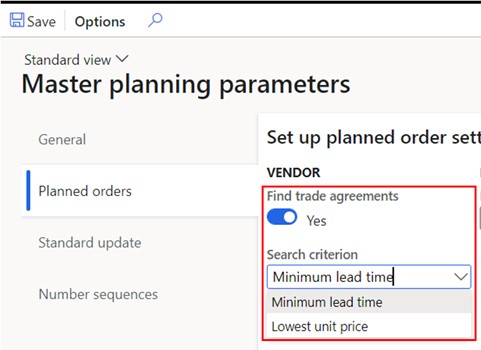
If you are using lead times specifically for purchase orders and you are using master planning and you want master planning to use these trade agreement lead times, you will need to enable the “Find trade agreements” flag on the master planning parameters in the “Planned orders” tab. You will also need to tell the system if the trade agreement search criteria should be based on the lowest lead time or the lowest unit price in the event that you have more than one applicable trade agreement.
Takeaways
Trade agreements are the core setup behind the D365 pricing engine. Once you understand how they work it is pretty simple to configure and make complex pricing structures. If you are having trouble getting your trade agreements to work, make sure you have activated all the applicable pricing types as discussed in the “Setup” section above. I have personally missed that in the past and was left trying to figure out what was wrong with my trade agreements. Once you feel comfortable with trade agreements you can also start to incorporate the Excel add-in and upload prices directly to a journal instead of manually inputting trade agreement lines.