Creating a customer is one of the most critical and foundational processes in Dynamics 365 Finance and Operations. Customers are related to many different aspects of the application and setting them up correctly can save some headaches later on. There are many fields on the customer master so it can be overwhelming if you don’t know what they are for. In this post I will take you through not only how to create a customer, but what each field does or is used for.
Create a Customer Record
To create a customer record, navigate to either Sales and Marketing or Account Receivable > Customers > All customers.
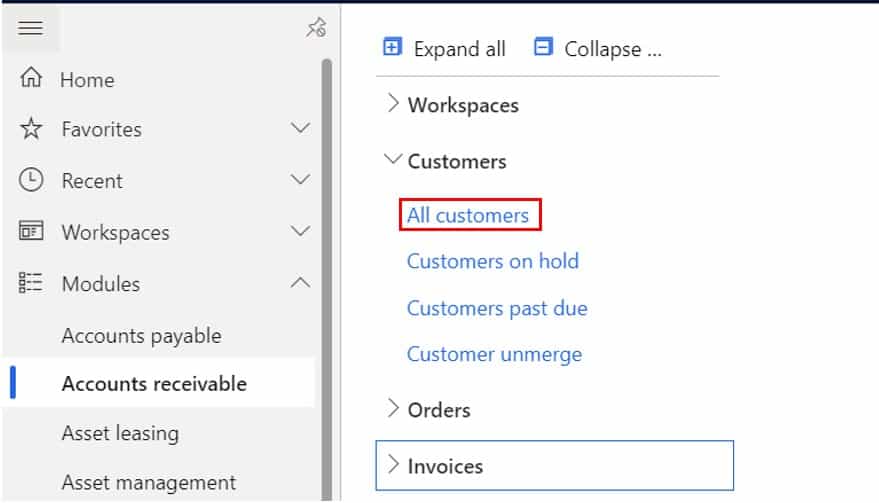
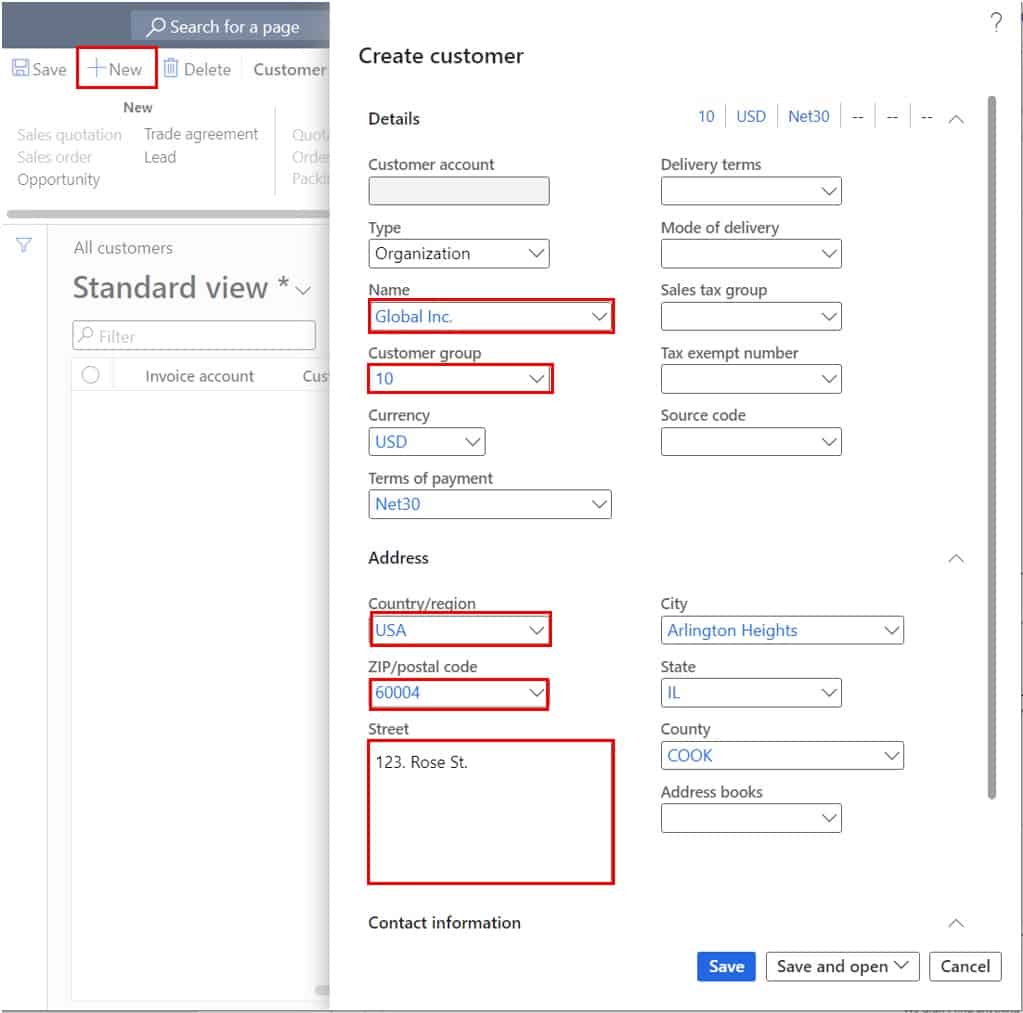
Click the “New” button. On the customer creation flyout form there are a few fields that are required to create the base customer record. Once we create the customer record we will go through each field on the form.
Customer account – This is the unique identifier for the customer record. If you set the customer account number sequence to “Manual” you will need to manually input the customer account number. If you have set the customer account number sequence to automatically generate you can ignore this field because the system will automatically generate the account number.
Type – This indicates if the customer account represents an organization or a person. Typically, in business to business transactions this will be set to “Organization”.
Name – Here you can type in the name of the customer.
Customer group – Customer groups serve the purpose of grouping similar customers together into logical groupings and also to drive posting to the ledger. Customer groups are used in customer posting profiles to direct ledger postings to accounts receivable summary accounts.
Country region – This is the country code associated to the primary address for the customer.
Zip/postal code – This is the zip code (if applicable) associated to the primary address for the customer. When you select the zip code, the system will automatically default all the applicable city, state, and county address fields if address data has been loaded into the system.
Street – This is the street address for the primary address for the customer.
These are the base fields that need to be populated to create a customer. Next click the “Save” button to create the customer record. In the next several sections we will go over each field in each of the fast tabs on the customer master record. Keep in mind the fields and sections we will discuss may be optional depending on your unique business requirements.
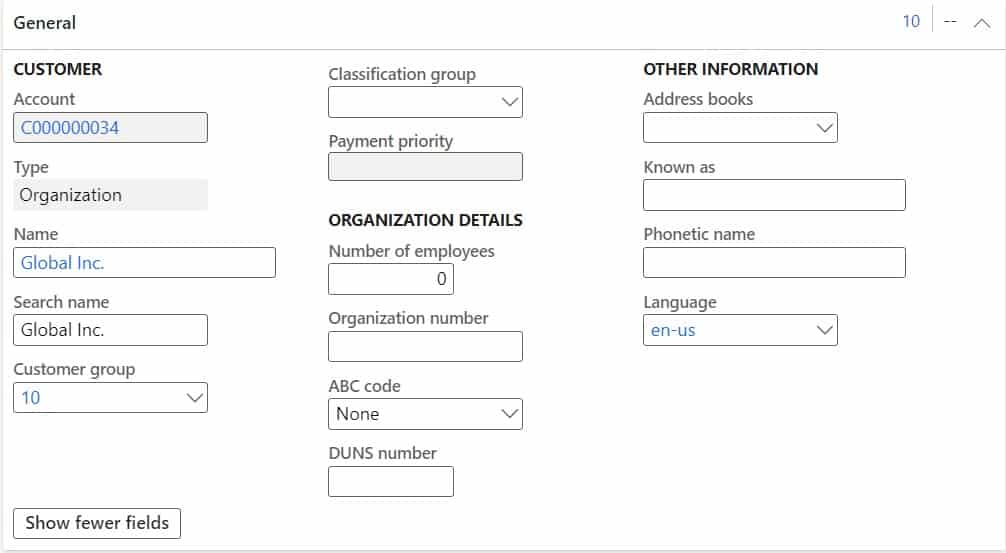
General
Classification group – Classification groups are used as a way (you guessed it) to classify customers into various groups. Classification groups are used on the “Release sales order for picking” form to filter and sort orders to release for picking but they can be used in many other situations where you need to filter or sort for customers.
Number of employees – This is the number of employees at the organization.
Organization number – If the customer account has an alternative organization identifier you can put that here.
ABC code – This is a way to assign an A, B, or C code to the customer. Similar to the ABC inventory classification method, this is a way you can identify customers that make up a disproportionately large percentage of the sales relative to other customers that would be classified as an A and other customers that make up less (B) all the way down to the customers that account for a much smaller percentage of sales (C).
DUNS number – This is the Dun & Bradstreet number assigned to the customer account.
Address books – Address books are typically used for retail functionality although they have other uses. Address books can be associated with retail stores and customers can be associated with one or many address books. This allows the retail store to look up the customer’s information.
Known as – If the customer account has a name that they are more commonly known as, you can populate that here.
Phonetic name – If the customer has a challenging name you can enter the phonetic name in this field.
Language – This dictates the language that will be printed on business documents.
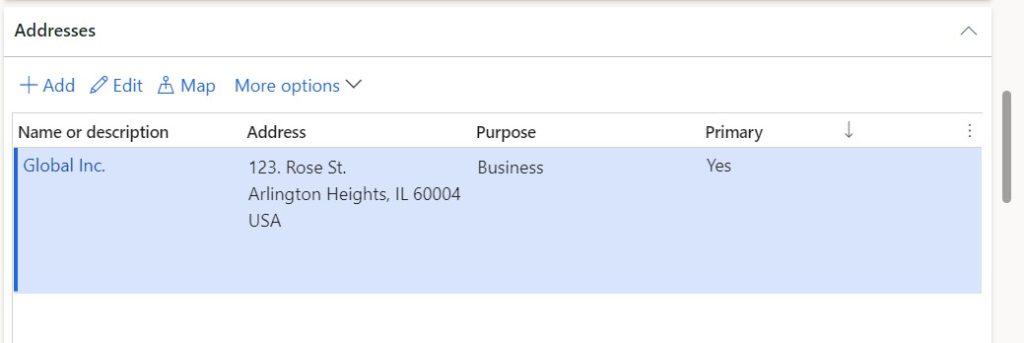
Addresses
The addresses fast tab can be used to add multiple addresses associated to the customer for various purposes. You can edit an existing address by clicking the “Edit” button or you can create a new address by clicking the “Add” button.
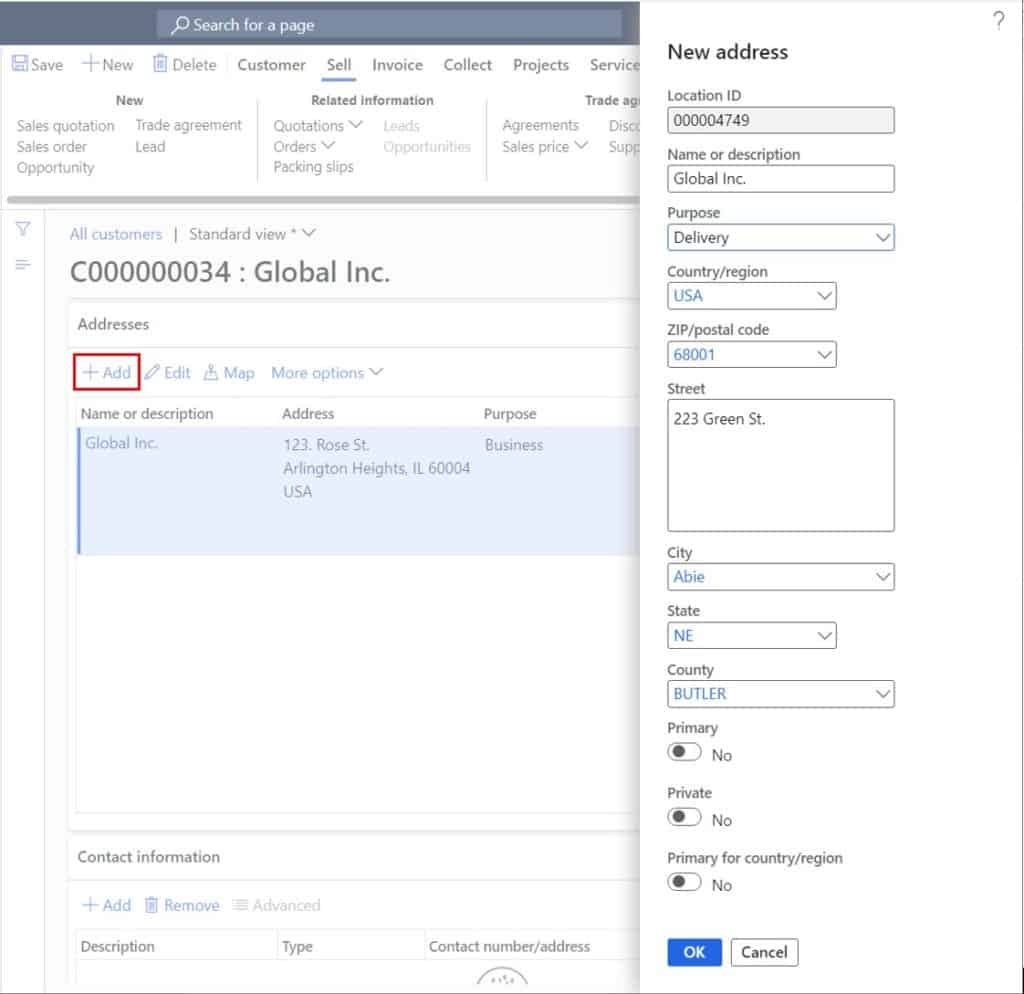
Once you click the “Add” button you will get a flyout form to enter the new address.
Name or description – This is the name that is associated with the address. Typically this is the same name as the customer’s name but if this particular address has a different name variation you can enter that here.
Purpose – This defines the purpose for the address. The most common are the “Delivery” purpose which is used to define a ship-to address and the “Invoice” purpose which is used to define a bill-to address. Note: you can assign one or multiple purposes to a single address.
Country/region – Country region for the address you are inputting.
Zip/postal code – Zip code for the address you are inputting. If you enter a country/region code that does not have a zip code this will not be applicable.
Street – Street for the address you are inputting.
City – City for the address you are inputting
State – State for the address you are inputting
County – County for the address you are inputting
Primary – This indicates if the address is the primary address for the customer. Note: Only one address can be the primary address.
Private – This indicates if the address is private and can only be seen by user roles that are selected to view private addresses.
Primary for country/region – This indicates if the address is the primary address for the country/region selected.
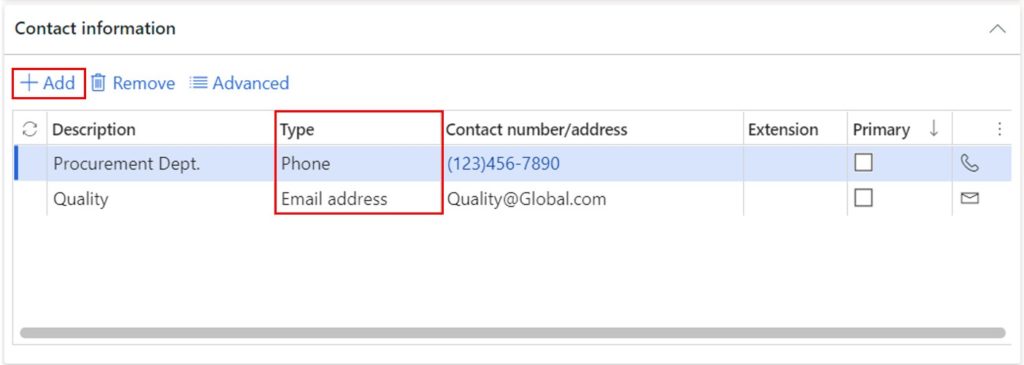
Contact Information
The contact information fast tab is where you can enter general contact information like email, phone, etc. related to the customer. To be clear, the contact information entered here should not be specific to any contact person associated to the organization, this section is more for general contact information.
To create a new contact record, click the “Add” button.
Description – This is a text description that gives more information on what the contact record is for. For example, a phone number may be a direct line the procurement department for your customer.
Type – This indicates the type of contact record you are entering. For example, if you are entering a phone number select “Phone” if you are entering an email address select “Email” etc.
Contact number/address – This is where you put the actual email address, phone number, fax number etc. depending which “Type” you select.
Extension – If you are entering in a phone number contact record you can use this field to specify a phone number extension.
Primary – This indicates if the address is primary for that specific contact record type. Only one contact record can be marked as primary for each type (phone, email, fax etc.).
Miscellaneous Details
The “miscellaneous details” fast tab contains a multitude of fields that I guess were difficult for Microsoft to organize into another fast tab, so they threw them in here.
One-time customer – A one-time customer is created when you need to quickly create a customer account and default in several values because you only intend to sell to the customer one time and do not want to spend the time to set them up as you would for a normal customer. This flag will be enabled by the system if you create the customer initially as a one-time customer.
Statistics group – This is a field that can be used to group sets of customers for different reporting or statistical purposes.
Account statement – This field allows you to set the frequency at which customers should receive their account statements. This field does not actually drive functionality other than using it in the query of your account statement batch job. For example, if you wanted to set up an account statement for your monthly customers and then another one for bi-monthly account statement customers, you could use this field in the query to achieve that.
History available – This field is relevant only if you are using the customer self service Power App portal. It indicates whether only web orders or all history is available to the customer.
ID number – This is government ID specific to whatever geographic location the entity is registered in.
Country/region – This is the country or region code associated to the government identification number you entered above.
State – This is the state code associated to the government identification number you entered above.
Vendor account – If you need to reimburse the customer for an outstanding credit balance you can create the customer as a vendor and use the customer reimbursement functionality to pay the customer.
Automatic notification and cancellation exempt – This setting will exempt the customer from the automatic notification and cancellation functionality related to retail order notifications.
Federal/Non-Federal indicator – When working with federal contractors there may be a requirement to indicate whether the customer is “Federal”, “Non-Federal”, or “Non Federal Exemption”.
Trading partner code – When working with the government it may be required to specify a trading partner code. You can create the code and specify that here.
Agency location code – The government agency location code can be specified here.
1099-C indicator – If the customer is 1099-C you can indicate that here.
Comments – This field is for any additional comments related to the government data entered above.
Active – This field cannot be edited from the customer record. This field is only set to yes if there is an intercompany relationship established for the customer account. Intercompany settings can be configured in the “General” tab in the ribbon by clicking the “Intercompany” button.
Company – If there is an intercompany relationship established with the customer this will indicate the legal entity for which the relationship exists.
Vendor account – This is the intercompany vendor account related to this customer.
Create intercompany orders – This flag will indicate that an order should be set to create intercompany orders when created for this customer.
Direct delivery – This will automatically set the direct delivery flag for orders created for this customer.
Create indirect order lines – This flag will enable the same flag on the sales order which will allow additional order lines to be added to the intercompany sales order directly from the intercompany sales order instead of the original sales order.

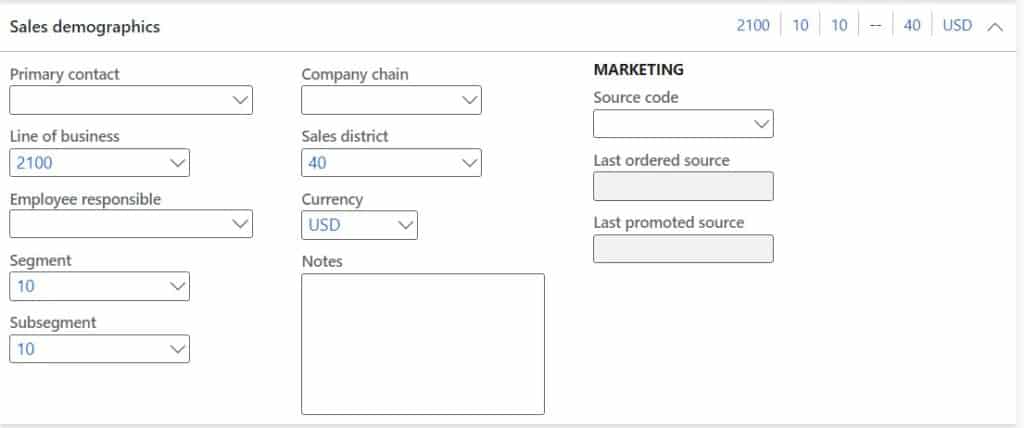
Sales Demographics
The sales demographics fast tab contains several fields related to segmenting and reporting on customers in various ways. These fields are optional but may be beneficial for more advanced reporting requirements.
Primary contact – This field allows you to specify a primary point of contact when selling to this customer. To select a primary contact, you first need to create an associated contact record.
Line of business – This is a user defined dropdown list that can be used to define the line of business that the customer is in. If you have particular reporting requirements around sales fpr lines of business or areas of business, you may benefit from setting up and using this field.
Employee responsible – This identifies if there is a particular employee responsible for the customer like an account manager or account executive.
Segment – This is another user defined dropdown field that is used for reporting on the particular market segment that the customer resides in.
Subsegment – The subsegment is one level down in the market segmentation hierarchy and allows for the user to define a second level of granularity in reporting on sales by market segmentation.
Company chain – The company chain field is a user defined field used to link related customers together. For example, there may be a case where you have several different customer accounts that all fall underneath a parent company or umbrella company. You can use this field to link those accounts together and then report on the company chain to roll the reporting up.
Sales district – This field is used to determine which sales district to attributes sales to for this customer. It can get a bit tricky if the customer has several locations and the sales must be attributed by ship-to address. This should only be used when the customer can be clearly attributed to a single sales district.
Currency – This is the currency that will be defaulted to the sales order when you create the sales order or invoice. This is not technically a required field but you cannot process a sales order without currency so I would recommend setting the default currency up front.
Notes – This field is a free text note field used to compile any additional sales notes or any relevant sales detail related to the customer.
Source code – The source code is related to marketing functionality where you can attribute a source code to a particular campaign or advertisement to attribute sales to a source code. If the customer was acquired through a particular source, it can be defined here.
Last ordered source – This is a system populated field that will display that last source code ordered against the customer.
Last promoted source – This is a system populated field that will display the last source code marketed to this customer.
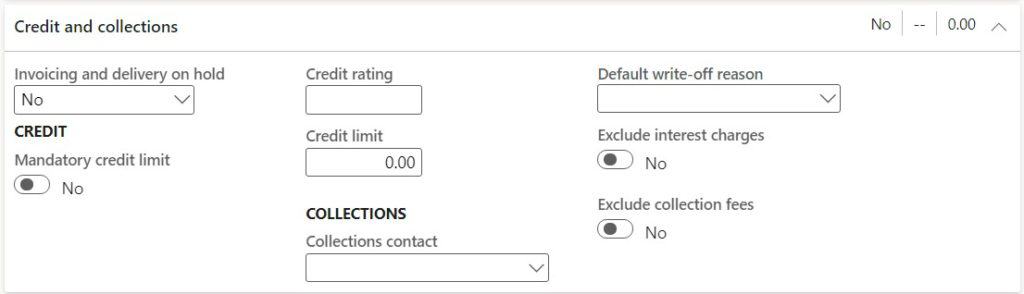
Credit and Collections
Invoicing and delivery hold – This field is how you can put a customer on hold for particular events. If the value is set to “No” the customer is not on hold for anything. If the value is set to “All” the customer will be on a complete account hold. For more information on customer holds check out this post.
Mandatory credit limit – If this field is selected it means a credit check will occur regardless of what the “Credit limit type” parameters are set to in the accounts receivable parameters or on a sales order posting form (confirmation, packing slip, invoice).
Credit rating – This field can be used to give the customer a credit rating. Typically, this is a letter grade or a numerical value from 1 to 100.
Credit limit – Here you can specify the customers credit limit that will be evaluated during credit limit checks.
Collections contact – Here you can select a specific customer contact who handles credit and collections related calls or inquiries. The contact will need to first be created and then it will be available in the dropdown list.
Default write-off reason – This will be the default write-off reason code used when writing off a customer balance or individual transaction.
Exclude interest charges – This flag will exclude the customer from interest charges during interest calculations.
Exclude collection fees – This flag will exclude the customer from fees associated will collection activities.
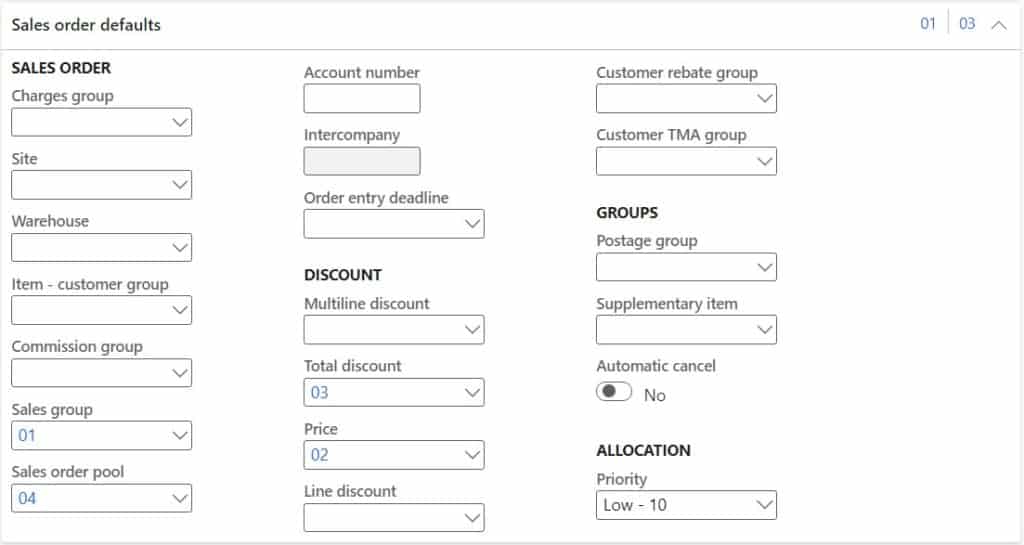
Sales Order Defaults
This section, as you might guess, contains fields that will default to the sales order whenever the customer is selected during sales order creation. None of these fields are required but if you are always shipping out of the same site and warehouse for a customer, I would recommend populating those fields.
Charges group – The charges group is a way to automate charges that should be assessed for sales orders. Charge groups that are assigned to customers will be evaluated by the auto charges set up in the Accounts Receivable module. To set up automatic charges navigate to Accounts receivable > Setup > Charges setup > Auto charges.
Site – This is the site that will default to the sales order when the customer is selected on a sales order.
Warehouse – This is the warehouse that will default to the sales order when the customer is selected on a sales order.
Item – customer group – This field is used for setting an external item description based on a grouping of customers. You can set up an external item customer group and then use that when setting up external item descriptions.
Commission group – If you are calculating sales commissions you can define a default commission group that will default to the sales order which will determine who receives the sales commissions. For more on sales commission calculations see this post.
Sales group – Sales group is also used in the sales commission calculation to determine which sales representatives will receive the commissions and what the commission percentages will be.
Account number – As a vendor typically your company will be in their ERP or procurement system and you will have an account number. You can reference your account number with this customer in this field.
Order entry deadline – Order entry deadline is used to set a deadline for order entry to push ship dates to the next available day if the order is taken past a specific time. Order entry deadlines can be set for all customers, groups of customers, or specific customers. This field is used if you have different order entry deadlines for different groups of customers.
Multiline discount – The is used to default the multiline discount group to the sales order where the multiline discount logic is evaluated to determine whether or not an order will receive a multiline discount. This field is typically used if you have different multiline discounts by groups of customers.
Total discount – This field is used to default a total discount group to a sales order where the order will be evaluated for a total discount. This field is used when you have different total discounts by groups of customers.
Price – This field is used to default the price group to a sales order where the price is evaluated during order line entry. This field is used when you have different price groups for sets of customers.
Line discount – This field is used to default the line discount group to the sales order where the line discount is evaluated to determine if order lines will receive discounts. This is used when you have line discounts by groups of customers.
Customer rebate group – Rebates can be set up for specific customers or groups of customers. If you have a rebate set up for a group of customers, you can set the group here and it will default to the sales order where the rebate will be evaluated.
Customer TMA group – Trade merchandise allowances can be set up for groups of customers. This group will default to the sales order where it will be evaluated for a trade allowance.
Supplementary item – When you set up a supplementary item you can make the item supplementary for one customer, a group of customers, or all customers. If you want to make it supplementary for a group of customers, you would assign a supplementary item group to all applicable customers and then set up your supplementary item with the supplementary item customer group you created.
Automatic cancel – If this is selected the system will automatically remove supplementary items added to the order if the primary item is either cancelled or deleted from the order.
Priority – This is a priority that defaults to the sales order to help the wave manager or similar position coordinate which sales orders get priority processing.
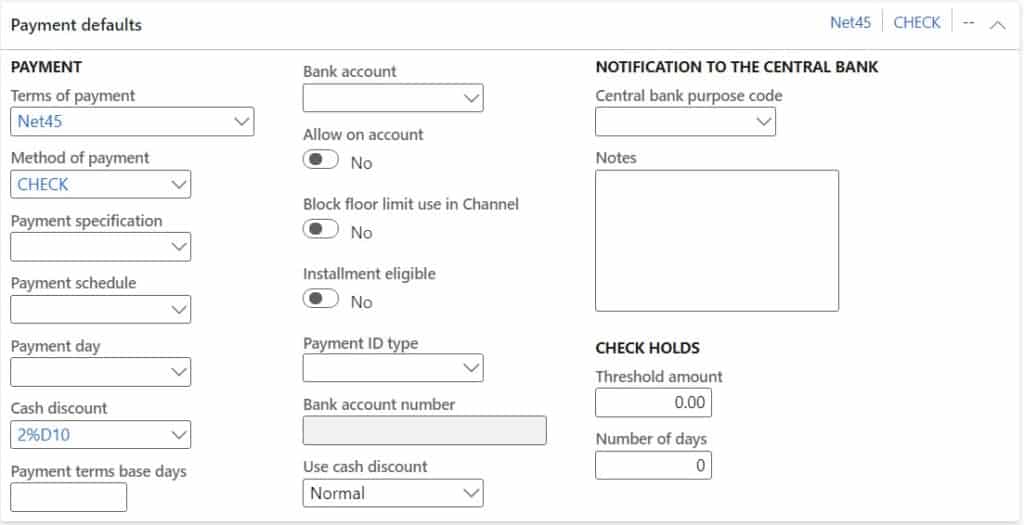
Payment Defaults
Terms of payment – The terms of payment define when and how much of the payment will occur. If you set the payment terms on the customer record it will default to the sales order and this will calculate the due date of the invoice once it is posted.
Method of payment – This will default the method of payment to the sales order. The method of payment is used to define how the customer will be paying the invoice. This can be overridden.
Payment specification – If an electronic payment is selected the payment specification further defines the electronic payment file format.
Payment schedule – If there is a specific payment schedule that has been negotiated with the customer, that can be defined here and defaulted to the sales order or invoice.
Payment day – Payment days defines logic for the payment day that the due date should fall on. For more on payment days check out this post.
Cash discount – Cash discount groups define the terms for which discounts are applied for early payment. The cash discount group will default to the sales order or invoice and if the payment is made within the terms of the cash discount, the discount will be applied.
Payment terms base days – Despite the name of this field this is actually used as the cash discount base days.
Bank account – The bank account setup defines the primary bank account and bank details associated to the customer.
Allow on account – If this flag is enabled the system will allow on account transactions.
Installment eligible – If this flag is enabled the customer will be eligible for installment payments.
Payment ID type – A payment ID is a unique identifier for electronic customer payments. It identifies the payment transaction received from the bank.
Bank account number – This is defaulted in from the bank account selected above. The account number is set on the bank account setup.
Use cash discount – This selection determines when cash discounts should be taken in the case of credit notes or partial payments.
Central bank purpose code – This is typically used for European reporting requirements to classify payments that are above a given threshold.
Notes – This is an additional notes field used to detail any important payment related notes.
Threshold amount – This is the central bank threshold mentioned above.
Financial Dimensions
If there are any customer specific financial dimensions that need to be posted to the general ledger you can define them here and they will default to the source document (sales order, invoice, journal). Depending on which financial dimensions you have activated in your environment you may see different financial dimensions available.

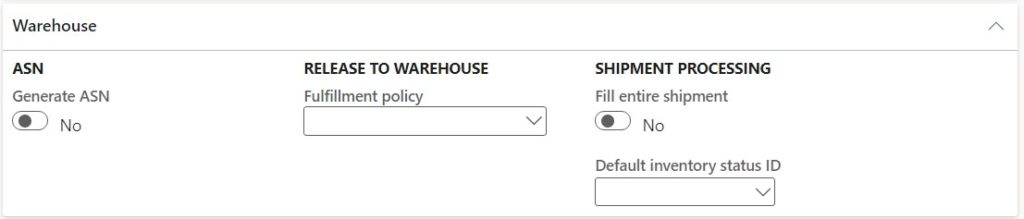
Warehouse
Generate ASN – This will enable sending an ASN during shipment after the packing slip is posted. There is other configuration required to generate the ASN but this flag must be checked on the customer for the ASN to be generated.
Fulfillment policy – The fulfilment policy defines how much of the price or quantity must be fulfilled when an order is released to the warehouse.
Fill entire shipment – If this flag is enabled the entire shipment must be able to be fulfilled or the release to warehouse will fail.
Default inventory status – This will be the inventory status that is defaulted to each sales order line where this customer is selected. If you leave it blank the default inventory status will default from the site or warehouse management parameters.
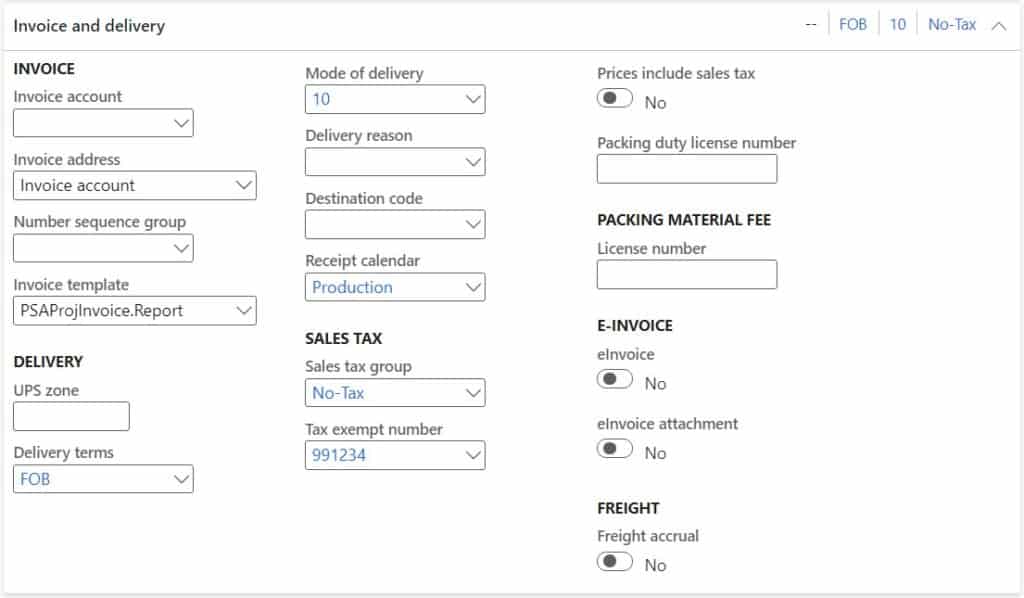
Invoice and Delivery
Invoice account – The invoice account is the account that will be debited when the invoice is posted. This invoice account will default to the sales order or invoice and if it is left blank the order account will get the debit.
Invoice address – Here you can specify if the invoice address should be taken from the order account or the invoice account on the sales order or invoice.
Number sequence group – The number sequence group is a way you can have multiple invoice number sequences by customer. The number sequence group must be created in the number sequence form on the accounts receivable parameters.
Invoice template – This is the project invoice template that is printed when a project invoice is generated.
UPS Zone – This is an informational field that is used to define the UPS freight zone associated with the customer. This may or may not be useful if the customer has many different ship-to addresses.
Delivery Terms – This defines the piece of a sales contract that defines when ownership and risk of loss is transferred.
Mode of delivery – This is the default mode of delivery that is typically set if the customer has a preference for one carrier and mode. If the mode of delivery is not defined until later in the shipping process you may want to leave this blank.
Delivery reason – The delivery reason is an optional reason code that can print on the packing slip to provide additional information for why the shipment was entered the way it was entered.
Destination code – The destination code references a geographic region associated to the customer shipping destination.
Receipt calendar – The receipt calendar allows you to define when customers are available to process receipts. For example, a customer may not accept deliveries on Friday so you could set up a calendar where Fridays are closed and assign the calendar as the receipt calendar. Then when the system does ship and receipt date calculations, based on whatever order promise method you are using, it will take the receipt calendar into account.
Sales tax group – The sales tax group along with the item sales tax group is what the system uses to calculate the sales tax that should be assessed.
Tax exempt number – If the customer is tax exempt you can specify the tax exempt number here.
Prices include sales tax – This flag indicates that the price specified on the invoice or sales order incudes sales tax.
Packing duty license number – If the customer is charged a packing material fee paid to a recycling company you can enter the company’s packing duty license number here.
License number – If the customer is charged a packing a material fee paid to a recycling company you can enter the company’s license number here.
eInvoice – This enables eInvoice which generates an XML file.
eInvoice attachment – This creates a document attachment in the invoice journal.
Freight accrual – This field, if enabled, will generate a rebate to the customer if the rebate program type configured in the rebate agreement is of type “Freight”.
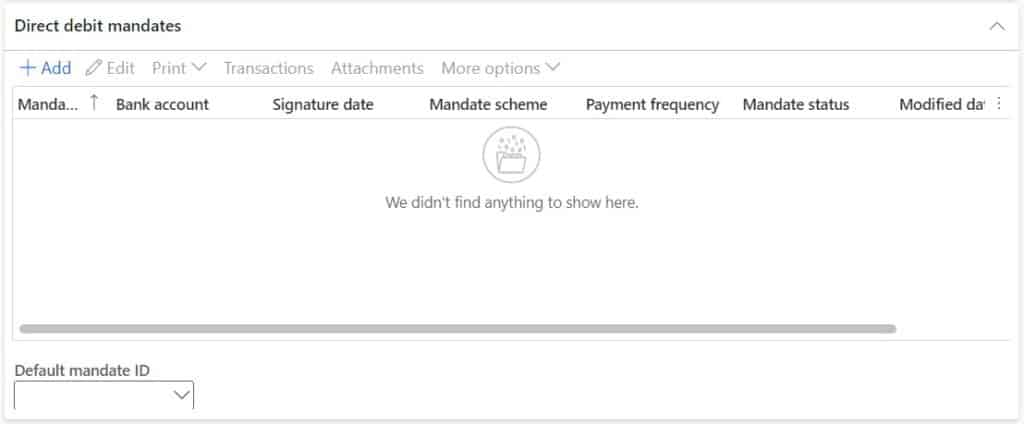
Direct Debit Mandates
The direct debit mandates fast tab deals with SEPA (Single Euro Payments Area) regulations. It allows the vendor to receive authorization from the customer for a direct debit from the customers bank account.
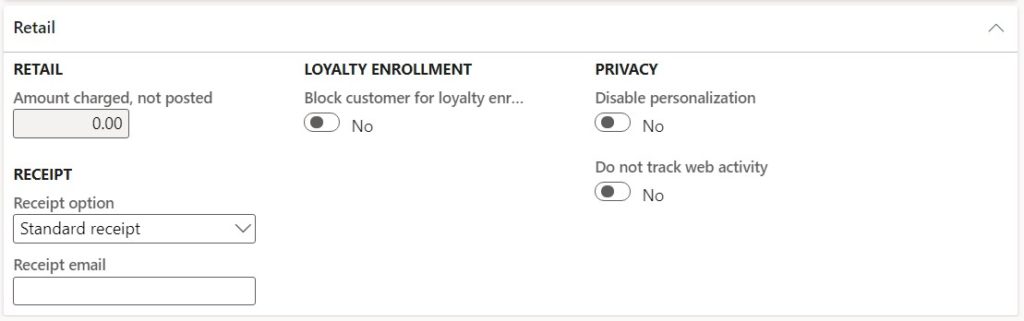
Retail
Amount charged, not posted – This field displays the amount that has been charged to a customer but not yet posted through the periodic statement posting in the retail module.
Receipt option – This option allows the customer to define preference for printed receipt at POS, emailed receipt, or both.
Receipt email – This is the email address the receipt is sent to.
Block customer loyalty enrollment – If this flag is enabled the customer will be prevented from loyalty enrollment.
Disable personalization – If this flag is enabled this customer’s experience will not include personalized product recommendations based on prior order history.
Do not track web activity – If this flag is enabled, clickstream and web activity will not be tracked for this customer.